Subtitle

. . . . . . A place to contribute, exchange tips and ideas and find further info on the LDC group on Meetup.

Showing posts with label how to. Show all posts

Sunday, 10 March 2019

Wealth of Experience: Sewing Tips

A post of tips - anything you wish someone had told you when you started to sew, that you figured out yourself since!
Machine stitching
If you're new to sewing with a machine and you find that your seams are wobbly: keep your eyes on the edge of the fabric as it goes through under the sewing foot. I remember that when I first started I stared at the machine needle - but looking at the fabric edge gives you a more even result.

Take it slow
It is so tempting to race through stitching something together but puckers and slipped layers are very frustrating. Take it slow when sitting at your sewing machine: check that all your layers are lying flat and that no fold of fabric got in the way. Particularly when sewing in sleeves...

Sew shortest seams first
When you have a narrow collar or buttonband, or any similar pattern piece, that you need to sew to something at its narrow end - sew those seams first. If you leave this until after you sewed the longer side, it is incredibly difficult to get the angle right. The narrow end is likely to slope in one direction or other and will be too long or too tight. As a result, the garment will look less well sewn.

Sew onto flat pieces first
I did a blog post about this one. It is easier to attach pieces like a patch pocket, a pocket flap, collars, etc... to a pattern piece when it is still flat and hasn't been sewn to many, if any, other pieces. The sewing instructions that come with your pattern may have you do these kinds of pieces last but that makes it more difficult.
After all haute couture does a lot of construction in flat pieces and only pulls it all together right at the end.

Zipper length
If your sewing pattern specifies a zip of say seven inches but you can only find one of eight inches or longer, don't despair: get the longer one.  If the difference is only one inch, you can let that dangle inside (easier to sew in as well!) and if longer than that then stitch the zip teeth together tightly on the inside and cut zipper off below. Worse like a charm.

Pinning a concave and a convex piece together
Put pins in perpendicular to the fabric edge but don't align the edges of the fabric pieces. The longer outside curved edge will need to pucker a little at that edge to make sure that the stitching line (the seam allowance's distance away from the edge) of both pieces gets pinned together smoothly. You can get the fabric pieces to come together flat at the stitching line when you hold the layers between a finger and thumb (at the stitching line) and make sure they are smooth and flat to the previous pin. It takes a bit of trial and error but you'll get there!

Double-folded hems
These are really tricky. Mine often produce these slight diagonally dragging lines from the folded edge to the stitching line - because one of the fabric layers shifted away from the other layer. Basting the hem may help; you can try a walking foot; or at the very least using lots of pins! Set thepins into the fabric perpendicularly. If you still have problems: do baby hems instead!

Baby hems
Try these instead of double folded hems. You need to serge/overlock the edge of your fabric to be hemmed. Then machine baste along the line where you want to fold the fabric up (before folding it) - this is using the longest straight sttich on your machine. Then fold up and press the hem with your iron: the fabric will fold easily at the machine basted/stitched line. It works beautifully!  Once you have your hem pressed, stitch at a suitable distance from the folded edge from the right side. Experiment with how deep you want your hem to be or if you literally only want to fold up the serged/overlocked edge and top stitch very close to the edge (which is then called edge stitching)

Use a tailor's awl
When it is tricky to sew over the bit where one fabric layer has a seam (you get loads of those when sewing patchwork!), then use a tailor's awl to hold the seam allowance down so you can sew smoothly over this bit. A tailor's awl is a straight spike with a handle at the end. It saves your fingers from going too close to the machine's needle. Don't use your fingers too close to the needle, it's not worth it.

Pulling pins before stitching
It is tempting to sew over the pins where they hold the fabric layers together. It is safer to pull each pin as you approach it. You can either stop stitching to remove each pin, or if it is a long straight seam and you're going slow, you may be able to remove pins before you get too close to sewing over them (and before the screw at the side of the machine foot comes plunging down onto your poor fingers). If your needle ever hits a pin straight on, the machine needle can break at the neede's eye and the pointed end will fly off at a high velocity. You really don't want it ending up in your eye, take time to pull the pins instead. Much safer.


What tip would you give yourself if you could go back in time?  Please post in the comments!

Sunday, 12 November 2017

Work on flat pieces first

So you're faithfully following along the sewing instructions of your pattern and then it suddenly becomes incredibly difficult to get your project under the machine's needle so you can work on a really tight area?  It's enough to give you grey hair!

Been there many times and I hate it.  Some commercial sewing pattern instructions seem determined to make things as difficult as possible.  Unfortunately these difficult to sew areas then make your garment look home-made rather than beautifully crafted.

Here's a principle that cuts down on some of those problem areas:  If in doubt work on the flat piece first.

Plackets, zips, pockets - what's the point of closing the long easy-to-do seams first and then do the fiddly bits?  I just don't get why some sewing instructions do this the difficult way around.

You don't need to stick to the order suggested.

Look at what features your garment has: double-ended darts, zip, plackets, pockets, pocket flaps, collar etc, etc? These are really nice sewing exercises (as long as you don't let the instruction sequence make your life more difficult).

Once you've cut out your pieces and overlocked what needs overlocking* - do all darts first before you sew anything else. No side seams, no nothing else. The sewing instructions usually start with this too, so no problem here. (The only exception I can think of is if a dart needs to meet another dart exactly: then it is much easier to close the seam first and sew the two darts as one across the seam. Anything to make life easier!)

*: But sew darts that end in a seam before you overlook the piece: less bulk when you take a single pass with your overlocker over the sewn up dart avoiding three layers of overlocking.

I used to hate having to do zips, now I like them more and more.  Sew them in first!


Don't even close the seam underneath yet (a lot of YouTube videos show it this way too so you're in good company), sew the zip onto both pieces and once you're happy with it close the seam underneath (make sure to off-set this line by a millimeter or so to avoid the pucker at the bottom of the zip).

Same thing for plackets on sleeves: sew them in before you attach the sleeve or close its side seam (a very good placket article on Threads shows it that way too).

Patch pockets: why go to the trouble of working on an almost assembled item when it is so much easier to sew a pocket onto flat fabric. In-seam pocket bags are also easier to do before you close the longer seams: a) attach a single pocket piece to one outer piece and b) the other pocket layer to the other piece - then c) sew the pocket layers to each other, and d) close the seam of the outer garment above and below the pocket opening.

I would attach a collar as soon as the shoulder seam is closed, before any other seam stitching.

Depending on the shape of a sleeve it can be easier to sew the sleevehead to the front and back of the garment before closing the side seams of body and sleeve - this is easier for wider, more relaxed styles. Sleeves that are quite tight and where the sleevehead needs to be eased into the armhole are better done after closing side seams.


Flat pieces are easier to manoeuvre and allow better accuracy. They are also easier to press (best sewing tip ever: press, press, and press again!).

Once you have these kinds of elements done, the rest of the garment is much easier to assemble: nice long seams that pull everything together. After that you are left with things like neckline bindings and hems that need to be done across all closed seams.  Couture houses work this way too: everything is done flat until only the long seams and hems are left over,

What do you think?  Is this useful?

Sunday, 23 April 2017

Tracing the pattern from a RTW garment

Have you traced the pattern of a ready to wear garment, one you bought in the shops?

It can be a great way to get a sewing pattern because it is a clothing item that you know fits well enough to want another one just like it.  Or at least with as few adjustments as needed. Preferrably the ones you know how to do.

I bought a lovely short-sleeved blouse with intriguing double layer ruffles from a charity shop.  I did realise at the time that I keep going for this very pale blue, chalky looking shade and then end up not wearing it because it makes me look pasty, to be brutally honest.  Do I learn from this and stop buying clothes or knitting yarn this colour?  Heck no, course not.


So it seems that I bought a pattern instead.

It took me a while to start taking this blouse apart.  I saw the great tip of leaving half the blouse intact so I can see how it goes back together - I only need one set of pattern pieces after all.  I'm glad I read that on a helpful blog somewhere, I'm not confident that I would have realised.  Start wielding a seam ripper and I keep on going...

This blouse fits fairly well.  The dart is not quite in the right place and I need to suppress a wedge of fabric in the underarm area, I am optimistic that I know how to adjust the underarm seams as well as the sleeve width. Fingers crossed.

I flattened each piece carefully, straightened what edges need to be straight (e.g. the centre back that will be cut on the fold), and weighed the whole down with my trusty pattern weights.  Also known as glass coasters in another life - I use them with the felt feet pointing up, they work fabulously.

I drew around each piece making sure that the shapes make sense: an armhole needs to look scooped and not jagged, no corner should look too sharp or seamlines lie in an undulating S-shape.  So far so good!  The test will come when I sew this up in a toile fabric.  I haven't got that far yet.

I did add more generous seam allowances because these were very narrow (the blouse was industrially made after all) and I may have to re-do the flounces. These are a circular shape that looks a bit like a Viennese whirl. Mine have an element of squashed doughnut to them, so I may compare to a commercial pattern I have in my collection. Just to sense-check.

I also traced some stretch fabric leggings that I loved but nasty moths had left a gaping hole near the knee, damn them.  I'm delighted that this worked really well too.  The pieces look astoundingly legging-like, just like a commercial pattern!  At least I like to think so.

I ripped apart most seams on one half only.  I ended up with the back piece and also a flat front piece that I left whole even though there is an internal seam that dissects it in a very intriguing style line.  That's the reason why I wanted to trace off this pattern.  I'd be looking for a pattern like it till the cows come home and not find it.

If I had ripped these pieces apart I'd end up with a very thin strip for the side panel. I think it would be very tough to lay this out straight.  A piece as narrow as this would go wonky as soon as you look at it.  Instead I traced the entire front piece, and then started to roll it back gently and marked the internal seam every couple of centimeters. That was a great way to prevent problems.

Have a look at the photo:


I reckon I've done well for not having traced off patterns in a pretty long time.  I haven't yet put these pattern pieces through their paces, but I live in hope that it'll go well too.

You may be able to trace a simple garment off without having to take it apart, as long as you can get each piece to lie flat.  But shapes would get distorted too easily if trying to trace off a complex item with multiple seams like my blouse.  I am lucky, I can't wear either of them so I didn't have to worry about it.

Have you sewn anything from a traced off pattern, how did the whole process work out for you? It would be really useful to hear of people's experiences - always good to learn from others. Please share in the comments!

~ ~ ~

Wednesday, 8 July 2015

Block fusing

Isn't learning to sew just really good fun?

You don't just get to learn how to do things in the general way (and following the instructions in the pattern envelope), - no, you also get to learn how to do the same things even better!  I really love that about it: that you get to figure out as much as you want to.

It is fantastic when you come across something that makes a process easier and more accurate - saving time and nerves. That's my kind of thing!  Particularly when the "old" way led to frustration because it just never turn out that well. Have you ever found that?

The new way of doing something can even turn out to not be quite easy, you just have to know of it: block fusing is one of those things.


Have you had to cut out a collar (x 2 in fabric and once more in interfacing), possibly even on the fold and found that your collar pieces ended up quite wonky?  It is so easy to get the 'on the fold' placement slightly wrong and you end up with a collar that's too tight, too shallow, or does any other kinds of things like sticking up a bit or having one side that's gone off the grainline, or even with a kink down the middle! Horrible. There's too much that can go wrong.

I did get round the 'on the fold' issue by redrawing the full collar pattern piece but it is still so annoyingly fiddly to cut out all three pieces and then iron the interfacing shape to one of the fabric pieces. I've never been really happy with the result doing it this way.

With block fusing you iron a piece of interfacing onto your fabric first and then cut out the lower collar piece out of the fused, stiffened material (plus the upper collar piece without interfacing: you only want one stiffened layer) - it is much more accurate and so much less fiddly nor frustrating!


You want to make sure you use a big enough piece of interfacing by allowing a generous enough margin but still avoid ending up with too much scrap material - I like to cut the interfacing along one long side of the pattern piece and leave enough on the other sides to take account of any slight shifts if your tissue piece moves around a bit.


You fuse your roughly chopped out piece of interfacing to your fabric, and then place the collar pattern piece on it to cut the interfaced layer (make sure you get the fabric grainline right) - you will only need one, so do make sure you cut the other layer from just fabric, without the interfacing.


You will probably find that interfaced fabric has shifted a little and that longer edge you cut earlier may need trimming - but you do get the chance to cut out a very accurate stiffened piece overall.


I have seen this technique presented on at least a couple of blogs, so if you want to know more then these blog posts have lots of photos that you can check out.

What do you think of cutting out interfaced pieces this way?

Please leave some comments below - we would like to know that the blog is getting readers! If you have problems posting, please mention it to me at a meeting.

Wednesday, 22 October 2014

Using stay tape at the waist

I blogged about bias tape last time.

I've since come across a technique that re-inforces the waistline to keep it from distorting. Using tape at the waist looks very interesting and it isn't complicated at all. In short it's the sort of thing I really like!

Re-inforcing any area with tape (or ribbon) makes use of said tape as something referred to as 'stay tape'.  The area "stays" in shape, so I suppse it's easy to remember.

~

Good old Sewaholics put me onto the concept:

A Different Kind of Waist Stay

~

Gertie from her Blog for Better Sewing has more about the whole thing:

The Wild World of Stay Tape

~

It even turns out that Claire Shaeffer describes it as a couture technique in her book of the same name, I even think I have this book:

Couture Sewing

Sewing the tape onto a foundation layer is a whole different kettle of fish that I want to explore at some future point.


Have you used either bias or stay tape?  How did it go?  Please post some photos of your projects, either as works in progress (yes please!) or completed projects, in the appropriate photo album on the Meetup site.

~

Friday, 10 October 2014

Bias tape on

This is a really good demonstration on how to use store bought bias tape to finish off raw arm hole edges:

Sewaholic's 'Finishing of armholes with bias tape'

It makes a lot of sense to use tape cut on the bias because it smooths itself around curves a lot more than tape cut on the grain would ever do, even if you were to iron it to within an inch of its life - straight grain tape would still pucker and misbehave.

I bought this kind of bias tape in a few colours, the one that is folded in at both edges - and I never knew what to do with it because it seemed to me that you would want it folded over just once with the crease running down the very centre.  I think I was thinking of using the tape as binding rather than as a facing.  Aha!

This makes a lot more sense.  Very glad I found this blog post.


Jaycotts.co.uk is a good site to get your supplies from

What kinds of projects have you used bias tape for?  Do you use it like a facing (on the inside of the garment) or like binding (visible on the outside of the garment too).

Please post in the comments, and better yet!  Why not do a short blog post about your project and show us how you used bias tape?  We would love to see!

Let's bring this blog to life again - now that summer and the holidays are over.

Looking forward to hearing from you!

Tuesday, 29 July 2014

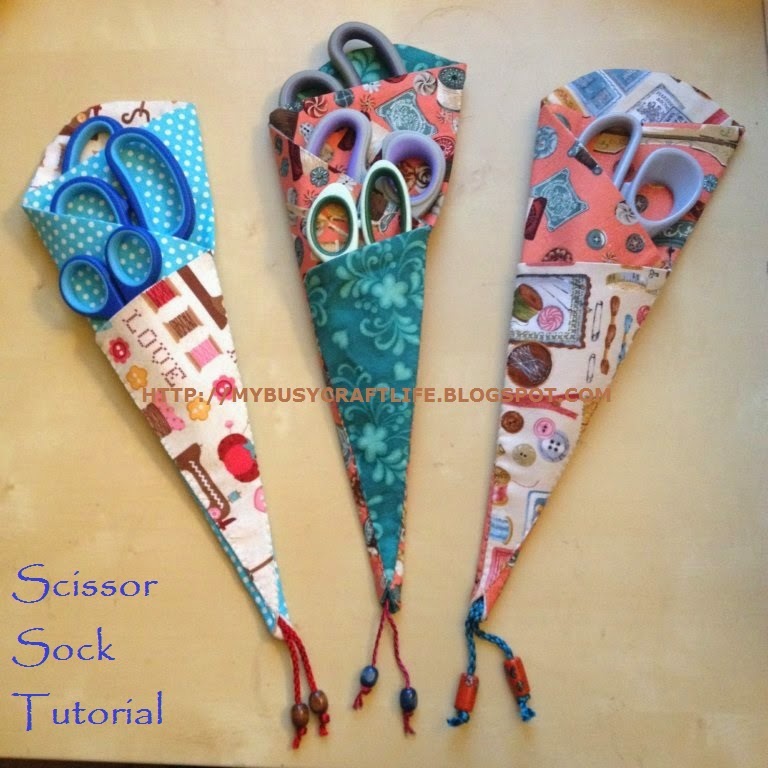
Scissor Sock Tutorial

Hi everyone!

I haven't posted on here yet, and I have been invited by Giselle to contribute every now and then. For those of you who don't know me, I have been sewing for about 20 years of which the last 10 were the most productive. I tend to stay away from creating fitting clothes but love making costumes and anything practical. 

By popular demand I have finally posted the Scissor Sock tutorial :) It has taken a bit longer than planned, but in the end I think it came out quite well. I've never made a sewing tutorial before, only a cooking one (trust me, those are so much easier!). 

Some of you have been given one of these as I just love them and think everyone should have at least one. As you can see, I made three of them for myself and that is when I realised how great these are. I always lose my scissors so this is perfect for me!


http://mybusycraftlife.blogspot.co.uk/2014/07/scissor-sock-tutorial.html


This is a great project for stashbusting or gift giving, especially with the holidays creeping up on us slowly. Please click on the picture for the tutorial, you will be redirected. I tried making it as easy as possible by photographing every step, so please let me know if I've missed something!

It probably goes without saying, but as this is not my pattern please don't use this for commercial purposes.

I hope you like it and will be curious to see which ones you make! 

UPDATE: Win a Scissor Sock, I'm hosting a giveaway! Enter HERE.

MJ

Wednesday, 23 July 2014

Create your own Kimono Tee or Dress


Here’s how to make a tee to your own measurements and your own design (courtesy of Miss P.)  Blogger Miss P. has developed and refined a kimono tee that you can draft to your own measurements.  Her clear instructions on how to do this are  at http://portialawrie.blogspot.co.uk/2014/05/draft-simple-kimono-tee-old-project.html.  What bliss!- a garment with only one pattern piece.  You can see from the  photographs of her finished result that the tee can look both elegant and casual, could be worn to the office, slung over a bikini for the beach or dressed up with accessories for the evening.
It is also a wonderful blank canvas so you can create your own unique garment.  This was the pattern I turned to when I wanted something quick and easy for summer wear.  The top does not take much fabric, I had a metre of cotton poplin and used 70 cm of 150 cm wide  for the main body and then cut into the remainder for bias binding and the belt backing plus oddments for the cuffs and outer side of the belt. My bust measurement  is 84 cm and thus I could place both front and back of the pattern on the same width of fabric.  If you have narrower fabric or more generous curves then you'll need a longer length but you will be able to figure out your fabric requirements once you have drafted the pattern to the size and length you want.
Here is my first effort.  The only addition I made to the pattern was to extend the sleeves and to add a simple belt fastened with a button to ring the changes


This is also an ideal pattern to use up leftover fabric from other projects.  As to the type of fabric to use, something with some drape, not too thick is best.  You definitely need some softness in the sleeve area but you could get away with a thicker central panel.  Personally I would not want to use anything stiffer than the cotton poplin that I used.  There are no darts so the shape relies on how the fabric hangs on your body.
I've sketched some ideas (sorry, I'm no artist).


1.Parti-coloured tee.  Simply adapt your pattern by adding a seam allowance to the centre back and centre front  as you will need to sew the right and left sides of the front and back together before proceeding to sew the front to the back.

2.  Tee with a panel.  Got a bit of fabric that you really want to use but there is not much of it?  Then this is the answer.  Depending upon how much fabric you have , you can have a panel both font and back, just a panel on one side or different fabric panels on each side..  Remember to cut your pattern where you want the panel to be and add a seam allowance to both sides of the cut.

3.Your addition of a different fabric doesn't have to be straight down or across.  Try going asymmetrical, a chevron or undulating wave ( this latter is trickier and probably best done as an applique).

4.  Trim the neckline, hem and sleeves with a different fabric.  You can make your own bias binding for the neckline, see Miss P's technique here.  That's how I cut my binding to trim the neckline of my tee.
Alternatively you can cut facings for your hem, neckline and sleeves in your alternative colour fabric.  Stitch them to the relevant edges with the right side of the facing against the wrong side of the fabric of the body.  Trim the seam and, if necessary, clip around curves.  Do not press seam open but press toward the tee body.  Then flip the facings over to the right side of the garment, press the neckline (or hem or sleeve) edge on to the right side of the garment.  Press or pin a hem of about 1 cm on to the wrong side of the facing around the outer edge of the facing and then pin or tack the facing to the tee preparatory to topstitching around the outer edge of the facing to secure it.    The advantage of this is that you have no raw edge to hem.

5.  If you have quite a bit of fabric you can make a dress of any length, short, knee length or maxi.  I made a dress for my second effort, just adding the extra length to the pattern that I had created and leaving the cuffs off (see photo below).  If you wish you can gather it in at the waist or under the bust, as in sketch 5, by running some elastic through a casing sewn around the inside of the dress at the relevant point.

Necklines. As Miss P. says, you can cut the neckline into a lower curve.  You don't have to make the neckline the same at the back as the front, just adjust the pattern according to your desire.  Remember though that you need to make it wide enough to get your head through.  If you want it to be closer to the neck then you will need to make an opening, such as the keyhole neckline in my sketch no. 4 which is closed with a button and loop.  An opening could be placed at the back instead of the front.

Hems. The simplest and quickest is just to turn up  a straight hem at the bottom and machine along it.  The example from Miss P's blog has a hem curving up at the sides ( you can use a plate to draw this for your pattern, this is what I used for the blue tee).  You can follow the current fashion for hems lower at the back than the front, have an asymmetrical hem (sketch 3) scalloped...and so on!  For my dress I left a small slit at the side seams to allow for more walking ease.

Embellishment.  Here you can go to town if you want something truly unique- lace, ribbon, sequins,ruffles, pockets, pleats, pintucks, buttons, beads, fringing-- the opportunities are endless.  To my dress I added an old lace collar (detachable) and a slim belt to give a 1940's tea dress feeling.  See how it changes the effect.


Why not join in our sewalong and create your own unique version?  See the details here http://www.meetup.com/dressmakers/events/196657002/

Thursday, 26 June 2014

How to ... turn a weekend project into a week's project

Saturday, the weather forecast mentions heavy and thundery rain, hail and frequent lightning. My plans were cancelled, not due to the weather, so I had all possibilities at my fingertips, as long as it didn't include wandering outside. My eyes looked at my famous Ikea bag with fabric, went over to my desk with my sewing machine and my brain remembered the sew-along "A simple item from stash fabric" which was about to start. Still lying in my bed, my weaker self started to nag about closing the eyes and get more rest, but my fingers were already infected with the sewing bug and it finally got hold of the rest of my body, wanting to finish the skirt over the weekend.

I found a white polycotton with red polka dots which I wanted to use as the skirt part of a dress. Since I don't yet have a dress pattern, I work with body blocks rather than with commercial patterns, that fabric had to wait ... or not. I could just turn it into a circle skirt and wear it on a lovely summer day. I decided for the latter and, instead of inserting a zipper or using elastic band, I decided to use some of my buttons. It also helped that I found a similar fabric here.

The fabric itself is rather see-through, so I decided for an underlined skirt and used some of the white polycotton I bought a while ago. I used the half circle skirt pattern which Barbara helped me to make, and cut the pieces. For the back piece, I just traced the pattern onto my fabric. For the front pieces though, I folded the pattern in half, traced it and added some extra fabric for the buttons and button holes, respectively. The width of that extra fabric is the width of the buttons I used, in this case 2 cm. (More explanations on how to add a button front closure can be found here - although that tutorial is for a dress.)

My folded blue half circle skirt pattern on the fabric I want to use, the buttons are next to it. 


I then sewed together my red polka dot fabric with my white underlining, wrong sides up, just a straight line along the edge where the buttons and buttonholes will be, zigzagged it and then trimmed it. Ironing is essential, so I ironed it, flipped it over and sewed another straight line, just for effect than for anything else, two cm (my button width) from the edge. If you want to, you could add another layer of fabric or underlining for the part where the button holes will be. But since my skirt is already underlined, I decided against it.

The front layer


It turned one pm, and the weather forecast was slightly wrong. It rained a few hours, no sign of hail or thunder and then the sun was visible. Quickly sewing the back piece to the two front pieces, and all which was left were buttons, buttonholes and hems. But first it was time for socialising!

Sunday morning, and this is how you turn a weekend project into a week's project: I realised that my back piece is wrong side up, so I had to rip the side seams apart and start again. Important note to myself: You must never rush things! I spend most of Sunday evening to undo the wrong I did to my skirt. And I did the hems.

After I found my motivation the week after, and a very useful hint to start with the button holes from my fellow seamstresses at a monthly meeting, I did the button holes. And forgot to take a picture. But basically, I marked where the top and bottom button hole would be. I then put a mark on exactly half the way down and made this the centre of another button hole. I repeated that until I had no more space on my fabric and marked 9 button holes. After sewing all of them and ripping them open, I marked the middle of each button hole on the other skirt front to know where my buttons should be.

Et voila:


Wednesday, 18 June 2014

Four kinds of finishing seams

This is an interesting blog posts about different kinds of finishing seams.  Four of them to be precise.  There are another few mentioned in the comments.

Do check it out: I want to be a turtle -Notionally Speaking: Finishing 

I don't agree that bias binding is a quick method, but maybe you get quicker with practice?  Love an overlocked or a French seam.  But then again the Hong Kong (bias strip) seams do look very nice!  Just make sure to use tape from a really thin fabric.  I wonder if organza would work?  Might be too slippery to work with though.

What's your favourite kind of seam finishing?

Saturday, 31 May 2014

How to ... improvise a skirt

When I just started dressmaking, I could only justify to buy remnants. So I ended up with a lot of beautiful fabric, unsure of what to do with them. One of the remnants is a turquoise polycotton with yellow polka dots, about 130 x 115 cm. Perfect for a half circle skirt, or so I thought. It turned out that my skirt will be somewhere closer to a 3/8 skirt.

I started with the pattern Barbara helped me to make. I drew the circles, one for the waist and one for the hem. Since I did not have enough fabric, the one for the lower hem - of course - did not fit onto the fabric. My idea was to place the pattern right in the middle of the fabric so that the pattern could be easily altered. I can't stress enough how important it is that nothing from the waist circle must be cut off since that's the only part of a circle skirt which has to be fitted. I then connected the outer waist circle with the most outer point of the hem circle and made sure I left enough for the seam allowance. It should be a straight line.

I then stitched together the side seams and tried it on. It fits perfectly and I was so enthusiastic that I cut the fabric along the side seam. In my enthusiasm, I only forgot that I wanted to insert a zipper on one side and hence did not leave enough fabric to actually be able to do it. It was a big mistake (first time ever!) and I hope I learned for the future. After the shock, I decided to make my skirt a little bit shorter and put in an elastic band.

An unexpected hint from a friend to add pockets as they are quite handy to have lead to me finding this post with the "top 10" of pockets. It has a lot of ideas and is a very interesting read with a lot of links. For this fabric, I decided for in-seam pockets. I found this post clearer than the others but it's definitely worthwhile to read through the other posts as well. Since it is very well explained how you can add pockets in those blog posts, I take the shortcut and ask to read those if interested.


Once finished the pockets (I had to do them twice) the only thing left was the waist hem and the elastic band. I went for the most simple of options, zigzagged the edge and folded it over once to insert an elastic band.


Et voila:


Thursday, 15 May 2014

Link to a great invisible zip tutorial

This is a great tutorial on how to insert an invisible zip.

Actually, the whole By Hand London blog is great. Do check it out.

Do make sure you use a zip that's at least 4-5cm (around two inches) longer than the opening you want.  The lower end will dangle on the inside of your skirt but this is much preferable to messing around with pulling the zip pull up while you're in the middle of stitching along the sides. With a dangly end you can stitch each side all the way down in one go.  It makes sense once you try this!

Leave the back centre seam unsewn (if you are going to insert the zip into the back centre seam of course).

You need an invisible zip sewing machine foot.  Inserting an invisible zip without this is the proverbial pain in the backside.  Once you own one you'll be forever grateful that someone had the good sense to invent them.

Try pressing the zipper teeth aside (as per this tutorial), I am told it makes stitching easier and more accurate.

This tutorial also shows very clearly where you need to start closing the back centre seam once the zip is in.  Lots of tutorials don't show this, which is why I was never that clear about what you're supposed to do at this point.

The description says to start the back seam about a half centimetre away from where you stitched before.  That's half a centimetre horizontally away from the stitching line, not vertically as I first thought.  The photo thankfully clears up that potential confusion.

If back-stitching isn't suited to your fabric because it makes the end of the stitching line too bulky: reduce your stitch length to the minimum your machine will give you (around 1mm or otherwise 1.1mm) and use this for up to half an inch, then increase the stitch length back to normal. The resulting tiny stitches will hold your thread.  You can take the thread ends back below the end of the stitching line and back stitch them by hand a couple of times in a suitable place. If this will show through you can try to whipstitch the ends around your stitching line (on the inside)

Monday, 5 May 2014

Some great tips for sewing accuracy


I just came across this collection of tips on how to sew more accurately:

Tips for accurate sewing

This is posted on TheSewingDirectory.co.uk site - this lists lots of classes, courses and workshops and also shows some menu items in the navigation bar that I haven't checked out yet: Events, Fabric Sales, Projects, Reviews, Interviews and the Techniques section that the above link goes to, and a few more.

Well worth checking out.

The blogger who wrote the Sewing Accuracy article is Sarah Flynn from FairyFaceDesigns blog. She does some great quilts, ie patchwork and quilting.  Check out her cushion covers!  They look like excellent stash busters when you have a few scraps that are too nice to throw out and a half meter or so of another fabric for the back.

She also does some sewing, like this excellent tutorial for a pencil case, so cute! Or these baby leggings, even more cute!  All together now: awww......


Back to the article on the sewing directory.  What I particularly liked was her emphasis of using a dry iron (no steam) to just press (not iron) your fabric while you are constructing your project.  She feels that steam distorts seams and makes accurate sewing rather more difficult.  It's an interesting thought.  I tend to spray a bit of water onto hard to tame areas but not so much overall.  That might be a good thing now that I really think about it.

Her point on starting with an accurately cut seam allowance is a very good one. 

I hope you enjoy Sarah's tips.  

What kinds of things have  you come across that make it easier to sew accurately?  Please share any and all tips in the comments!
Sarah Flynn from FairyFacAccourate cuttinge Designs - See more at: http://thesewingdirectory.co.uk/news/2012/03/23/tips-for-accurate-sewing/#sthash.p7qblTS5.dpuf

Tuesday, 4 March 2014

Turn out perfect collar corners

Here is the link to the 'How to turn your collar points so that they're perfect' tutorial that I promised to post at the Sew a Detachable Collar session on Monday 3 March.

The Off The Cuff tutorial

I don't think that you need quite as long a thread as shown here, a bit shorter is fine too. 

While the collar is still inside out and hasn't been turned yet: only the thread loops should be showing outside the whole thing.  If you can see the two ends of thread and the loop is hidden inside the collar layer sandwich, that's the wrong way round (ask me how I know. I've done this wrong on every single collar I sewed up as samples on Sunday. Yes, every single one).

Once you turn the collar out through the gap left in the stitching, you should then gain access to the two loose ends of the thread.  You want to pull at both of them at the same time - just like the tutorial emphasises.

You can apply this trick to every type of garment where you need to turn a corner inside out. You could even use a couple of thread loops on a strong curve to turn that out if you feel it'll be difficult to do, on say the end of a rounded lapel that has no point but a sharp curve?  Or perhaps the end of a fabric tube that you sew shut, that kind of thing.  Those long, thin tubes of fabric are often turned inside out with a plastic gadget that acts a bit like a needle.  Thread loops are as good as that gadget, and definitely much better than a safety pin, which is what I used to use.

I had a problem with cutting into the thread when trimming the corners - you want to make sure to hold the thread loop out of the way when it comes to trimming.  Or insert the thread after sewing with the help of a darning needle, that works very well too!

After turning with the thread loops still attached

Let us know of your experience turning collar points.  Have you tried this technique and what do you think?  Do you do something different, and how are you finding it?  Please let us pick your brain for further insights into other ways of doing this!


Re stitching along the top and outside edges of a collar: I have seen more than one tailor/dressmaker sew off the edge of the fabric and sew each seam of the collar in separate goes.  I am not quite sure how different this is to pivoting at the corner and sewing without cutting the thread.  Does anyone have any insights into this?

Sunday, 2 March 2014

LDC jacket lining discussion

LDC Dilemma Corner: Lining your jacket
Sew-a-long discussion.

Hello Seamstresses,

Many of us got involved in the great jacket sew-a-long if you have completed your project how did you find the lining stage? Any hints and tips? If you are yet to complete it still let LDC Seamstresses know how you plan to tackle this section, it can be mind boggling ... That is my experience!

Wednesday, 12 February 2014

How to make a muslin - a tutorial link

Quick one.  I just came across this post: How to make a muslin (also called a toile) on Sewaholic's blog.  This is just fabulous.

She machine bastes along the stitching lines which I have done before and it is very useful.  Even if you don't topstitch an edge (it's only a muslin after all) you can still see where it would be.  The basted stitch line prevents the fabric from distorting.  And it makes it much easier, and more accurate, to fold the fabric over and press into place for a better idea of how this piece will look.

She also stitches along the line markings for darts - now, I've never done that before but it's brilliant!

She explains that she does this for super clear accuracy: any changes you make to the muslin you can then apply exactly to the pattern.  If you used a calico fabric you can write on it and those marked lines can be easily seen and compared to the basted lines of the original pattern.  Genius.

Go read her blog post, there are follow-up pieces, i.e. a post about reasons for making a muslin.

I also liked the fact that she was making up the muslin of only the bodice to check for fit and didn't waste material and time on the skirt.  You could if you want a wearable muslin out of the whole effort, but a non-wearable version that you can mess around with is good too.  I would recommend it for difficult and complex patterns.

I am posting photos of the muslin I made of my jacket for the sewalong.  I'm so glad I did: I found that I don't like the style at all.  That was rather eye-opening.  I'm so glad I didn't waste my previous black wool fabric.

At least it gave me the chance to do an FBA: it was great practice and also good to see that it worked well.


Thursday, 6 February 2014

Sewing a dart


I was talking to someone the other day about sewing darts and how to avoid them ending in points that introduce a wrinkle or even worse the dreaded “cone shaped” look.
Dart location can be important: your bust dart should stop short of the bust point by about an inch,

I was attempting to explain how I do mine in about five seconds flat and I’m not sure how well I did. I'd have been confused to be honest.  So I thought I might as well write it up on our new blog. The more contributions the merrier after all, right?

* * *

Here goes, the really looong-winded way (you might want to fetch a fortifying cuppa first, honestly):
 

Your dressmaking pattern will show a dart as a triangular shape: you sew along the two dart legs to pinch out the fabric between them.  When I talk about the point or end of the dart I mean the spot where the two dart legs meet.


I like to mark the dart legs with a Frixion pen (on the wrong side of the fabric).  Advantage: it irons off (markings will disappear when heat or friction is applied, on most fabrics. So check on a scrap of your fabric; my pink satin was left with a clear/white line. The ink also reappears in extreme cold), Disadvantage: it irons off, sometimes at the most inconvenient times. Still.
 

Use a ruler for lines that are nice and crisp.

Stick in a pin to mark the point of the dart in the right place while folding the fabric so the dart legs are roughly on top of each other (1). Your pin should stick out a bit beyond the fold for easy removal when you get ready to sew.


I put my next pin thro one of the two marked lines (2) in about the place where the stitching line crosses the dart line (the seam allowance width from the cut fabric edge) and then push it through the other dart line in roughly the corresponding spot at the stitching line (3). Make sure the folded fabric lies nice and flat - then bring the tip of the pin back through both fabric layers towards you so that this second insertion point is also on the marked line (4).


With this second pin safely in, turn the fabric over and take a look if your pin went through the dart line on that side too (5). Re-adjust if needed.

Depending on how long your dart is you may want to insert more pins - your aim is to have the fabric lie flat enough so your sewing machine won't push things out of place while sewing.  So very big gaps between pins aren't great but you won't need loads of pins. Maybe three for an average length dart (6+7).

Now the fun sewing part begins!
 

* * *

I sew my darts from the dart tip towards the cut edge. Place your fabric carefully so you can lower the needle to pierce the fabric just inside the fold (8): the fewer threads from the fold edge that you can catch the better. Try and stay inside a millimetre. You will have lowered your sewing foot at a suitable point in the proceedings (this is roughly the point when you want to remove that first pin (9): if it sticks out it’s easier to pull from where it's squashed under the sewing foot) - your fabric should lie straight so that when you sew straight ahead you won't run off the fabric (10).


Keep hold of your thread ends (to avoid the sewing machine sucking them in) and take some three stitches, or so, very slowly and straight ahead, parallel to the fabric fold edge (10). Don't do any back stitching: their bulkiness would show. Then begin to curve in towards the marked dart line (11a). Keep your stitching in a smooth line. The slower the better! You have time and this isn’t a race. You might as well dawdle a bit over the important bits.


When you sew slowly you should be able to sew directly on your marked line (11b). Such a satisfying feeling to get a dart as precise as possible. It can make quite a difference in how your garment will look and drape.


* * *

Other things to look out for before you start marking the darts: if you use something like a Frixion pen that comes off easily, then mark as late in the process as possible: just before you pin and sew.  That way you can be more certain that the marks are in the right place, and they will still be nice and sharp.  Chalk lines can also get rather vague the longer ago they were made, and tailor tacks are great but very time consuming.

When I cut out fabric I like to put a pin with a big coloured head into the right side (RS) of the fabric.  I don’t remember how often I got confused.  Sometimes it matters, other times it doesn’t.

Check your pinned fabric to make sure that the darts stick out towards the wrong side (WS) of your fabric – nothing more annoying than having to rip and re-stitch because you didn’t check for right and wrong sides.

Before you put the fabric under the sewing foot for machine stitching: just take one more look at the piece in your hands to see if it makes it through a common sense check.  Does it all look sensible?  Is anything off?  If you have a nagging feeling (I trust those!) then listen.  Go make another cup of tea, or something, and look at it again with fresh eyes.  So satisfying to get something right first time.  And very soothing for the nerves too, ask me how I know...


You can either knot your thread ends at the dart point (as above), or hand sew them with a couple of stitches where they can't be seen on the right side (pics 1-3, pink plaid dart below).
Then cut (4).


I don't ususally bother to backstitch the thread at the outer edge (see lilac dart 12 and 13 above). The stitching line across the darts will secure it and back-stitching would only make the seam allowance more bulky near the pleat bulk of the dart. If you prefer you can take a back stitch or two.


Once your darts are sewn use your iron to press them into place: press vertical darts towards the centre and horizontal darts down.  You may want to place your piece on the ironing board so that the dart point is very close to the board’s edge – or use a tailor ham, those are great as well.

You also want to make sure that the material lies flat at the cut fabric edge so you can easily sew over it when you assemble your garment.  Your iron is your best sewing friend, it will make such a difference to how easy it is to sew pieces together and how well the garment will look at the end.  It is vital for quilting, and it is also very important in dressmaking: press down rather than moving the iron from side to side.

Then hold up to admire and congratulate yourself on a job well done! That’s my favourite bit.

* * *

Did I forget anything, muddle anything up?  Do you know another way of sewing darts that you find useful?  I would love lots of comments so we get a lively exchange of ideas by as many members as possible. Don't be shy, chip in!


Apologies for the very long descriptions. I felt it was better to explain too much than leave something out that would be useful. Much easier to ignore extreme wordage than try to guess at what's missing.

I didn't intend to take quite so many pictures either.  I can't quite see myself going as overboard as this again.  At least we all hope I won't...

* * *
 
But, just in case, don't hold your breath...