Subtitle

. . . . . . A place to contribute, exchange tips and ideas and find further info on the LDC group on Meetup.

Showing posts with label sewing. Show all posts

Sunday, 3 February 2019

Sewing inspiration - Sewing for a Capsule Wardrobe

We were going to post more links to sources of sewing inspiration, as mentioned in the previous blog post. This post suddenly focussed on capsule wardrobes. I like going with the flow, so here goes!


Samantha recommended a Facebook group: Capsule Wardrobe Sew Along. You have to join before you can see posts by members:

"I never manage to follow a blog but I do Facebook. One of the groups on there 'Capsule Wardrobe Sew Along' I really recommend - loads of inspirational people planning simple capsule wardrobes entirely self sewn.  A strict no nastiness policy lends to a really supportive and positive group and people's work ranges from amazing to nearly as basic as me.
I like the idea of working on key pieces per season that you can mix and match, updated a few pieces per season. For an erratic and not very confident sewer like me it seems almost attainable!
People post all kinds of problems or fit issues and loads of lovely people offer great advice and suggestions. People also ask for recommendations and opinions on patterns and fabrics and there is loads of inspiration.
So good to see the work of other home sewers not quite up to the professional standard of a blogger but enjoying their sewing like me."

Here's a Google search result that takes you straight there: Capsule Wardrobe Sew Along on FB.

~ ~ ~

This is the page that the above group links to:


Here are some interesting thoughts on how to sew a capsule wardrobe:
Link to freenotion.com/blog

The most recent blog post on this blog is from 2017 but the ideas are still great. Pick and chose what makes sense to you.

~ ~ ~

Sewing with Sarah also has a fantastic post on capsule sewing. There are lots of photos (love a blog post with lots of photos!) so this is very visually inspiring.

Sarah came to sew for a capsule wardrobe after she noticed having many fabrics in colours that went well together. If that's not a good reason, I don't know what is!

~ ~ ~

In conclusion:

When I think about sewing for a capsule wardrobe, I don't think of sewing all the various items. I look at what clothes I have in order to decide what the gaps are. Do I have enough work skirts, could I do with a mid length cardigan (because my most beloved one has gone to cardie heaven! Sneeef...), or could something like a waistcoat in a fantastic print pull outfits together...?

I very much want to focus on just one item at a time, trying to do lots just piles on way too much pressure, and that in turn makes me stop sewing altogether. An outcome strictly to be avoided! So I focus on one thing (though I admit that I don't finish that one item before another project catches my attention. Bad habit that. But I'm sewing!).

What is your experience with a capsule wardrobe?  Any insights, thoughts and comments - what are your recommendations?  Please leave Samantha and me comments, we appreciate it very much.

Sunday, 6 January 2019

Sources of sewing inspiration

At our monthly London Dressmakers Club meetings we often mention sewing blogs or other sources of sewing inspiration that we like. We all like different ones and haven't all come across the same ones, so it would be lovely to spread the joy and list one source each that other members (and non-members) may enjoy too.

I hope we will do more posts like this one. Let us know in the comments if you read any of the listed blogs - or even better: tell us if you want to write up your favourite in a future sewing blog post (yes please!). We would like lots of people to contribute to this members blog. It is all about the more the merrier!  Please share - one paragraph and the link is all that's needed.

Here goes:

I am being greedy and giving more than my fair share of reccomendations, and I could do many more, but here are 3 of them - Barbara.


i) MOOD SEWCIETY
 It is the blog for the legendary Mood Fabric store in the USA.  They have the most amazing free patterns to download (for women mainly, but also for men and children)  but I am not really sure how to subscribe to this from their site.  I used to have to keep checking for new blogs every so often but I have accidentally managed to subscribe to it today via Bloglovin.
The link should be here.


ii) STITCH SISTERS
This is a vlog rather than a blog.  The lovely Nikki and Rachel run a sewing school in Sodbury, near Bristol, and even though you might not get to their school you can still get loads of advice, reviews, fabric hauls and inspiration from their vlog. They are just as friendly and chatty in the flesh as on the screen- they do come to London sometimes and I have been able to admire the creations they have been wearing IRL.  They sew the sort of garments I would make for myself - if I had a bit more flair and colour sense.
The link should be here


iii) STITCHER'S BREW
And this one is a podcast.  An hour or more each Friday of bubbly chat from Gabby (Gabberdashery) and Megan (Pigeon Wishes) and their guests of the week who are people whose blogs you may well read or whose independent businesses you buy from or otherwise involved in the sewing world.  It is like eavesdropping on a stitcher's tea party and just the thing to listen to while seated at your sewing machine- preferably with a mug of tea and a bit of cake to hand- and hear the behind the scenes stories.
The link should be here


Here is my contribution - Giselle:


I always enjoy reading the Allison C Sewing Gallery blog
She uses quite a few Burda patterns and her garments are often very interesting but entirely wearable. There is one from the July edition of Burda Style that she refers to as #113 Knot Dress. It has a very intriguing round "cut-out" that gets gathered up with a bow.  I am fascinated by pattern details like that!
She makes all kinds of garments: dresses, blouses, coats, trousers, you name it.  I am very jealous about the fit she achieves!


Catherine's Patterns
I also enjoy reading about all kinds of patterns and garments that Catherine sees at exhibitions, and the many fantastic photos she posts. She writes about some of the many vintage patterns she owns. What I love the most is the amount of details of some patterns: sometimes it is the cut of a garment but it can also be a design element like a collar or vent or a neckline, or some intriguing gathering... there is such a lot of interest there. I am very glad that Catherine writes her blog! She is also one of our members.

I guess you can see a bit of theme here!  There are quite a few more that I love reading, I'll save them for the next post like this!


We want to post more like this one. Part II is to follow soon!

Saturday, 3 March 2018

Please contribute: tips for sewing a simple skirt

Shall we do a collaborative blog post?  All about tips for sewing beginners about sewing a skirt.

At our monthly meetings we often get the question from sewing beginners: "I would like to sew but I never have before and I don't know where to start".  We have lots of advice and tips so how about collecting it all in one place?  Like right here!

We often recommend that a beginner sew a simple skirt first. There isn't quite as much going in terms of different elements that a dress or trousers would demand (getting sleeves to fit into the armhole, or doing a front zip on trousers).

First tip: when you want to use a stretch fabric and you have never sewn before then pick a firm jersey fabric that is a bit thicker than the cheaper jerseys that are very saggy and extremely difficult to sew with. Sewing with thin jersey fabric is something that I still can't do. Avoid it if you want to retain your sanity. Honestly.

Woven fabrics are much easier to sew with (as far as I'm concerned), but because they don't stretch they need to be fitted to your shape to look good.

There are different skirt styles with different degrees of difficulty. A gathered skirt made from two rectangular pieces is the easiest, - circular skirts and skirts made from flared panels are also relatively simple.

The more pieces your pattern has the more sewing you'll do, but you also get more opportunity to fit the garment to your shape because you have more seamlines you can adjust.

Sewing in a zip isn't as difficult as I feared when I was a beginner but you may want to go with a button closure on a first project. See how you feel.

A commercial pattern is useful because it has instructions: not just how to sew but there is also the layout of the pieces for cutting out, and it tells you which piece to interline. There is also really useful guidance on seam allowances and how to do the different ways of stitching (like top or edge stitching, under stitching, stay stitching, or how to stitch for gathering - all kinds of information).

The sewing pattern size is not the same as your dress size in shops. Measure your waist and hips and compare to the measurement table on your pattern. Most pattern envelopes have multiple sizes in them, often split by the smaller and the bigger sizes.

Above all pick a skirt shape that you are excited about! I often make the mistake of falling in love with the pretty fabric they used and forget to check the line drawing to see if I actually like the style. Which is kind of important.

Now I've gone on much longer than I meant to. I haven't even said much about sewing itself (the things we discover as we go along) - I hope that other Dressmakers Club members want to give tips and advice in the comments!

Sunday, 10 December 2017

Little girl's dress - Burda 9420

I made a child's garment for the first time.

Burda 9420.  This pattern was easy to make:


I made version B because I didn't have enough of the blue fabric for version A (longer, without the ruffle).  I would have liked to angle the pockets inwards a touch more and would do that if I did this with two pockets again.


The top of the pocket folds in.  Depending on what the revers of a fabric looks like, I could also fold this out and under a little, and sew across before attaching to the dress. It is fine like this though.


I started out with two even sides along the back slit. By the time I was done, the left-hand side was a touch longer.  This has happened to me before and I don't quite understand it.  Perhaps I did slightly different seam allowances on either side when attaching the facing? Otherwise this is very odd indeed.

The little black button is perhaps not a little girl colour but I like the pretty texture of it. It was also the size I was looking for. I made the loop on the left-hand side with embroidery thread in its full six strands. That came together very quickly which I really appreciated. The button is just sewed to the side of the vent so it sits nicely centred when closed.


I sewed the ruffle down with suitably pink yarn.  That was not in the instructions but I thought it would make it hang nicely. Don't know if sewing this down is a good thing once this gets washed and needs to be pressed. I'll ask the little girl's mum to tell me so I'll know for next time.


I enjoyed making this a lot and think that it will make a great repeat pattern. I might use the binding on the armholes next time - I didn't have enough of the blue fabric so I went for a baby hem which unfortunately twists outwards a bit in the tightest under-arm area.

I will keep an eye out for a fun, bright and colourful 'kids' fabric for the next one. I can't remember if I heard mum say that her daughter doesn't like pink? Hopefully this shade is okay but that's something to keep in mind too.

I'm already wondering if I can use up some fat quarters and colour block it: use a fabric for the "bodice" part and at least one other fabric for the "skirt" part. And if a fat quarter isn't wide enough then maybe in pieced vertical stripes with a third fabric?

It would also be nice if I could draw sleeves for this. Short ones would be enough. I should be able to Frankenpattern this from somewhere else - the downside is that I wasn't exactly planning on starting a stash of kids patterns! Oh well, it might help me use up fabrics.

A great project and I can recommend the pattern!  You don't have to do a zip so this would be suitable for slightly more advanced beginners than complete new-to-sewing starters. If you are looking for a small and first project: do a gathered skirt made from two rectangles like Simplicity 9938.

Sunday, 12 November 2017

Work on flat pieces first

So you're faithfully following along the sewing instructions of your pattern and then it suddenly becomes incredibly difficult to get your project under the machine's needle so you can work on a really tight area?  It's enough to give you grey hair!

Been there many times and I hate it.  Some commercial sewing pattern instructions seem determined to make things as difficult as possible.  Unfortunately these difficult to sew areas then make your garment look home-made rather than beautifully crafted.

Here's a principle that cuts down on some of those problem areas:  If in doubt work on the flat piece first.

Plackets, zips, pockets - what's the point of closing the long easy-to-do seams first and then do the fiddly bits?  I just don't get why some sewing instructions do this the difficult way around.

You don't need to stick to the order suggested.

Look at what features your garment has: double-ended darts, zip, plackets, pockets, pocket flaps, collar etc, etc? These are really nice sewing exercises (as long as you don't let the instruction sequence make your life more difficult).

Once you've cut out your pieces and overlocked what needs overlocking* - do all darts first before you sew anything else. No side seams, no nothing else. The sewing instructions usually start with this too, so no problem here. (The only exception I can think of is if a dart needs to meet another dart exactly: then it is much easier to close the seam first and sew the two darts as one across the seam. Anything to make life easier!)

*: But sew darts that end in a seam before you overlook the piece: less bulk when you take a single pass with your overlocker over the sewn up dart avoiding three layers of overlocking.

I used to hate having to do zips, now I like them more and more.  Sew them in first!


Don't even close the seam underneath yet (a lot of YouTube videos show it this way too so you're in good company), sew the zip onto both pieces and once you're happy with it close the seam underneath (make sure to off-set this line by a millimeter or so to avoid the pucker at the bottom of the zip).

Same thing for plackets on sleeves: sew them in before you attach the sleeve or close its side seam (a very good placket article on Threads shows it that way too).

Patch pockets: why go to the trouble of working on an almost assembled item when it is so much easier to sew a pocket onto flat fabric. In-seam pocket bags are also easier to do before you close the longer seams: a) attach a single pocket piece to one outer piece and b) the other pocket layer to the other piece - then c) sew the pocket layers to each other, and d) close the seam of the outer garment above and below the pocket opening.

I would attach a collar as soon as the shoulder seam is closed, before any other seam stitching.

Depending on the shape of a sleeve it can be easier to sew the sleevehead to the front and back of the garment before closing the side seams of body and sleeve - this is easier for wider, more relaxed styles. Sleeves that are quite tight and where the sleevehead needs to be eased into the armhole are better done after closing side seams.


Flat pieces are easier to manoeuvre and allow better accuracy. They are also easier to press (best sewing tip ever: press, press, and press again!).

Once you have these kinds of elements done, the rest of the garment is much easier to assemble: nice long seams that pull everything together. After that you are left with things like neckline bindings and hems that need to be done across all closed seams.  Couture houses work this way too: everything is done flat until only the long seams and hems are left over,

What do you think?  Is this useful?

Wednesday, 3 May 2017

Getting to grips with an unfamiliar sewing foot

Do you use more than a couple of the sewing feet that come with  your machine? I must admit that I didn't.

The walking foot on a Janome sewing machine

I swapped the standard foot with the walking foot (also known as a even feed foot or dual feed foot) for most of my straight stitching: preventing slippage of one fabric layer is a wonderful thing!  I don't miss the standard foot at all.

I also use my zip foot for sewing in zips, obviously, - this tends to be the only thing that I remove my walking foot for.


But I didn't use all these other sewing feet except for trying out the blind hem foot (which works fabulously!) - the other day I was thinking about why.  I have a feeling that I somehow thought that I should be able to do all kinds of things with just these two feet, almost as if that was some kind of challenge.  How silly!

The other reason is likely a fear of a bad experience, that trying would make me feel very dejected (yes, call me chicken).  Just ask me about my experiences sewing in invisible zips because I didn't realise that I had the wrong foot. Yah, that one.

But the thing is that a specialised sewing foot can make your sewing much easier, if you give yourself enough time to experiment with it and learn how to use it without wanting to throw your machine out of the window...  You know, when things go really badly.

It is very easy to get discouraged when sewing isn't going well and you don't know why.  One of the more horrible feelings that could make you feel so wretched that you stop sewing. Let's not do that!

So how can you get to grips with a different foot without feeling like a right fool?


Sewing machine feet come in two different kinds on the main: those you screw on and those that snap on. Your machine will only take one rather than the other.  Make sure that the manufacturer of the foot lists it as suitable for your specific machine model - if you're not sure that you want to spend the money on the genuine part, maybe you can borrow it from a friend or try it out at their place?  It'll give you the best idea of whether it's a good investment. A generic foot may sound good but if it doesn't work then it's wasted money.

But let's say that you have the right foot and you installed it - that alone can take quite a while!  I try to do something unfamiliar only when I have lots of time and there's no pressure.

My very best tip is to check that a) you picked the right machine setting for your purpose, and b) that the machine needle will not hit the foot itself.

To do this safely: hold on to the sewing thread at the back (or use a starter patch) and then move your machine needle by turning the wheel by hand.  If the foot or the setting is wrong then the needle could hit the foot itself on any downward motion that make up the stitch.

Some feet work with a straight stitch and others with a zigzag stitch - that's why it is important to manually move the needle through a whole repeat of the stitch.

Use a test patch of fabric because it is much easier to manoeuvre a small piece.  Check for tips for using your specific foot online and on YouTube - there may be a trick or hint that's not obvious, e.g. that the fabric needs to touch the guide's side of the narrow hem foot when you guide it into the roll-over bit.  A rolled hem foot may behave similarly, please check.

Use your slowest sewing speed if you can adjust it and then play around some. Use a different kind of fabric if your first sample fabric turns out as stubborn and non-userfriendly, see what works for you.  Once you get to grips with another fabric, you can go back to the one you'll want to use.

If the foot isn't doing what you thought it would - there is a chance that it is a different foot or that the fabric needs to lie a different way to feed under the needle. YouTube videos can be particularly helpful for that.

For example a blind hem foot works by catching just a couple of threads of a fabric fold - so the fabric has to lie the right way.  I find it quite counter-intuitive and tend to try it the wrong way round first. Ugh.

The way you pin a seam can make a difference: a narrow hem foot won't work with pins put in perpendicular to the edge, you need to start off with just the one pin placed parallel to the edge, - any additional pins are in the way because you need to hold the fabric to guide it. I think this probably applies to a rolled hem as well.

There is a good article on the Threads website about the narrow foot:

The start of the three page article, and here is the link to all the pages. I think the first link has a bit more information.


What sewing feet have you tried and do you have any advice on how best to use them? Please share!

~ ~ ~

Monday, 13 March 2017

Sewing tips - or I love YouTube videos!

Isn't YouTube fantastic for all kinds of things?  It most definitely is extremely useful for the many videos about sewing and dressmaking.  The trick is finding them.

Here is one on Ten Sewing Tips that I think is very good. One of the best 12 minutes you'll spend!

National Sewing Circle's '10 Sewing Tips from the Experts'

You may have come across some of these, but I bet that there is something here that is useful. I know that I had not heard of surgical seam rippers before (they sound kind of dangerous? But they could be quite good for the purposes described) and I thought the tip of how to test whether a sewing maching needle is the right size by threading the loose needle by hand and checking if the needle runs easily along the thread - that tip alone was worth the time watching the clip!

Some of the tips concern the sewing machine, others are general tips. All useful.


I really liked what Ellen March says about reading your sewing machine's manual.  Now if you're like me then your eyes glaze over at the thought of reading through the whole thing when you just bought your machine, or even later on (let's face it: none of us did that when we first got our machines. I know I didn't).  It takes a lot of focus and concentration to follow along - particularly when it is all theoretical at this stage, without an immediate practical use.

I would rather break this up into several sessions and avoid the long slog of a single sitting reading.

My problem is that I tend to forget things that I don't use soon after reading them. That's why my advice is to dip in and out of your manual and for that reason it is a really fantastic idea to designate a permenent place for it near your sewing machine. You'll want to know where it is at all times - it's beyond frustrating to start searching for the damn thing every single time you'll want it.

I learned how to do lapped zips from my manuel. The drawings are very useful and the description tells you what you're looking at. I don't do lapped zips all that often and therefore find it a very good idea to open my manual to remind myself how to place the fabric layers and which bit to fold over or under...

It saves time and energy that I prefer to use for actual sewing.


Having praised this video, I also have a book containing hundreds of sewing tips (by both experts and everyday seamstresses), called: "1,000 Clever Sewing Shortcuts & Tips", by Deepika Prakash from Patternreview.com - it is very good. There is so much material in this book that I have not been able to even get through a tenth of it.  This blog post reminds me of the book. I'll think I'll go and put it with my machine manual!

What are your tips of something useful that you do all the time? Please share!

Friday, 10 March 2017

Sewing motivation in little steps


You know what sewing is like: you're really into it, making great progress, you're so looking forward to the finished garment... and then something happens that slows you down, interrupts your flow, gums up the works - you put your sewing aside, and despite your good intentions, you don't get round to pick it up again another day. 

Unfortunately it often happens that a short break from sewing results in a much longer period of not sewing at all.  Sewing is not like knitting that's easily put-downable and pick-upable, to coin a phrase.  You have to pull the sewing machine back out, free up the space for all the stuff you need, get all the bits back together, - and you generally need to plan things a lot more than just carrying on on impulse.


I have found it incredibly easy to lose my motivation to sew.  While the thought of my massive fabric stash, and all those lovely patterns, and all these exciting ideas what I could make (if only), and what design features I could incorporate... they seem to percolate away but not lead anywhere.

Tash has written a great post about sewing motivation, I very much enjoyed it.  My post is about  one technique that I use to overcome the not-sewing-but-I-really-want-to slump: do something, anything that comes to mind, even if it's just a little something.


Small steps, the itty-bitty tiny ones, are very useful to regain your motivation to sew again.

The sorts of things I like to do, just one at a time, - in no particular order:

  • Read through some of the sewing instructions to check how it deals with a particular part of the sewing process
  • Wind my bobbin - ready to sew whenever that might be ('bobbin mates' are great for keeping a bobbin spool and sewing thread together)
  • Look at my fabric and stroke it a bit (yes really. Though that works slightly better with wool when comtemplating a knitting project)
  • Clearing my cutting table. You never know it might make me spread the fabric out and maybe even cut out some of the pieces... or all of them once I get started and it's not as horrendously labourious as I expected...
  • If I am further along: pin something, measure something, baste or tack pieces together, do a little pressing with the iron, ...
  • Set up the ironing board, including iron, tailor ham, clapper or whatever else I like to use
  • Heck, even dust off my sewing machine.  It likes a bit of tender loving care occasionally
  • Write a bullet point list of steps needed from now to the end of the project, or just a couple of points of my next steps
  • Lay my dressmaking pattern envelope on my sewing table, or put it with my machine.  Adding the fabric to keep it company is good too
  • Cut out the pattern tissue pieces.  Even if I only start with the big ones, or the little ones, I can usually go on to do all of the ones I need (I have big freezer bags, with a ziplock top, that I put the tissue pieces, pattern envelope and other materials into ready to use)
  • Look at the pattern envelope to familiarise myself with the line drawing, what kinds of pieces there are, what shape they're in, where the seams are. That sort of thing
  • Take out the sewing instructions and circle all the numbers of the pattern pieces for my chosen view or option
  • Go out and buy or look for the other bits I'll need: check the zip colour and length against my fabric, pull out interfacing, set out pins, chose buttons (or pin different options to the fabric to see which I like), grab tape or ribbons, double-check that my sewing thread hasn't gone dry and brittle if I had it a while (been there, done that), double-check the pattern for anything I forgot
  • Check out the fabric in the mirror to see what it'll look like on me
  • Sew 'just' the one seam... which usually leads to a bit more... and this little bit here, and that one bit there...

Any of these things might be all I do at the time.  It gives me a feeling of satisfaction that I managed to successfully put a stop to my slump.  And strangely enough one small thing is often enough to do a second little something: either straight away, or a bit later in the day.

The best thing about the little step approach is that everything more is a bonus and you're not expecting that you'll complete your project in a few hours from the time you get up to do anything.  If you're literally only reminding yourself of the sewing instructions then that's enough to get you thinking about things in a practical manner again.

And that seems to losen the paralysis of "I really want to sew, so why don't I?"

What other small steps can you think of?  What do you do to get yourself over a long pause in sewing?  What gets your creative energy flowing?

Please let us know in the comments!

Sunday, 24 July 2016

Press, press and press again

A good press with the iron makes sewing so much better! 


One of the most valuable sewing tips I can give is about pressing your work as you go along.  One caveat: I sew mainly with woven fabric, the need to press may or may not apply to jersey fabrics.

I used to underestimate the difference it would make.  I dismissed the need for pressing and felt it was just a bit too over-the-top, too fussy and pernickety - I wanted to sew!  Which meant that anything that was not about sitting at the sewing machine and putting my foot down (literally, on the foot pedal) didn't feel like 'proper sewing' - it just didn't count in my book.

I used to get incredibly impatient with the need to cut out the fabric, mark it, overlock, baste or pin and when I finally got to the sewing stage I just didn't want to stop for anything.  Getting the iron out?  What for?!

Well, I learned from experience that sewing over unpressed seams produces an end result that I am not happy with. Fabric has this habit of not creasing by itself: it will hold a certain rolled shape at the seam until you press it flat.  If you are really stuck without an iron you could try to use your thumb nail to crease a seam flat enough to be able to sew over it, but it is not ideal.

You will need the iron anyway for attaching interfacing but keep the ironing board out, or you could get an ironing mat you can spread out on a table - quilters use this a lot but their projects start smaller than full-size garments. It is so very much worth the time to set this up because you can wander on over whenever needed. Use it often: if in doubt, press!  Except, perhaps:

...there are areas where pressing is not wanted at some stages of construction: when you make welt button holes or pocket openings you don't want press the welt lips flat because it would distort them before you carry on with further steps. A skirt waist edge that will be understitched to stop the facing or lining rolling up into view should also only be pressed once the understitching is done.  There might be other occasions, let me know if you can think of other elements.

But most of the time a quick press is hugely important for a good result that brings joy as opposed to the frustration of a bodged project: it feels very demotivating to have put all this time and energy into a sewing job and then it doesn't turn out very well.  You're not quite sure what went wrong so you don't even know how to fix it next time.

Pressing seams flat might just make the difference.  Try it!


What are your experiences of using an iron while sewing?  Any mishaps, any tips?

Friday, 26 February 2016

Using two types of materials in dressmaking

We are thinking about suggesting a new sewalong with the theme of using a contrast material with the main fashion fabric.

Googling the phrase I just found this wonderful article on the Threads website:

http://www.threadsmagazine.com/item/28239/combining-fabric-weaves-and-weights/page/all

There are so many very useful and inspiring tips there, with photos that illustrate the subject, that I couldn't ever hope to provide from my own sewing expertise so I thought you might like a link to the article.  I won't attempt a summary of the article either, do have a look yourself.

Our sewalong came out of an observation by Barbara on an element of a Chanel fashion show that had lace filling in the kick pleat of a skirt.

Most of us have some kind of material in our stash that we don't know what to do with - usually a small amount that was meant for some kind of trim or accent.

Here is a skirt I made with a fat quarter of cotton and a Scuba like stretch fabric in black, just as an example:


I basted the black fabric in two lines to the red fabric underneath, turning under as I went. Then later I top-stitched both edges, as below, and then removed the white basting thread:


This is just one example of a garment that was made from two fabrics (I had to interface the hem of the red fabric or it would have been too floppy)


How about we exchange ideas of how to use at least one of these stash items up?

I myself still have a length of lovely scallopy lace or ribbon that I haven't found a use for in over fifteen years. I think it's time I did.

How about you?  Is anything lurking in your stash that could provide a great contrast to a fabric - what kind of garment can you imagine yourself making?

Please share.

Friday, 24 April 2015

Our Sewalongs


Butterick 4790

Every so often we schedule sewalongs as part of the LDC group's events.  This is how they work:

Our sewalongs usually start with some members of the London Dressmakers Club deciding that they would like to make either a specific garment or item, or something with a specific theme. Sewalong aren't "meetings" as such.  We don't meet up in a physical location for this, this is an opportunity to sew the item at home, at your own pace: a sewalong is just like a knitalong, you do your own thing and then you compare notes.

The scheduled event gives you a chance to exchange tips and comments with the others who have signed up. You can post comments on the Sewalong meetup page, or upload photos in the suitable photo album.  If you have a query or get stuck with your project, then ask a question in the comments or bring your work-in-progress along to a monthly meeting to ask the others for advice in person.

Meetup allows us to post meetings that last up to two weeks, but no more. The Sewalongs typically run much longer - we like to put them on for anything from two to three months.  It is up to you whether you might like to get started early and get it done, or if you want to space out your sewing a bit over the entire period. Life is busy and it can be a challenge to find sewing time.  It is important to be able to sew in whichever way works best for you.  The Sewalongs can be great inspiration and motivation to complete a specific item.

Some sewalongs are quite informal: we did put a 'simple item' sewalong on a while ago and dressmakers could make anything they wanted. We set a time of two months and invited comments and photos but didn't suggest any other framework or structure.

Other sewalongs were a bit more structured: we split the two months into several two week slots that we scheduled individually and suggested specific tasks for each part.  We will probably keep doing both kinds of sewalongs, some people prefer one to the other.

Our May/June/July sewalong is to make a Summer Wrap Dress - any kind. This came out of several members wanting to make the Walk Away dress (as seen on the Sewing Bee 2015: Butterick 4790 or the vintage edition Butterick 6015. There was even a 'Walk Away Dress, the Mini Version'! Butterick 6204), some of us have the pattern and want to make it up.  It is up to you whether you want to make the Walk Away dress or another kind of summer dress, it doesn't strictly have to be a wrap dress, this is more by way of suggestion.  Go with whichever pattern and style of dress you feel like!

Butterick 4790


Butterick 6015

Do you have any question about our sewalongs?  Don't be shy asking, just post a comment below or on the relevant sewalong meetup page.

Happy Sewing!


.

Tuesday, 21 April 2015

A stash-busting skirt

My most recent project is this skirt out of two fabrics:


I had a little bit of the grey pin stripe, just about 25cm of it or so, and about a half metre of the dark red fabric.  No idea what to do with either, the jacket didn't materialise that might have offered an opportunity for the pin stripe to become cuffs, nor was I happy to have a very short mini skirt out of the red material.

Then I realised I had the same width in both fabrics (150cm wide) and they were the same material (wool) and weight!  Wahey, if that wasn't meant to be...


So I sewed both of 'em together and then treated it as one piece of fabric with an obvious line in it that I had to match between all three pieces: front (cut on the fold) and the two back pieces.

I drafted my darts in the back pieces and sewed those up, coming to a nice shallow point (I like to stitch along the edge of the fold for the last 3-4 stitches or so, with as few fabric threads till the folded edge as you can without sewing off the fabric.  Here's a post on darts that I prepared earlier!).

I didn't use a ready made pattern (I went to my trusty body block from Wendy's pattern drafting course at her MIY Studio in Brighton) so I couldn't follow instructions.  I just went with what made the most sense to me.

I got into a bit of a mess with the lining at some point, but it all ended well eventually. I put a lapped zip in first, then closed the side seams, attached the lining at the top edge at the waist and later sewed the lining edges to the zip on the inside.

It had taken quite a bit of time to get to that stage - but I finally tried on the skirt once I could.  I had a bit of a shock: the panel of the grey colour sits much higher on my hips that I had fondly imagined.  I was really disappointed actually because it just looked... odd...

It was neither a panel, nor a yoke, but just a nothing sort of thing. I did not like the proportion between the two blocks of colour at all.

I had so looked forward to trying the skirt on and getting it all done, and it looks like... Something not at all to my liking.  I felt quite disheartened and upset.

Then I thought: what about a fix that pulls the eye down from that line between the two fabrics?  How about a plain black ribbon at the point where I would have wanted the seamline to be?

Well!

I think it looks pretty good even if I'm a bit prejudiced. I think this did the trick. I am really quite happy with it now.

Here's a close-up:


I think I did quite well in matching up the ribbon ends "across" the lapped zip. Needed only a bit of hand-stitching (and some swearing when I stuck the needle into my finger... We won't mention that)

I wasn't completely happy with my first attempt at the hem. I had only folded it over and stitched it down.  My sewing thread didn't match all that well and the hem looked all puckered despite copious bouts of pressing with lots and lots of steam. It just flipping wouldn't lie flat! Argh.

I wasn't happy so I did a blind hem by hand (I was sitting around with a crafts group on the Sunday afternoon just gone, and it got all done as if it was sewing itself)...

And now I have a much nicer seam:


I suppose I should attach a tab at the top of the zip for a hook and eye or something, but I can't be bothered.  Besides, that V shape looks quite interesting and I think I'll just leave it like it is.

What do you think?

And what kinds of sewing challenges have you encountered?  Please comment below - I changed the settings so it is now easier to leave a comment.

Thank you!

Wednesday, 22 October 2014

Using stay tape at the waist

I blogged about bias tape last time.

I've since come across a technique that re-inforces the waistline to keep it from distorting. Using tape at the waist looks very interesting and it isn't complicated at all. In short it's the sort of thing I really like!

Re-inforcing any area with tape (or ribbon) makes use of said tape as something referred to as 'stay tape'.  The area "stays" in shape, so I suppse it's easy to remember.

~

Good old Sewaholics put me onto the concept:

A Different Kind of Waist Stay

~

Gertie from her Blog for Better Sewing has more about the whole thing:

The Wild World of Stay Tape

~

It even turns out that Claire Shaeffer describes it as a couture technique in her book of the same name, I even think I have this book:

Couture Sewing

Sewing the tape onto a foundation layer is a whole different kettle of fish that I want to explore at some future point.


Have you used either bias or stay tape?  How did it go?  Please post some photos of your projects, either as works in progress (yes please!) or completed projects, in the appropriate photo album on the Meetup site.

~

Tuesday, 29 July 2014

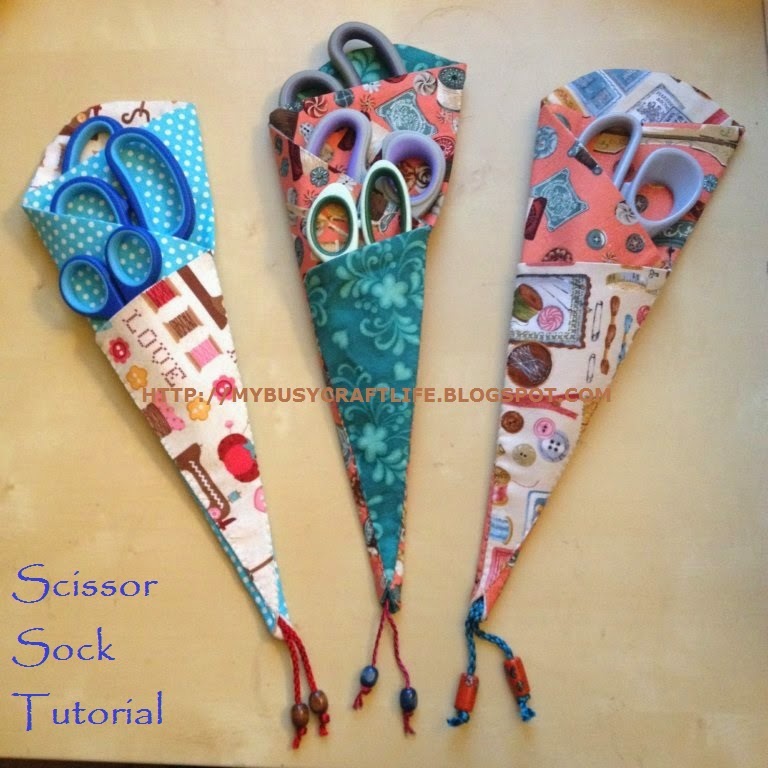
Scissor Sock Tutorial

Hi everyone!

I haven't posted on here yet, and I have been invited by Giselle to contribute every now and then. For those of you who don't know me, I have been sewing for about 20 years of which the last 10 were the most productive. I tend to stay away from creating fitting clothes but love making costumes and anything practical. 

By popular demand I have finally posted the Scissor Sock tutorial :) It has taken a bit longer than planned, but in the end I think it came out quite well. I've never made a sewing tutorial before, only a cooking one (trust me, those are so much easier!). 

Some of you have been given one of these as I just love them and think everyone should have at least one. As you can see, I made three of them for myself and that is when I realised how great these are. I always lose my scissors so this is perfect for me!


http://mybusycraftlife.blogspot.co.uk/2014/07/scissor-sock-tutorial.html


This is a great project for stashbusting or gift giving, especially with the holidays creeping up on us slowly. Please click on the picture for the tutorial, you will be redirected. I tried making it as easy as possible by photographing every step, so please let me know if I've missed something!

It probably goes without saying, but as this is not my pattern please don't use this for commercial purposes.

I hope you like it and will be curious to see which ones you make! 

UPDATE: Win a Scissor Sock, I'm hosting a giveaway! Enter HERE.

MJ

Wednesday, 23 July 2014

Create your own Kimono Tee or Dress


Here’s how to make a tee to your own measurements and your own design (courtesy of Miss P.)  Blogger Miss P. has developed and refined a kimono tee that you can draft to your own measurements.  Her clear instructions on how to do this are  at http://portialawrie.blogspot.co.uk/2014/05/draft-simple-kimono-tee-old-project.html.  What bliss!- a garment with only one pattern piece.  You can see from the  photographs of her finished result that the tee can look both elegant and casual, could be worn to the office, slung over a bikini for the beach or dressed up with accessories for the evening.
It is also a wonderful blank canvas so you can create your own unique garment.  This was the pattern I turned to when I wanted something quick and easy for summer wear.  The top does not take much fabric, I had a metre of cotton poplin and used 70 cm of 150 cm wide  for the main body and then cut into the remainder for bias binding and the belt backing plus oddments for the cuffs and outer side of the belt. My bust measurement  is 84 cm and thus I could place both front and back of the pattern on the same width of fabric.  If you have narrower fabric or more generous curves then you'll need a longer length but you will be able to figure out your fabric requirements once you have drafted the pattern to the size and length you want.
Here is my first effort.  The only addition I made to the pattern was to extend the sleeves and to add a simple belt fastened with a button to ring the changes


This is also an ideal pattern to use up leftover fabric from other projects.  As to the type of fabric to use, something with some drape, not too thick is best.  You definitely need some softness in the sleeve area but you could get away with a thicker central panel.  Personally I would not want to use anything stiffer than the cotton poplin that I used.  There are no darts so the shape relies on how the fabric hangs on your body.
I've sketched some ideas (sorry, I'm no artist).


1.Parti-coloured tee.  Simply adapt your pattern by adding a seam allowance to the centre back and centre front  as you will need to sew the right and left sides of the front and back together before proceeding to sew the front to the back.

2.  Tee with a panel.  Got a bit of fabric that you really want to use but there is not much of it?  Then this is the answer.  Depending upon how much fabric you have , you can have a panel both font and back, just a panel on one side or different fabric panels on each side..  Remember to cut your pattern where you want the panel to be and add a seam allowance to both sides of the cut.

3.Your addition of a different fabric doesn't have to be straight down or across.  Try going asymmetrical, a chevron or undulating wave ( this latter is trickier and probably best done as an applique).

4.  Trim the neckline, hem and sleeves with a different fabric.  You can make your own bias binding for the neckline, see Miss P's technique here.  That's how I cut my binding to trim the neckline of my tee.
Alternatively you can cut facings for your hem, neckline and sleeves in your alternative colour fabric.  Stitch them to the relevant edges with the right side of the facing against the wrong side of the fabric of the body.  Trim the seam and, if necessary, clip around curves.  Do not press seam open but press toward the tee body.  Then flip the facings over to the right side of the garment, press the neckline (or hem or sleeve) edge on to the right side of the garment.  Press or pin a hem of about 1 cm on to the wrong side of the facing around the outer edge of the facing and then pin or tack the facing to the tee preparatory to topstitching around the outer edge of the facing to secure it.    The advantage of this is that you have no raw edge to hem.

5.  If you have quite a bit of fabric you can make a dress of any length, short, knee length or maxi.  I made a dress for my second effort, just adding the extra length to the pattern that I had created and leaving the cuffs off (see photo below).  If you wish you can gather it in at the waist or under the bust, as in sketch 5, by running some elastic through a casing sewn around the inside of the dress at the relevant point.

Necklines. As Miss P. says, you can cut the neckline into a lower curve.  You don't have to make the neckline the same at the back as the front, just adjust the pattern according to your desire.  Remember though that you need to make it wide enough to get your head through.  If you want it to be closer to the neck then you will need to make an opening, such as the keyhole neckline in my sketch no. 4 which is closed with a button and loop.  An opening could be placed at the back instead of the front.

Hems. The simplest and quickest is just to turn up  a straight hem at the bottom and machine along it.  The example from Miss P's blog has a hem curving up at the sides ( you can use a plate to draw this for your pattern, this is what I used for the blue tee).  You can follow the current fashion for hems lower at the back than the front, have an asymmetrical hem (sketch 3) scalloped...and so on!  For my dress I left a small slit at the side seams to allow for more walking ease.

Embellishment.  Here you can go to town if you want something truly unique- lace, ribbon, sequins,ruffles, pockets, pleats, pintucks, buttons, beads, fringing-- the opportunities are endless.  To my dress I added an old lace collar (detachable) and a slim belt to give a 1940's tea dress feeling.  See how it changes the effect.


Why not join in our sewalong and create your own unique version?  See the details here http://www.meetup.com/dressmakers/events/196657002/