Ever since I got my copy of Tilly's new book STRETCH I have been sewing like one possessed. I highly recommend this book both for the clear explanation of techniques and the patterns that come with it. I used to be afraid of jersey knits but no more! I have a Bibi skirt and two Freya tops now, one with the mock roll neck and one with a modified cowl neck. I was going to make the Stella Hoodie dress next but then the British weather turned from Arctic to Tropical and I decided to make a Frankie tee but as a dress.
This is so easy to do and probably the method requires no explanation but I am going to give one in any case.
Cut across the Lengthen or Shorten Here line on the pattern. Since the Frankie pattern is cut on a straight centre back and centre front fold line all you need to do is place a sheet of appropriate paper to align with that fold line as a continuation from the Lengthen or Shorten line.
Decide how much longer you require the tee shirt to be to turn it into a dress and place the bottom piece of the pattern at the desired length, remembering that the pattern includes a 2 cm hem allowance. You will need to create a gentle flare line between the severed patterns pieces. I went for a flare of 1 inch (this will give a total of 4 inches extra width to the dress at the hem) and positioned the bottom pattern piece 1 inch in from the centre fold line.
I then drew a straight line between the bottom of the side seam of the top part to the bottom edge of the side seam of the lower part.
And there is your amended pattern. Since the front and back pieces of the Frankie Tee are the same from below the lengthen and shorten line, I only had to do this with one piece and carefully removed the dress bottom taped to the back bodice piece and placed it over the front bodice of the Tee to cut that piece. Below you can see the difference between an original pattern piece and the amended one.
And now some more views of the completed dress.
I cut a size 3 (if I was doing the top only I would do a size 2) as I do not know what is the composition of the fabric, which has been in my stash for years so I am pleased to do some stash busting, but it was synthetic and I wanted a loose cut to allow air to circulate in the summer but also that could take a close fitting polo neck (cue the Freya) in the colder weather. I added 47 cm in length to the pattern. It took 2 metres of 160 cm wide fabric for this dress in the long sleeve version. I hope this helps in estimating how much fabric you would need if you wanted to make this pattern into a dress.
Finally a thank you to the Sun for shining. It makes the flowers look glorious.
Subtitle
. . . . . . A place to contribute, exchange tips and ideas and find further info on the LDC group on Meetup.
Showing posts with label Tilly & The Buttons. Show all posts
Sunday, 22 April 2018
Wednesday, 11 January 2017
Tilly & The Buttons Cleo Dungaree Dress Part 3- In which I sew another version.
I was so pleased with my first version, like so many other sewing bloggers, that I decided to go ahead and make another, learning from my original effort. and making a few changes.
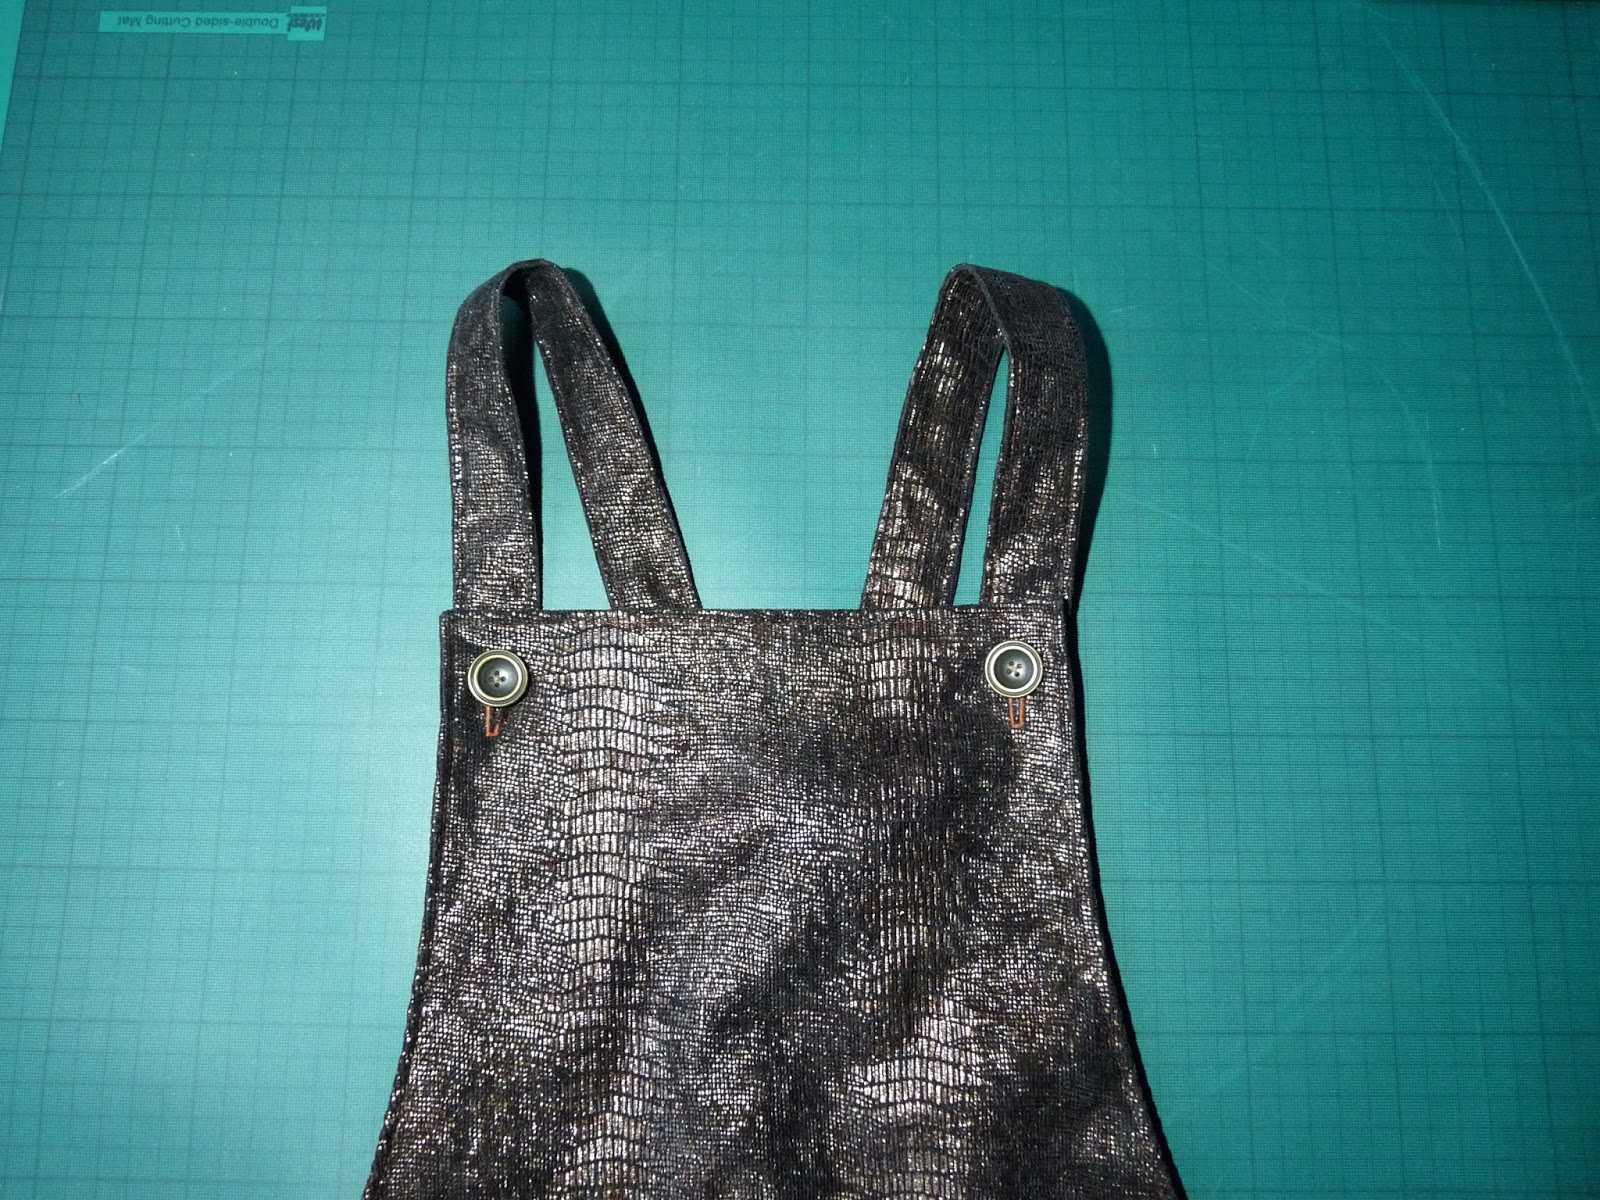
The fabric was a faux snakeskin in a bronze colour with a sheen, purchased about three years ago for a pittance at 34 Market Row, Brixton. I did away with the centre front and centre back seams, as such seams would detract from the effect of the fabric, and added some length.
To leave some walking room, as I was making a longer version, I left slits at the bottom of the side seams but rounded the side edges for a shirt tail effect.
I also drafted new hip pockets with rounded bottoms echo that hem style.
I fully lined the dress and applied the fusible interfacing to the inside of the lining. Below you can see the inside back of the Cleo.
The lining was from the Sewing and Craft Store by Tooting Bec tube station and was such a gorgeous purpley bronze colour that the photograph doesn't do justice. I would love to use it to make something you can see, it's ex-Jigsaw and so soft and smooth. The buttons, which have an unusual concave shape, came from Simply Fabrics, Brixton.
Unfortunately I can't take a photograph of it being worn as I have no "volunteer" photographer to hand today. I cannot even take one of the dress on my Adjustoform Tailor's Dummy as the shoulders are too wide to get the dress on it. This just shows that, helpful as they may be, these type of dummies cannot reproduce you exactly, I always have to do a narrow shoulder adjustment to garments I make. The best I can do is below.
I have enthused before, in the previous parts of this particular blog, about this pattern. Not only is it easy to make and has no zips, darts, gathers or pleats to contend with but it is takes very little fabric and could be a stash buster, especially if you do a short version, - imagine it with contrast pockets and straps, using two fabrics, maybe two different colour denims, and dividing it horizontally, vertically or creating panels. Let your imagination run wild! One day there may even be a part 4 to this blog if I make another.
Have you made a Cleo? We would love to see a photograph of it in our Member's Makes Photo Album on The London Dressmakers Club Meetup site.
The fabric was a faux snakeskin in a bronze colour with a sheen, purchased about three years ago for a pittance at 34 Market Row, Brixton. I did away with the centre front and centre back seams, as such seams would detract from the effect of the fabric, and added some length.
To leave some walking room, as I was making a longer version, I left slits at the bottom of the side seams but rounded the side edges for a shirt tail effect.
I also drafted new hip pockets with rounded bottoms echo that hem style.
I fully lined the dress and applied the fusible interfacing to the inside of the lining. Below you can see the inside back of the Cleo.
The lining was from the Sewing and Craft Store by Tooting Bec tube station and was such a gorgeous purpley bronze colour that the photograph doesn't do justice. I would love to use it to make something you can see, it's ex-Jigsaw and so soft and smooth. The buttons, which have an unusual concave shape, came from Simply Fabrics, Brixton.
Unfortunately I can't take a photograph of it being worn as I have no "volunteer" photographer to hand today. I cannot even take one of the dress on my Adjustoform Tailor's Dummy as the shoulders are too wide to get the dress on it. This just shows that, helpful as they may be, these type of dummies cannot reproduce you exactly, I always have to do a narrow shoulder adjustment to garments I make. The best I can do is below.
I have enthused before, in the previous parts of this particular blog, about this pattern. Not only is it easy to make and has no zips, darts, gathers or pleats to contend with but it is takes very little fabric and could be a stash buster, especially if you do a short version, - imagine it with contrast pockets and straps, using two fabrics, maybe two different colour denims, and dividing it horizontally, vertically or creating panels. Let your imagination run wild! One day there may even be a part 4 to this blog if I make another.
Have you made a Cleo? We would love to see a photograph of it in our Member's Makes Photo Album on The London Dressmakers Club Meetup site.
Wednesday, 23 November 2016
Tilly & The Buttons Cleo Dungaree Dress. Part 2 - In which I learn some lessons for the next time I make this dress.
Since writing Part 1 I have discovered that the error on the front facing pattern of the dress only affects those
patterns sold between 3 and 8 November. All patterns
sold subsequently have been corrected. People who ordered the pattern
and received it prior to 8 November have been sent instructions on how
to correct it. I was just unlucky as I bought mine on 6 November direct from the
charming Tilly herself, she was wearing a great example of the Cleo
dress in dark blue. How to correct the facing is explained here by Tilly.
If you read Part 1 you will know I was contemplating cutting out a new front facing but I got lazy and cut through the middle of my too big facing then, instead of joining them together by sewing a 1.5 cm seam allowance along the centre front, overlapped the two pieces one on top of the other by the appropriate amount and did a large zig-zag stitch down the centre front. Then I decided that I wanted to line the dress, as you can see from this photograph of the inside.
Instead of creating a proper lining pattern to fit the facing properly I bodged it by sketching the facing onto my traced patterns for the front and back of the dress and roughly folding the pattern down by the facing amount minus sufficient for a seam allowance. It didn't have to be exact as, once I had cut it out, I just placed the facing with the lining beneath the facing on top of the outer dress pieces, which showed me the shapes I needed to match, and pinned the lining to the facing to align it. I zig-zag stitched the lining to the facing. Next I added another line of stitching about ! cm away from the zig-zag and trimmed away any excess lining fabric beyond this line. I then followed the instructions for applying the facings to the dress,treating the combined facing and lining in the same way as I would have were it only a facing It is not a beautiful inner but it worked- almost!
I thought I would be clever in cutting out the lining and eliminate the centre seams for the front and back as unnecessary so cut the lining on the fold excluding the central seam allowances. This works well for the back BUT I forgot that I had a centre front split in the version I was making. Because the lining need not meet exactly at the edge of the split, I managed by cutting the lining up the centre front from the hem as far as the top of the split and turning under the tiniest of hems on the edges on either side of the cut. I might improve this and make it more secure by binding it with some thin ribbon later - or I might just leave it as it is.
So there is the finished article. Not as exciting as other versions that I have seen on the internet so far- and I look particularly grim, not just because I am outside in the cold but also because our boiler has been out of action for about 2 weeks. It is a great item just to fling on in the morning over a cosy handknit sweater, thermal vest and some warm tights when faced with boiler malfunction that has defied the efforts of the engineer to repair it. If the boiler situation continues I may well make a Cleo with a fleece or fake fur lining. I heartily recommend this pattern to a beginner- or, indeed, anyone. Do not be put off by my Victorian Workhouse style version but think of all the interesting prints, exciting thread colours for topstitching and alternative pocket styles you could use.
So the lessons I learnt for next time were:
1. If I am going to have a lining consider eliminating the facings and applying the fusible interfacing to the lining.
2. If I am going to have a version with a split then consider a) lining only as far as the split or b) incorporating a small stitched pleat in the centre front of the lining to be released at split level so there is a larger amount allowed for turning back and hemming.
3. The slit could go at the back and I might do this for my next effort.
Do you have a pattern that you can enthuse about? Perhaps you could tell us about it in a comment or, better still, write a blog post about it for the London Dressmakers Club.
If you read Part 1 you will know I was contemplating cutting out a new front facing but I got lazy and cut through the middle of my too big facing then, instead of joining them together by sewing a 1.5 cm seam allowance along the centre front, overlapped the two pieces one on top of the other by the appropriate amount and did a large zig-zag stitch down the centre front. Then I decided that I wanted to line the dress, as you can see from this photograph of the inside.
Instead of creating a proper lining pattern to fit the facing properly I bodged it by sketching the facing onto my traced patterns for the front and back of the dress and roughly folding the pattern down by the facing amount minus sufficient for a seam allowance. It didn't have to be exact as, once I had cut it out, I just placed the facing with the lining beneath the facing on top of the outer dress pieces, which showed me the shapes I needed to match, and pinned the lining to the facing to align it. I zig-zag stitched the lining to the facing. Next I added another line of stitching about ! cm away from the zig-zag and trimmed away any excess lining fabric beyond this line. I then followed the instructions for applying the facings to the dress,treating the combined facing and lining in the same way as I would have were it only a facing It is not a beautiful inner but it worked- almost!
I thought I would be clever in cutting out the lining and eliminate the centre seams for the front and back as unnecessary so cut the lining on the fold excluding the central seam allowances. This works well for the back BUT I forgot that I had a centre front split in the version I was making. Because the lining need not meet exactly at the edge of the split, I managed by cutting the lining up the centre front from the hem as far as the top of the split and turning under the tiniest of hems on the edges on either side of the cut. I might improve this and make it more secure by binding it with some thin ribbon later - or I might just leave it as it is.
So there is the finished article. Not as exciting as other versions that I have seen on the internet so far- and I look particularly grim, not just because I am outside in the cold but also because our boiler has been out of action for about 2 weeks. It is a great item just to fling on in the morning over a cosy handknit sweater, thermal vest and some warm tights when faced with boiler malfunction that has defied the efforts of the engineer to repair it. If the boiler situation continues I may well make a Cleo with a fleece or fake fur lining. I heartily recommend this pattern to a beginner- or, indeed, anyone. Do not be put off by my Victorian Workhouse style version but think of all the interesting prints, exciting thread colours for topstitching and alternative pocket styles you could use.
So the lessons I learnt for next time were:
1. If I am going to have a lining consider eliminating the facings and applying the fusible interfacing to the lining.
2. If I am going to have a version with a split then consider a) lining only as far as the split or b) incorporating a small stitched pleat in the centre front of the lining to be released at split level so there is a larger amount allowed for turning back and hemming.
3. The slit could go at the back and I might do this for my next effort.
Do you have a pattern that you can enthuse about? Perhaps you could tell us about it in a comment or, better still, write a blog post about it for the London Dressmakers Club.
Wednesday, 16 November 2016
Tilly & The Buttons Cleo Dress. Part 1. In which I discover two flaws
If you are a habitue of sewing blogs, dressmaking shops and sewing Fairs then you must know about Tilly and The Buttons patterns. They are celebrated for their stylish designs, the quality of the packaging and the pattern paper (no flimsy paper envelope and easily torn tissue here) and the calibre of the instructions. They are more expensive in price than the big commercial companies but, in my opinion, the superiority of the aforementioned justifies this.
I have never tried one of the patterns but, when I was at the Renegade Craft Fair in November, I came upon Tilly's stall and thought that I should try out a pattern for myself. I almost bought the famous Coco dress pattern but then my eye lighted upon a new issue- the Cleo Dungaree Dress. This was marked as a pattern for beginners and looked very easy with no zips, sleeves to set in, pleats or gathers, not much in the way of fitting issues. Plus it was the perfect all year round wear, layered over a T shirt for Summer, a blouse for Autumn or a sweater for Winter.
I was determined to use some fabric from my stash to try to alleviate my guilt at buying a pattern when one of my 2016 resolutions was not to buy any. The back of the envelope suggests medium to heavy weight fabric. After pondering I chose a textured grey fabric, bought many years ago from Abakhan in Liverpool. I don't know the fabric content but it has a certain amount of body and resists creasing. The picture below does not reveal its annoying tendency to fray on handling.
There is a good choice of sizes for this pattern from 61 cm waist and 84 cm hip to 96.5 cm waist and 119.5 cm hip. I wanted to do the knee length version but the pattern came above my knee. There was no indication on the pattern of the height for which this pattern is drafted so I decided to seek help from Tilly & The Buttons Facebook page
The prompt answer was that it was for a height of 5' 5" to 5'6". I am 5'7" and I needed to add more than 1 inch to the pattern but I know the proportions of the various parts of my body do not conform to the "norm"- whose does?! I traced out the pattern for pattern size two, and, as well as lengthening, slightly decreased the waist size. The pattern instructions includes the finished garment sizes (Hurrah!) and also warns that you should not take in the waist too much- this garment is a pull-on but in a woven fabric so does not have any give. If you have any doubt then cut larger and pin the garment together to try on. This is very easy to do, there are only a few pieces and you can easily reduce the dress where appropriate if you need to do so. A cutting layout is provided but play around with your placement, taking note of the grainline, as you may be able to use less than the given quantity. I did.
The pattern pieces are clearly marked so that you have no doubt which edge is the armhole edge or side seam.
The instruction booklet, that's right- a booklet, is illustrated with photographs and clear instructions for every stage. For someone who first started sewing when you were lucky to get half a page of brusque directions without any illustration, this is sewing heaven.
So I started sewing merrily. All went well, my two back pieces and two front pieces were sewn together and top stitched. I did contemplate sewing on the front hip pockets ( this is the version I decided upon) before sewing the two front pieces together but decided against it because I reckoned that I would be better able to ensure that the pockets were evenly aligned once the fronts were joined. I had sewn the side seams and I was top stitching the second strap when my thread ran out. Too late to go and buy some more so I thought I would jump to applying the interfacing to the facings. This is when I discovered the first problem.
The front facing should fit the front of the dress exactly but it doesn't, it is too big. At first I thought I had been stupid and traced off the wrong size but I had not. It seems to me that the facing was drafted as though it was intended to have a centre front seam the same as the dress itself. There is no need for the facing to have that seam and to have it would make the front bulky. I took a photo, see below, to demonstrate this problem but, unless you peer at it closely, it is difficult to see, due to the nature of the fabric, that it shows that the facing extends beyond the dress front at the sides. Luckily I have spare fabric so I can cut another facing, once I have changed my traced pattern piece to match the dress front by deducting the necessary amount from the centre front of the facing. Luckily I have not yet cut out the interfacing so I will be able to cut the front interfacing correctly on first go.
21 November 2016. I posted a query about this error on Tilly & The Buttons Facebook page and 3 days later I got a response to say that only the patterns sold between 3 and 8 November had this error and all patterns sold subsequently have been corrected. Those who ordered the pattern and received it prior to 8 November have been sent instructions on how to correct it. I was just unlucky as I bought mine direct from the charming Tilly herself, who was wearing a great example of the Cleo dress in dark blue.
Subsequently I noticed a minor discrepancy in the instructions for the straps. The instructions indicate where there are variations in the method of instruction depending upon the version of the dress that you chose to make. The strap construction is clearly labelled "For all versions" and tells you to sew two of the open sides of the folded strap piece. Later on, if you are making the version with button and buttonholes, you are told to trim the short end, according to the length of strap required, and overstitch or turn and topstitch the now raw edge. In this case why do you need to sew the end when creating the strap? Maybe it was thought not to be possible to turn a tube without sewing the end but I can do this using a big safety pin and here is a video that shows you how.
I am hoping to buy the thread tomorrow, if I can get the same colour, and crack on with the dress at the weekend because, despite these minor hiccups, I think it will be a great addition to my wardrobe and it is a pattern any beginner could make.
I have never tried one of the patterns but, when I was at the Renegade Craft Fair in November, I came upon Tilly's stall and thought that I should try out a pattern for myself. I almost bought the famous Coco dress pattern but then my eye lighted upon a new issue- the Cleo Dungaree Dress. This was marked as a pattern for beginners and looked very easy with no zips, sleeves to set in, pleats or gathers, not much in the way of fitting issues. Plus it was the perfect all year round wear, layered over a T shirt for Summer, a blouse for Autumn or a sweater for Winter.
I was determined to use some fabric from my stash to try to alleviate my guilt at buying a pattern when one of my 2016 resolutions was not to buy any. The back of the envelope suggests medium to heavy weight fabric. After pondering I chose a textured grey fabric, bought many years ago from Abakhan in Liverpool. I don't know the fabric content but it has a certain amount of body and resists creasing. The picture below does not reveal its annoying tendency to fray on handling.
There is a good choice of sizes for this pattern from 61 cm waist and 84 cm hip to 96.5 cm waist and 119.5 cm hip. I wanted to do the knee length version but the pattern came above my knee. There was no indication on the pattern of the height for which this pattern is drafted so I decided to seek help from Tilly & The Buttons Facebook page
The prompt answer was that it was for a height of 5' 5" to 5'6". I am 5'7" and I needed to add more than 1 inch to the pattern but I know the proportions of the various parts of my body do not conform to the "norm"- whose does?! I traced out the pattern for pattern size two, and, as well as lengthening, slightly decreased the waist size. The pattern instructions includes the finished garment sizes (Hurrah!) and also warns that you should not take in the waist too much- this garment is a pull-on but in a woven fabric so does not have any give. If you have any doubt then cut larger and pin the garment together to try on. This is very easy to do, there are only a few pieces and you can easily reduce the dress where appropriate if you need to do so. A cutting layout is provided but play around with your placement, taking note of the grainline, as you may be able to use less than the given quantity. I did.
The pattern pieces are clearly marked so that you have no doubt which edge is the armhole edge or side seam.
The instruction booklet, that's right- a booklet, is illustrated with photographs and clear instructions for every stage. For someone who first started sewing when you were lucky to get half a page of brusque directions without any illustration, this is sewing heaven.
So I started sewing merrily. All went well, my two back pieces and two front pieces were sewn together and top stitched. I did contemplate sewing on the front hip pockets ( this is the version I decided upon) before sewing the two front pieces together but decided against it because I reckoned that I would be better able to ensure that the pockets were evenly aligned once the fronts were joined. I had sewn the side seams and I was top stitching the second strap when my thread ran out. Too late to go and buy some more so I thought I would jump to applying the interfacing to the facings. This is when I discovered the first problem.
The front facing should fit the front of the dress exactly but it doesn't, it is too big. At first I thought I had been stupid and traced off the wrong size but I had not. It seems to me that the facing was drafted as though it was intended to have a centre front seam the same as the dress itself. There is no need for the facing to have that seam and to have it would make the front bulky. I took a photo, see below, to demonstrate this problem but, unless you peer at it closely, it is difficult to see, due to the nature of the fabric, that it shows that the facing extends beyond the dress front at the sides. Luckily I have spare fabric so I can cut another facing, once I have changed my traced pattern piece to match the dress front by deducting the necessary amount from the centre front of the facing. Luckily I have not yet cut out the interfacing so I will be able to cut the front interfacing correctly on first go.
21 November 2016. I posted a query about this error on Tilly & The Buttons Facebook page and 3 days later I got a response to say that only the patterns sold between 3 and 8 November had this error and all patterns sold subsequently have been corrected. Those who ordered the pattern and received it prior to 8 November have been sent instructions on how to correct it. I was just unlucky as I bought mine direct from the charming Tilly herself, who was wearing a great example of the Cleo dress in dark blue.
Subsequently I noticed a minor discrepancy in the instructions for the straps. The instructions indicate where there are variations in the method of instruction depending upon the version of the dress that you chose to make. The strap construction is clearly labelled "For all versions" and tells you to sew two of the open sides of the folded strap piece. Later on, if you are making the version with button and buttonholes, you are told to trim the short end, according to the length of strap required, and overstitch or turn and topstitch the now raw edge. In this case why do you need to sew the end when creating the strap? Maybe it was thought not to be possible to turn a tube without sewing the end but I can do this using a big safety pin and here is a video that shows you how.
I am hoping to buy the thread tomorrow, if I can get the same colour, and crack on with the dress at the weekend because, despite these minor hiccups, I think it will be a great addition to my wardrobe and it is a pattern any beginner could make.
Subscribe to:
Posts (Atom)