Subtitle

. . . . . . A place to contribute, exchange tips and ideas and find further info on the LDC group on Meetup.

Showing posts with label stashbuster. Show all posts

Friday, 26 February 2016

Using two types of materials in dressmaking

We are thinking about suggesting a new sewalong with the theme of using a contrast material with the main fashion fabric.

Googling the phrase I just found this wonderful article on the Threads website:

http://www.threadsmagazine.com/item/28239/combining-fabric-weaves-and-weights/page/all

There are so many very useful and inspiring tips there, with photos that illustrate the subject, that I couldn't ever hope to provide from my own sewing expertise so I thought you might like a link to the article.  I won't attempt a summary of the article either, do have a look yourself.

Our sewalong came out of an observation by Barbara on an element of a Chanel fashion show that had lace filling in the kick pleat of a skirt.

Most of us have some kind of material in our stash that we don't know what to do with - usually a small amount that was meant for some kind of trim or accent.

Here is a skirt I made with a fat quarter of cotton and a Scuba like stretch fabric in black, just as an example:


I basted the black fabric in two lines to the red fabric underneath, turning under as I went. Then later I top-stitched both edges, as below, and then removed the white basting thread:


This is just one example of a garment that was made from two fabrics (I had to interface the hem of the red fabric or it would have been too floppy)


How about we exchange ideas of how to use at least one of these stash items up?

I myself still have a length of lovely scallopy lace or ribbon that I haven't found a use for in over fifteen years. I think it's time I did.

How about you?  Is anything lurking in your stash that could provide a great contrast to a fabric - what kind of garment can you imagine yourself making?

Please share.

Tuesday, 21 April 2015

A stash-busting skirt

My most recent project is this skirt out of two fabrics:


I had a little bit of the grey pin stripe, just about 25cm of it or so, and about a half metre of the dark red fabric.  No idea what to do with either, the jacket didn't materialise that might have offered an opportunity for the pin stripe to become cuffs, nor was I happy to have a very short mini skirt out of the red material.

Then I realised I had the same width in both fabrics (150cm wide) and they were the same material (wool) and weight!  Wahey, if that wasn't meant to be...


So I sewed both of 'em together and then treated it as one piece of fabric with an obvious line in it that I had to match between all three pieces: front (cut on the fold) and the two back pieces.

I drafted my darts in the back pieces and sewed those up, coming to a nice shallow point (I like to stitch along the edge of the fold for the last 3-4 stitches or so, with as few fabric threads till the folded edge as you can without sewing off the fabric.  Here's a post on darts that I prepared earlier!).

I didn't use a ready made pattern (I went to my trusty body block from Wendy's pattern drafting course at her MIY Studio in Brighton) so I couldn't follow instructions.  I just went with what made the most sense to me.

I got into a bit of a mess with the lining at some point, but it all ended well eventually. I put a lapped zip in first, then closed the side seams, attached the lining at the top edge at the waist and later sewed the lining edges to the zip on the inside.

It had taken quite a bit of time to get to that stage - but I finally tried on the skirt once I could.  I had a bit of a shock: the panel of the grey colour sits much higher on my hips that I had fondly imagined.  I was really disappointed actually because it just looked... odd...

It was neither a panel, nor a yoke, but just a nothing sort of thing. I did not like the proportion between the two blocks of colour at all.

I had so looked forward to trying the skirt on and getting it all done, and it looks like... Something not at all to my liking.  I felt quite disheartened and upset.

Then I thought: what about a fix that pulls the eye down from that line between the two fabrics?  How about a plain black ribbon at the point where I would have wanted the seamline to be?

Well!

I think it looks pretty good even if I'm a bit prejudiced. I think this did the trick. I am really quite happy with it now.

Here's a close-up:


I think I did quite well in matching up the ribbon ends "across" the lapped zip. Needed only a bit of hand-stitching (and some swearing when I stuck the needle into my finger... We won't mention that)

I wasn't completely happy with my first attempt at the hem. I had only folded it over and stitched it down.  My sewing thread didn't match all that well and the hem looked all puckered despite copious bouts of pressing with lots and lots of steam. It just flipping wouldn't lie flat! Argh.

I wasn't happy so I did a blind hem by hand (I was sitting around with a crafts group on the Sunday afternoon just gone, and it got all done as if it was sewing itself)...

And now I have a much nicer seam:


I suppose I should attach a tab at the top of the zip for a hook and eye or something, but I can't be bothered.  Besides, that V shape looks quite interesting and I think I'll just leave it like it is.

What do you think?

And what kinds of sewing challenges have you encountered?  Please comment below - I changed the settings so it is now easier to leave a comment.

Thank you!

Tuesday, 29 July 2014

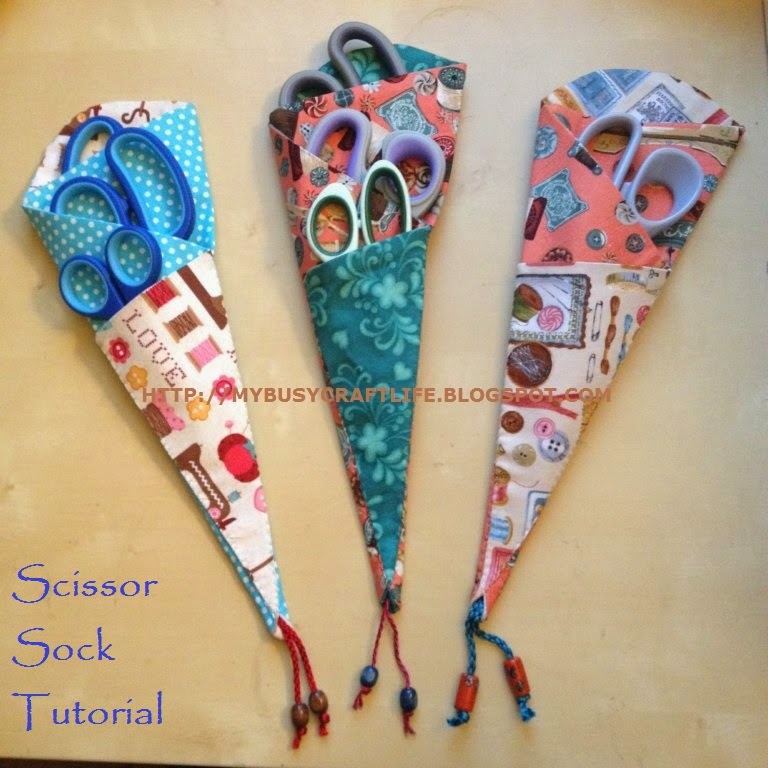
Scissor Sock Tutorial

Hi everyone!

I haven't posted on here yet, and I have been invited by Giselle to contribute every now and then. For those of you who don't know me, I have been sewing for about 20 years of which the last 10 were the most productive. I tend to stay away from creating fitting clothes but love making costumes and anything practical. 

By popular demand I have finally posted the Scissor Sock tutorial :) It has taken a bit longer than planned, but in the end I think it came out quite well. I've never made a sewing tutorial before, only a cooking one (trust me, those are so much easier!). 

Some of you have been given one of these as I just love them and think everyone should have at least one. As you can see, I made three of them for myself and that is when I realised how great these are. I always lose my scissors so this is perfect for me!


http://mybusycraftlife.blogspot.co.uk/2014/07/scissor-sock-tutorial.html


This is a great project for stashbusting or gift giving, especially with the holidays creeping up on us slowly. Please click on the picture for the tutorial, you will be redirected. I tried making it as easy as possible by photographing every step, so please let me know if I've missed something!

It probably goes without saying, but as this is not my pattern please don't use this for commercial purposes.

I hope you like it and will be curious to see which ones you make! 

UPDATE: Win a Scissor Sock, I'm hosting a giveaway! Enter HERE.

MJ

Saturday, 17 May 2014

Sew-along: a simple one metre item from stash fabric

Hello,

Many of you that have met me already through the LDC meet-up know that I love a good sew-a-long. This is my progress on the most recent 'a simple item from stash fabric' challenge.

As soon as this was announced on the meet-up group I knew that I was going to make another version of Simplicity 1884. This was perfect for the challenge for a number of reasons: -
  • The top only required 1 metre of fabric (win!)
  • It didn't require any additional notions such as zippers, buttons etc. 
  • It is an easy pattern and quick to make


One thing that I always have to bear in mind when I am doing sew-a-longs is whether or not I will be able to finish the project within the given time. Not that it matters if I don't finish it by the end of the sew-a-long, being motivated by to start a project is always exciting. However, the timescale is good practice for me when it comes to time planning, and it helps me when I am sewing projects to wear for a particular event, for example a work event or special occasion where the deadlines are more crucial. 


The fabric was picked up from a shop on Brick Lane (I can't remember what it was called but it was towards the Aldgate end) and only cost £3.50 per metre. This fabric had been in my stash for a while and although I knew that I wanted to use it for a top it always got pushed to the bottom of my priority list. I am delighted that this sew-a-long has made me do some impromptu stash busting!

Do check out the meetup page for this challenge to see what other LDC members are working on. It will also be great to hear what other ideas people have for 1 metre projects. 

Good luck with the challenge and don't forget to upload some pics so we can all see your 1 metre progress and projects!

Happy Sewing!