Subtitle

. . . . . . A place to contribute, exchange tips and ideas and find further info on the LDC group on Meetup.

Tuesday, 12 August 2014

Paris- Art, Architecture & Amour OR Fashion, Fabric & Food

Well, which would you go for?  To tell the truth you can do all six.  I was in Paris for a few days recently to visit an old Parisian friend, to catch up with some Canadian relatives while they were traveling in Europe (I love them dearly so there is the Amour) and to enjoy myself generally.
While I was there I went to a current exhibition," Paris 1900" at the Petit Palais, appropriately built for the 1900 Exposition Universelle-(Architecture), in which, according to the publicity "Over 600 works will plunge visitors to the Petit Palais into the atmosphere of Belle Époque Paris. There will be paintings, objets d’art, costumes, posters, photographs, films, furniture, jewellery and sculptures"- (Art).  It evoked a sparkly atmosphere of sophistication, luxury and change- ignoring the less fortunate of the time.  But what you want is the Fashion!
Look at the hours of work that must have been necessary to create this jacket. 


Clothes like these really were only for the rich. Even a day dress had much in the way of pin-tucks, insertions and frills to be sewn by some poor seamstress.


And you needed a maid to get into it as it is fastened down the back with buttons and hooks and eyes.


Even elegant footwear must have been a struggle to get on unaided.


And as for evening wear-  this dress is believed to have been designed by Worth, one of the most famous designers of the time, for a rich American client. 


However this exhibition closes on 17 August 2014.  Luckily you have until 2 November 2014 to get to  the Palais Galleriathe  and the exhibition  on French Couture in the 1950's.  Unfortunately absolutely no photography was allowed at this exhibition but you will see some images on another blog here.  This blog seems to indicate that it is only Christian Dior garments but it includes over 100 items from many different couturiers including Gres, Balenciaga, Cardin, Vionnet, Chanel, Schiaparelli, Piguet and many more.  It included both day and evening wear, swimwear, lingerie plus hats and other accessories.  Well worth a visit and I would have loved to get the hefty hard back catalogue but it was almost 45 Euros.

And I was saving my money for the next item- Fabric.  If you have never been then I can assure you that all you have heard about fabric shopping around Sacre Coeur is true.  And not just fabric but haberdashery of all sorts as well.  If you are going by Metro then the nearest is Anvers and the shops are concentrated in the area between that Metro and the steps leading to Sacre Coeur.  Look out for Rue d'Orsel, Place St Pierre, Rue Seveste, and Rue Charles Nodier.  Some retailers have several outlets so you come across stores with the same name "Au Bonheur des Dames", or  "Au Gentleman des Tissus" for example.  Just wander and rummage.  The most tempting are the "Coupons", lengths of fabric cut into 3 metre lengths and piled high inside and outside the shops.  You can also buy fabric by the metre, it ranges from the very cheap (and rather nasty) to the absolutely exquisite ex-haute couture and everything in between.  Furnishing fabrics are also sold.


Shops are open Monday to Saturday, usually from 9.30 to 19.00 but some do not open until the afternoon on a Monday.  The staff are usually knowledgeable and helpful.  Below is the lovely Sabrina, at one of the branches of "Au Gentleman des Tissus",  who eagerly asked me about fabric shopping in London.  I am about to buy the black and white striped cotton laid on top of the other fabrics near the counter: 3 metres of 148 cm wide for 10 Euros.  I eventually came away from the area with another 2 pieces of 3 metres each, for 5 and 10 Euros, making a grand total of 25 Euros for 9 metres of fabric.
There are several shops devoted exclusively to haberdashery with a fantastic range of colours in items such as zips and lashings of trimmings of all sorts.

Several shops also sell leather


And now for Food as after all that shopping I wanted a quiet and restful spot for a pot of tea so I went to my favourite place for afternoon tea and cake.
  Musee Jacquemart-Andre, 158 boulevard Hausmann- a fabulous mansion house, now a museum filled with works of art collected to decorate this home of a very wealthy 19th century husband and wife.  It is open every day of the year and, although you have to pay to go around the museum, entry to the cafe is free.  The cafe is a work of art itself with a ceiling by Tiepolo and Flemish tapestries based on the story of the Greek warrior, Achilles.


It is very peaceful ( I suspect people do not realise it is there and you can just go in the cafe without going to the museum) and I can imagine myself as a wealthy guest of the previous owners, choosing which type of tea I shall have from the varieties on offer, note that they do other drinks as well but tea has a sort of old-fashioned graciousness that goes better with the decor.  Oh, and the food- really you should go in two's because the cakes are so huge and rich and it is better for one's diet to share one.  However I did manage to consume all of this pile of deliciousness.  It's a massive pistachio macaroon cake filled with pistachio cream and the hugest raspberries I've ever seen.  I'm afraid I'd eaten a fair bit of it before I thought to take a picture But I think there is enough to give you the idea.

Tuesday, 29 July 2014

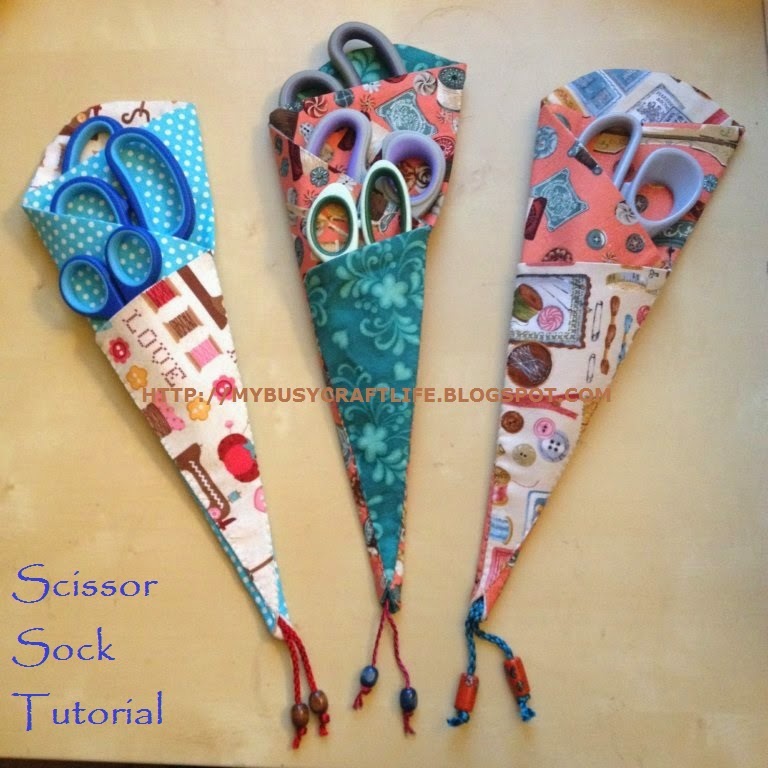
Scissor Sock Tutorial

Hi everyone!

I haven't posted on here yet, and I have been invited by Giselle to contribute every now and then. For those of you who don't know me, I have been sewing for about 20 years of which the last 10 were the most productive. I tend to stay away from creating fitting clothes but love making costumes and anything practical. 

By popular demand I have finally posted the Scissor Sock tutorial :) It has taken a bit longer than planned, but in the end I think it came out quite well. I've never made a sewing tutorial before, only a cooking one (trust me, those are so much easier!). 

Some of you have been given one of these as I just love them and think everyone should have at least one. As you can see, I made three of them for myself and that is when I realised how great these are. I always lose my scissors so this is perfect for me!


http://mybusycraftlife.blogspot.co.uk/2014/07/scissor-sock-tutorial.html


This is a great project for stashbusting or gift giving, especially with the holidays creeping up on us slowly. Please click on the picture for the tutorial, you will be redirected. I tried making it as easy as possible by photographing every step, so please let me know if I've missed something!

It probably goes without saying, but as this is not my pattern please don't use this for commercial purposes.

I hope you like it and will be curious to see which ones you make! 

UPDATE: Win a Scissor Sock, I'm hosting a giveaway! Enter HERE.

MJ

Wednesday, 23 July 2014

Create your own Kimono Tee or Dress


Here’s how to make a tee to your own measurements and your own design (courtesy of Miss P.)  Blogger Miss P. has developed and refined a kimono tee that you can draft to your own measurements.  Her clear instructions on how to do this are  at http://portialawrie.blogspot.co.uk/2014/05/draft-simple-kimono-tee-old-project.html.  What bliss!- a garment with only one pattern piece.  You can see from the  photographs of her finished result that the tee can look both elegant and casual, could be worn to the office, slung over a bikini for the beach or dressed up with accessories for the evening.
It is also a wonderful blank canvas so you can create your own unique garment.  This was the pattern I turned to when I wanted something quick and easy for summer wear.  The top does not take much fabric, I had a metre of cotton poplin and used 70 cm of 150 cm wide  for the main body and then cut into the remainder for bias binding and the belt backing plus oddments for the cuffs and outer side of the belt. My bust measurement  is 84 cm and thus I could place both front and back of the pattern on the same width of fabric.  If you have narrower fabric or more generous curves then you'll need a longer length but you will be able to figure out your fabric requirements once you have drafted the pattern to the size and length you want.
Here is my first effort.  The only addition I made to the pattern was to extend the sleeves and to add a simple belt fastened with a button to ring the changes


This is also an ideal pattern to use up leftover fabric from other projects.  As to the type of fabric to use, something with some drape, not too thick is best.  You definitely need some softness in the sleeve area but you could get away with a thicker central panel.  Personally I would not want to use anything stiffer than the cotton poplin that I used.  There are no darts so the shape relies on how the fabric hangs on your body.
I've sketched some ideas (sorry, I'm no artist).


1.Parti-coloured tee.  Simply adapt your pattern by adding a seam allowance to the centre back and centre front  as you will need to sew the right and left sides of the front and back together before proceeding to sew the front to the back.

2.  Tee with a panel.  Got a bit of fabric that you really want to use but there is not much of it?  Then this is the answer.  Depending upon how much fabric you have , you can have a panel both font and back, just a panel on one side or different fabric panels on each side..  Remember to cut your pattern where you want the panel to be and add a seam allowance to both sides of the cut.

3.Your addition of a different fabric doesn't have to be straight down or across.  Try going asymmetrical, a chevron or undulating wave ( this latter is trickier and probably best done as an applique).

4.  Trim the neckline, hem and sleeves with a different fabric.  You can make your own bias binding for the neckline, see Miss P's technique here.  That's how I cut my binding to trim the neckline of my tee.
Alternatively you can cut facings for your hem, neckline and sleeves in your alternative colour fabric.  Stitch them to the relevant edges with the right side of the facing against the wrong side of the fabric of the body.  Trim the seam and, if necessary, clip around curves.  Do not press seam open but press toward the tee body.  Then flip the facings over to the right side of the garment, press the neckline (or hem or sleeve) edge on to the right side of the garment.  Press or pin a hem of about 1 cm on to the wrong side of the facing around the outer edge of the facing and then pin or tack the facing to the tee preparatory to topstitching around the outer edge of the facing to secure it.    The advantage of this is that you have no raw edge to hem.

5.  If you have quite a bit of fabric you can make a dress of any length, short, knee length or maxi.  I made a dress for my second effort, just adding the extra length to the pattern that I had created and leaving the cuffs off (see photo below).  If you wish you can gather it in at the waist or under the bust, as in sketch 5, by running some elastic through a casing sewn around the inside of the dress at the relevant point.

Necklines. As Miss P. says, you can cut the neckline into a lower curve.  You don't have to make the neckline the same at the back as the front, just adjust the pattern according to your desire.  Remember though that you need to make it wide enough to get your head through.  If you want it to be closer to the neck then you will need to make an opening, such as the keyhole neckline in my sketch no. 4 which is closed with a button and loop.  An opening could be placed at the back instead of the front.

Hems. The simplest and quickest is just to turn up  a straight hem at the bottom and machine along it.  The example from Miss P's blog has a hem curving up at the sides ( you can use a plate to draw this for your pattern, this is what I used for the blue tee).  You can follow the current fashion for hems lower at the back than the front, have an asymmetrical hem (sketch 3) scalloped...and so on!  For my dress I left a small slit at the side seams to allow for more walking ease.

Embellishment.  Here you can go to town if you want something truly unique- lace, ribbon, sequins,ruffles, pockets, pleats, pintucks, buttons, beads, fringing-- the opportunities are endless.  To my dress I added an old lace collar (detachable) and a slim belt to give a 1940's tea dress feeling.  See how it changes the effect.


Why not join in our sewalong and create your own unique version?  See the details here http://www.meetup.com/dressmakers/events/196657002/

Thursday, 26 June 2014

How to ... turn a weekend project into a week's project

Saturday, the weather forecast mentions heavy and thundery rain, hail and frequent lightning. My plans were cancelled, not due to the weather, so I had all possibilities at my fingertips, as long as it didn't include wandering outside. My eyes looked at my famous Ikea bag with fabric, went over to my desk with my sewing machine and my brain remembered the sew-along "A simple item from stash fabric" which was about to start. Still lying in my bed, my weaker self started to nag about closing the eyes and get more rest, but my fingers were already infected with the sewing bug and it finally got hold of the rest of my body, wanting to finish the skirt over the weekend.

I found a white polycotton with red polka dots which I wanted to use as the skirt part of a dress. Since I don't yet have a dress pattern, I work with body blocks rather than with commercial patterns, that fabric had to wait ... or not. I could just turn it into a circle skirt and wear it on a lovely summer day. I decided for the latter and, instead of inserting a zipper or using elastic band, I decided to use some of my buttons. It also helped that I found a similar fabric here.

The fabric itself is rather see-through, so I decided for an underlined skirt and used some of the white polycotton I bought a while ago. I used the half circle skirt pattern which Barbara helped me to make, and cut the pieces. For the back piece, I just traced the pattern onto my fabric. For the front pieces though, I folded the pattern in half, traced it and added some extra fabric for the buttons and button holes, respectively. The width of that extra fabric is the width of the buttons I used, in this case 2 cm. (More explanations on how to add a button front closure can be found here - although that tutorial is for a dress.)

My folded blue half circle skirt pattern on the fabric I want to use, the buttons are next to it. 


I then sewed together my red polka dot fabric with my white underlining, wrong sides up, just a straight line along the edge where the buttons and buttonholes will be, zigzagged it and then trimmed it. Ironing is essential, so I ironed it, flipped it over and sewed another straight line, just for effect than for anything else, two cm (my button width) from the edge. If you want to, you could add another layer of fabric or underlining for the part where the button holes will be. But since my skirt is already underlined, I decided against it.

The front layer


It turned one pm, and the weather forecast was slightly wrong. It rained a few hours, no sign of hail or thunder and then the sun was visible. Quickly sewing the back piece to the two front pieces, and all which was left were buttons, buttonholes and hems. But first it was time for socialising!

Sunday morning, and this is how you turn a weekend project into a week's project: I realised that my back piece is wrong side up, so I had to rip the side seams apart and start again. Important note to myself: You must never rush things! I spend most of Sunday evening to undo the wrong I did to my skirt. And I did the hems.

After I found my motivation the week after, and a very useful hint to start with the button holes from my fellow seamstresses at a monthly meeting, I did the button holes. And forgot to take a picture. But basically, I marked where the top and bottom button hole would be. I then put a mark on exactly half the way down and made this the centre of another button hole. I repeated that until I had no more space on my fabric and marked 9 button holes. After sewing all of them and ripping them open, I marked the middle of each button hole on the other skirt front to know where my buttons should be.

Et voila:


Wednesday, 18 June 2014

Four kinds of finishing seams

This is an interesting blog posts about different kinds of finishing seams.  Four of them to be precise.  There are another few mentioned in the comments.

Do check it out: I want to be a turtle -Notionally Speaking: Finishing 

I don't agree that bias binding is a quick method, but maybe you get quicker with practice?  Love an overlocked or a French seam.  But then again the Hong Kong (bias strip) seams do look very nice!  Just make sure to use tape from a really thin fabric.  I wonder if organza would work?  Might be too slippery to work with though.

What's your favourite kind of seam finishing?