Subtitle

. . . . . . A place to contribute, exchange tips and ideas and find further info on the LDC group on Meetup.

Showing posts with label blog. Show all posts

Sunday, 22 March 2020

I came across this great blog post on fitting

This is a great blog post on fitting:


https://www.thesewingdirectory.co.uk/accurate-fitting/
Written by Lorna Knight the author of 'Complete Dressmaking Skills' and 'Dressmaking to Flatter your Shape'.

The article is a very good no-nonsense description of how to pick the size to cut out, test sew a garment (i.e. as a toile, also called a muslin) and to pin the areas that need adjusting. What I like a lot is that it sets out all the general steps that help with fitting, and covers all the main issues.

I particularly liked her suggestion that you can iron interfacing to the back of your pattern tissues once you're happy with the fit you achieved.

This article gives good basic advice but it is not a guide on advanced fitting so if you run into specific fitting issues that you can't solve yourself then you need to look at one of the many fitting advice  books that are out there.

Useful advise on the more advanced fitting solutions are to "follow the draglines". When an ill-fitting garment pulls, these drag lines will often point to the area of concern. Say you have sewn a test top and these diagonal dragging folds point towards the bust area: chances are that you need a full bust adjustment.

If you cannot pin an area tigher on a test garment because you need more space rather then less, then you can undo a seam to see if more fabric in this area solves the issue. Some guides advise to slash the fabric itself open, but you do need to carry on the slash to the edge of a garment - fabric is a flat, two-dimensional material that needs darts and seams to shape it into a threedimensional construct. You can't creat a sticking out bump in the middle of a flat piece of fabric. There needs to be a seam or dart somewhere.

The other great fitting tip I came across:  if for example the seat of trousers looks a bit tight but you can't quite pin-point just what kind of change you need to make to your pattern - have a look for 'grab'. Where does the fabric (or tissue if you are tissue fitting), "grab" your figure? Is it across more than in an up and down direction? Is it both?

Again there might be some draglines, really tiny ones, that point the right way but if a garment is only a little bit too tight then you may not be able to see them. But looking for 'grab' instead is a great way of figuring out where the pattern piece needs to be bigger.

If you need a swayback adjustment on a dress or tunic that has no waist seam (you can pinch out the extra material at a waist seam): you may be able to raise the inside shoulder point. This is the corner of your pattern where the shoulder seam ends at the neckline.  Mark off the amount that needs pinching out vertically down from the shoulder seam (or a bit less) and then redraw the slope of the shoulder seam. You will then to lower the entire back neckline to the new lower level. There are blog posts about this out there (that's where I've got this tip from. Apologies, I can't remember right now where I saw it).

A rounded upper back can present some fitting issues because the shape of the area makes different kinds of adjustments necessary. For some you may need to increase the darts at the shoulder seam, but for others you need to slash the back bodice piece horizontally, from about mid shoulder slope across to the centre seam or fold. You then raise the pattern piece above the slash. This is the adjustment I need and I had no idea for a very long time. It seems counter-intuitive.

You may also need to rotate the shoulder seam forward when you have a rounded upper back. This makes much more sense: if your posture isn't totally upright but instead you carry your shoulders turned forward a little, then you are going to need more material in the back piece and a little less in the front at either side from the shoulder seam.  This adjustment is really easy: tape the back and front pattern piece together at the shoulder seam, draw in your new shoulder seam (keep the inside corner where it is and only change the angle of the seam), and cut apart. Done.

Whatever your fitting issue is (once you know which it is), it is very useful to search online - there may be youtube videos and/or blog posts about that very issue. Chances are that you'll find the answer. If not, come along to one of our LDC meetings and ask us! We may have the answer or be able to point you in the right direction.

This is a great blog post about fixing a gaping back neckline with the help of darts:
https://inhousepatterns.com/blogs/news/6229370-back-contour-shaping

Check out the book "Fit for Real people", it can be very helpful.

I will look for some more guides on fitting and blog about them as and when. Happy sewing!

Lorna Knight who is the author of Complete Dressmaking Skills - See more at: http://www.thesewingdirectory.co.uk/accurate-fitting/#sthash.IYAbWy1e.dpuf

Sunday, 3 February 2019

Sewing inspiration - Sewing for a Capsule Wardrobe

We were going to post more links to sources of sewing inspiration, as mentioned in the previous blog post. This post suddenly focussed on capsule wardrobes. I like going with the flow, so here goes!


Samantha recommended a Facebook group: Capsule Wardrobe Sew Along. You have to join before you can see posts by members:

"I never manage to follow a blog but I do Facebook. One of the groups on there 'Capsule Wardrobe Sew Along' I really recommend - loads of inspirational people planning simple capsule wardrobes entirely self sewn.  A strict no nastiness policy lends to a really supportive and positive group and people's work ranges from amazing to nearly as basic as me.
I like the idea of working on key pieces per season that you can mix and match, updated a few pieces per season. For an erratic and not very confident sewer like me it seems almost attainable!
People post all kinds of problems or fit issues and loads of lovely people offer great advice and suggestions. People also ask for recommendations and opinions on patterns and fabrics and there is loads of inspiration.
So good to see the work of other home sewers not quite up to the professional standard of a blogger but enjoying their sewing like me."

Here's a Google search result that takes you straight there: Capsule Wardrobe Sew Along on FB.

~ ~ ~

This is the page that the above group links to:


Here are some interesting thoughts on how to sew a capsule wardrobe:
Link to freenotion.com/blog

The most recent blog post on this blog is from 2017 but the ideas are still great. Pick and chose what makes sense to you.

~ ~ ~

Sewing with Sarah also has a fantastic post on capsule sewing. There are lots of photos (love a blog post with lots of photos!) so this is very visually inspiring.

Sarah came to sew for a capsule wardrobe after she noticed having many fabrics in colours that went well together. If that's not a good reason, I don't know what is!

~ ~ ~

In conclusion:

When I think about sewing for a capsule wardrobe, I don't think of sewing all the various items. I look at what clothes I have in order to decide what the gaps are. Do I have enough work skirts, could I do with a mid length cardigan (because my most beloved one has gone to cardie heaven! Sneeef...), or could something like a waistcoat in a fantastic print pull outfits together...?

I very much want to focus on just one item at a time, trying to do lots just piles on way too much pressure, and that in turn makes me stop sewing altogether. An outcome strictly to be avoided! So I focus on one thing (though I admit that I don't finish that one item before another project catches my attention. Bad habit that. But I'm sewing!).

What is your experience with a capsule wardrobe?  Any insights, thoughts and comments - what are your recommendations?  Please leave Samantha and me comments, we appreciate it very much.

Sunday, 6 January 2019

Sources of sewing inspiration

At our monthly London Dressmakers Club meetings we often mention sewing blogs or other sources of sewing inspiration that we like. We all like different ones and haven't all come across the same ones, so it would be lovely to spread the joy and list one source each that other members (and non-members) may enjoy too.

I hope we will do more posts like this one. Let us know in the comments if you read any of the listed blogs - or even better: tell us if you want to write up your favourite in a future sewing blog post (yes please!). We would like lots of people to contribute to this members blog. It is all about the more the merrier!  Please share - one paragraph and the link is all that's needed.

Here goes:

I am being greedy and giving more than my fair share of reccomendations, and I could do many more, but here are 3 of them - Barbara.


i) MOOD SEWCIETY
 It is the blog for the legendary Mood Fabric store in the USA.  They have the most amazing free patterns to download (for women mainly, but also for men and children)  but I am not really sure how to subscribe to this from their site.  I used to have to keep checking for new blogs every so often but I have accidentally managed to subscribe to it today via Bloglovin.
The link should be here.


ii) STITCH SISTERS
This is a vlog rather than a blog.  The lovely Nikki and Rachel run a sewing school in Sodbury, near Bristol, and even though you might not get to their school you can still get loads of advice, reviews, fabric hauls and inspiration from their vlog. They are just as friendly and chatty in the flesh as on the screen- they do come to London sometimes and I have been able to admire the creations they have been wearing IRL.  They sew the sort of garments I would make for myself - if I had a bit more flair and colour sense.
The link should be here


iii) STITCHER'S BREW
And this one is a podcast.  An hour or more each Friday of bubbly chat from Gabby (Gabberdashery) and Megan (Pigeon Wishes) and their guests of the week who are people whose blogs you may well read or whose independent businesses you buy from or otherwise involved in the sewing world.  It is like eavesdropping on a stitcher's tea party and just the thing to listen to while seated at your sewing machine- preferably with a mug of tea and a bit of cake to hand- and hear the behind the scenes stories.
The link should be here


Here is my contribution - Giselle:


I always enjoy reading the Allison C Sewing Gallery blog
She uses quite a few Burda patterns and her garments are often very interesting but entirely wearable. There is one from the July edition of Burda Style that she refers to as #113 Knot Dress. It has a very intriguing round "cut-out" that gets gathered up with a bow.  I am fascinated by pattern details like that!
She makes all kinds of garments: dresses, blouses, coats, trousers, you name it.  I am very jealous about the fit she achieves!


Catherine's Patterns
I also enjoy reading about all kinds of patterns and garments that Catherine sees at exhibitions, and the many fantastic photos she posts. She writes about some of the many vintage patterns she owns. What I love the most is the amount of details of some patterns: sometimes it is the cut of a garment but it can also be a design element like a collar or vent or a neckline, or some intriguing gathering... there is such a lot of interest there. I am very glad that Catherine writes her blog! She is also one of our members.

I guess you can see a bit of theme here!  There are quite a few more that I love reading, I'll save them for the next post like this!


We want to post more like this one. Part II is to follow soon!

Saturday, 3 March 2018

Please contribute: tips for sewing a simple skirt

Shall we do a collaborative blog post?  All about tips for sewing beginners about sewing a skirt.

At our monthly meetings we often get the question from sewing beginners: "I would like to sew but I never have before and I don't know where to start".  We have lots of advice and tips so how about collecting it all in one place?  Like right here!

We often recommend that a beginner sew a simple skirt first. There isn't quite as much going in terms of different elements that a dress or trousers would demand (getting sleeves to fit into the armhole, or doing a front zip on trousers).

First tip: when you want to use a stretch fabric and you have never sewn before then pick a firm jersey fabric that is a bit thicker than the cheaper jerseys that are very saggy and extremely difficult to sew with. Sewing with thin jersey fabric is something that I still can't do. Avoid it if you want to retain your sanity. Honestly.

Woven fabrics are much easier to sew with (as far as I'm concerned), but because they don't stretch they need to be fitted to your shape to look good.

There are different skirt styles with different degrees of difficulty. A gathered skirt made from two rectangular pieces is the easiest, - circular skirts and skirts made from flared panels are also relatively simple.

The more pieces your pattern has the more sewing you'll do, but you also get more opportunity to fit the garment to your shape because you have more seamlines you can adjust.

Sewing in a zip isn't as difficult as I feared when I was a beginner but you may want to go with a button closure on a first project. See how you feel.

A commercial pattern is useful because it has instructions: not just how to sew but there is also the layout of the pieces for cutting out, and it tells you which piece to interline. There is also really useful guidance on seam allowances and how to do the different ways of stitching (like top or edge stitching, under stitching, stay stitching, or how to stitch for gathering - all kinds of information).

The sewing pattern size is not the same as your dress size in shops. Measure your waist and hips and compare to the measurement table on your pattern. Most pattern envelopes have multiple sizes in them, often split by the smaller and the bigger sizes.

Above all pick a skirt shape that you are excited about! I often make the mistake of falling in love with the pretty fabric they used and forget to check the line drawing to see if I actually like the style. Which is kind of important.

Now I've gone on much longer than I meant to. I haven't even said much about sewing itself (the things we discover as we go along) - I hope that other Dressmakers Club members want to give tips and advice in the comments!

Friday, 17 April 2015

Member of the Month April 2015 Jennifer Taillefer


Hello everyone!  I am really loving being part of this group so far, as none of my friends are really into sewing, and while they are very kind about listening to me talk about projects, I can tell they don’t have a clue what I am banging on about!   So it is lovely to read the posts here, and to have met some of you at an outing.

I have been sewing since I was five years old, when my mother bought me my first little hand crack machine and showed me how to make outfits for my dolls.  I love to upcycle items, play with different ways of putting patterns together (is it called pattern hacking these days?), and to clash fabrics and colours.  I am very inspired by the fashions of the 1920’s to the 1960’s.  I have a particular love of very finely finished garments, and I am always trying out new seam finishes, and ways of making the inside of my pieces as beautiful as the outside.  If you want to know more about me my new website is at www.jennstitches.comI also really enjoy taking old garments and remaking them into new ones, especially as I hate to see fabric wasted.   Therefore Make Do and Mend is right up my street, and that combined with my love of vintage fashion made me eager to see the exhibition I am writing about today.

Fashion on the Ration: 1940’s Street Style is currently on at the Imperial War Museum.  As a lover of all things from the first half of the 20th century, I was eager to see it, and hopefully get some inspiration for my own sewing.

During the Second World War, women showed great ingenuity in clothing their families despite the rations that were placed first on ready-made clothing, and then on dressmaking fabrics.  By re-using and adapting clothes that were already in their possession they created new garments, and I would say a very personal sense of style.  I was really taken with how unique the women looked in the photographs in the exhibition, much more so than in group photos from earlier decades.

There are a number of homemade garments on display in the exhibition as well as a series of uniforms for various branches of the services, although the actual garments are outnumbered by photos of what was worn.  There is however, an excellent section on Utility clothing. 

The Utility scheme was introduced in 1942 as an attempt to create more equality in the clothing available to those in different financial strata.  When rationing was first introduced an article of clothing required the same number of coupons regardless of the quality.  Therefore someone who could afford a high-quality, robust garment would have it last much longer, thereby freeing up future coupon allocations for other wardrobe pieces.   Those who had to purchase much cheaper versions would find themselves needing to replace the garment a great deal sooner.  By introducing the Utility scheme the government was trying to standardise the quality of clothing, and at the same time save even more fabric for the war effort by limiting the amount that could be used for any particular kind of garment.

The range of clothing on display in this part of the exhibition is a testament to how much you can do design-wise with very little material!

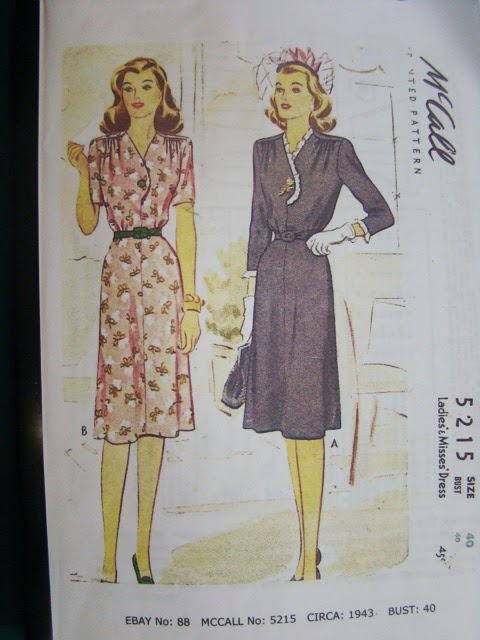
Seeing the exhibition inspired me to have a go at a vintage pattern I had bought last year.  This is a reproduction of a 1943 McCall’s dress pattern, and it uses surprisingly little fabric for the amount of style detail that is in it.


As you will see from the images, it is a lovely curved neckline, which is finished with a rather scanty facing - but why waste material on the inside!  I will say that the neckline was the hardest part of the dress, and I did have to baste it into place twice before I got it to sit nicely.  This is because the shoulder seam is sitting to the front of the shoulder and has a curve in it as well.  There are several large dots close together on the pattern at the shoulder, and it took some time to work out which ones were supposed to match up!  I did burst out laughing at my first attempt and I wish now I had taken a picture of it on the mannequin!


The fastening on this dress is a placket fastening.  Some of you might remember seeing the contestants on GBSB Series Two grappling with this on the vintage blouse they made.  Essentially the way it works is that the seam allowance on each side of the opening is faced with a small rectangle of fabric, one folding inside the garment and one extending past the edge.  These then overlap and have hooks and eyes or poppers attached to close the gap when the dress is done up.


The bright red button and the buckle on the belt were both vintage items I found at my great aunt’s home.  She was a seamstress as well, and I love adding little bits and pieces I found in her stash to my own garments.


The exhibition at the IWM is on until the 31st of August and is well worth a visit.  I particularly liked the recordings of real people sharing their experiences of Fashion on the Ration!  If you do go and get inspired to try a vintage make, then do post a picture of it so we can all admire.
 P.S. from Barbara- Do check out Jennifer's web site and all the fantastic things she has made in the photograph Gallery there.

Monday, 23 March 2015

Member of the month

Hi,

My name is Emma Smith, and I confess I'm a fabric hoarder and compulsive sewer!

This is me wearing the Wear anywhere dress by So Sew Easy


My journey started as a child - my mum used to make me and my sister dresses and I had a bag of scraps which I used to hand sew clothes for my Sindy dolls. I progressed to mini hand sewn patchwork using hexagonal blocks and eventually moved on to clothes.
I took needlework o-level (my only "A" grade!), a B-tech in fashion and textiles, finishing with a fashion and textiles degree.
For 8 years after I graduated I worked for various UK manufacturers, designing mainly childrens wear. A job I loved, but the UK retailers priced the UK manufacturers out of the market by using cheap offshore producers and after 3 redundancies I made the decision to change direction I to a more sensible industry.

So that's my potted history.
After I moved into my role in  IT services I continued to sew for pleasure and was lucky to live in a flat where I could have a dedicated sewing room. But once I met and moved in with my husband I no longer had that luxury and in the flush of a new relationship my sewing waned.

I decided that in order to meet people in my new home and to give myself a creative outlet I'd try painting, and spent quite a few years expressing my creativity via watercolour and acrylic painting classes - it was a great outlet away from work and a rear stress buster.

It was the need to shorten a curtain that got me back to sewing. I got my machine out and couldn't remember how to use it! I was devastated as sewing had been a big part of my life and what had shaped my early years and career. Well that spurred me on, I not only got the machine under control but determined to change my creativity from painting back to sewing.
That was three years ago and pretty much tied in with series 1 of the GBSB, and since then there is no stopping me!

So on to what you really want to see - the photos!

I make dresses...

This one is the Sew Over It Tea Dress


 This is the Bella dress that came free with Love Sewing magazine
                                                              

And this one from Salme - their buttonless shirt dress


I also make accessories:

this was a self drafted knitting needle case as a gift for a friends birthday
 another self drafted bag for my niece
             

And a cushion for other friends who had their 40th just a few days apart

And things for my nieces and nephew:


I have so many patterns i could never hope to make them all and similarly so much fabric that I don't know what to do with it all. Neither of which stops me adding more to my stash at every opportunity

Hope you enjoyed my story! There's lots to come still as I work my way through my stashes.

Monday, 16 February 2015

Member of the Month - February 2015


http://photos2.meetupstatic.com/photos/member/c/5/9/6/highres_242750582.jpeg


Our February Member of the Month is Camilla who has recently started on the dressmaking road.

My interest in sewing began when I was small.  My Nan was a dressmaker and used to make me all sorts of things customised to the dreams and whims of a very girly little girl (The Sound of Music, Barbie, Jem (pictured below) and The Bangles were big sources of inspiration). 


I grew up on the Essex coast and have moved in and around the London area over the last 15 years or so, and moved to Raynes Park a couple of months ago.  Having moved on from wanting to be a rock star, I now work full time in London organising global events for a training company (almost as cool).  I’ve still retained my childhood dream of designing and making my own clothes so now I’m actually channeling my energy into making it happen, one garment at a time!
 I’m at beginner’s stage of dressmaking, having started at school with patchwork and appliqué cushions and then moving on to a long, brown, paneled skirt with matching buttons all the way down the front.  I made a pair of grey-green, trousers several years ago, with a lot of help from my Mum!!  They were wide-leg style with a side zip (sorry Barbara! - From Barbara - Chacun a son gout, as Prince Orlofsy sings though not in reference to sewing.  I hate side zips in trousers but that's just my preference.) and were great because I just couldn’t find any trousers to fit me on in shops on the High Street.  I managed to lose them in a house move so alas no photo!

My favourite (and most recent) make is a grey skirt I made last year.


It’s actually the most challenging project I’ve completed, particularly working out how to fit a lining inside which felt like a cognitive puzzle :0)  The fabric was a light-medium weight crepe I purchased in John Lewis about 18 months ago and one good thing is that is doesn’t crease.  Whilst I like the finished skirt, I incorrectly adjusted the length of the skirt and it now sits too low – on my hips rather than my waist.  Giselle has talked me into having a go at making another one, so I can learn from my mistakes – an excellent idea which I’m going to buy some fabric for at our Goldhawk Road meet up in February :0) 
Having very recently joined this group, I felt very welcome and also really enjoyed listening to what other members had to say about their experiences and current projects.  It made me feel less alone with my sewing struggles which was just what I needed!  I’m really excited to see how everyone is getting on at our next meet up :0)
My top purchase last year was the double tracing wheel by Clover


This was recommended in a YouTube clip – Craftovision - https://www.youtube.com/watch?v=APN3LCvehVU   This girl is a quirky American sewer and I found her videos very helpful as my experience, skills and tools were limited!  The double tracing wheel means you can trace your seam allowance line at the same time as marking the pattern onto fabric (over carbon, coloured paper).  Saved me a lot of time!


The next item I'm hoping to make is a shift dress in a cotton blend fabric.  It's a basic shape with a V-neck and either short or no sleeves (I've not decided yet).  My sewing space is the dining room table in my flatshare.  It's medium sized and luckily my housemate doesn't use it much so I can use it fairly regularly :0)