Hi everyone!
I haven't posted on here yet, and I have been invited by Giselle to contribute every now and then. For those of you who don't know me, I have been sewing for about 20 years of which the last 10 were the most productive. I tend to stay away from creating fitting clothes but love making costumes and anything practical.
By popular demand I have finally posted the Scissor Sock tutorial :) It has taken a bit longer than planned, but in the end I think it came out quite well. I've never made a sewing tutorial before, only a cooking one (trust me, those are so much easier!).
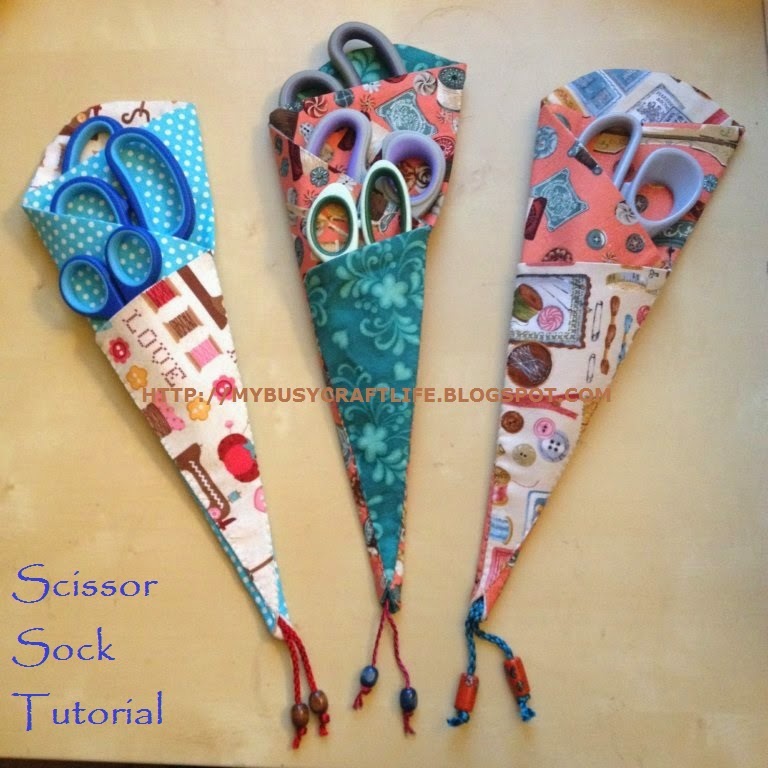
Some of you have been given one of these as I just love them and think everyone should have at least one. As you can see, I made three of them for myself and that is when I realised how great these are. I always lose my scissors so this is perfect for me!
This is a great project for stashbusting or gift giving, especially with the holidays creeping up on us slowly. Please click on the picture for the tutorial, you will be redirected. I tried making it as easy as possible by photographing every step, so please let me know if I've missed something!
It probably goes without saying, but as this is not my pattern please don't use this for commercial purposes.
I hope you like it and will be curious to see which ones you make!
UPDATE: Win a Scissor Sock, I'm hosting a giveaway! Enter HERE.
MJ
Subtitle
. . . . . . A place to contribute, exchange tips and ideas and find further info on the LDC group on Meetup.
Tuesday, 29 July 2014
Wednesday, 23 July 2014
Create your own Kimono Tee or Dress
Here’s how to make a tee to your own measurements and your
own design (courtesy of Miss P.) Blogger Miss P. has developed and refined a kimono tee that you can draft to your own measurements. Her clear instructions on how to do this are at http://portialawrie.blogspot.co.uk/2014/05/draft-simple-kimono-tee-old-project.html. What bliss!- a garment with only one pattern piece. You can see from the photographs of her finished result that the tee can look both elegant and casual, could be worn to the office, slung over a bikini for the beach or dressed up with accessories for the evening.
It is also a wonderful blank canvas so you can create your own unique garment. This was the pattern I turned to when I wanted something quick and easy for summer wear. The top does not take much fabric, I had a metre of cotton poplin and used 70 cm of 150 cm wide for the main body and then cut into the remainder for bias binding and the belt backing plus oddments for the cuffs and outer side of the belt. My bust measurement is 84 cm and thus I could place both front and back of the pattern on the same width of fabric. If you have narrower fabric or more generous curves then you'll need a longer length but you will be able to figure out your fabric requirements once you have drafted the pattern to the size and length you want.
Here is my first effort. The only addition I made to the pattern was to extend the sleeves and to add a simple belt fastened with a button to ring the changes
This is also an ideal pattern to use up leftover fabric from other projects. As to the type of fabric to use, something with some drape, not too thick is best. You definitely need some softness in the sleeve area but you could get away with a thicker central panel. Personally I would not want to use anything stiffer than the cotton poplin that I used. There are no darts so the shape relies on how the fabric hangs on your body.
I've sketched some ideas (sorry, I'm no artist).
1.Parti-coloured tee. Simply adapt your pattern by adding a seam allowance to the centre back and centre front as you will need to sew the right and left sides of the front and back together before proceeding to sew the front to the back.
2. Tee with a panel. Got a bit of fabric that you really want to use but there is not much of it? Then this is the answer. Depending upon how much fabric you have , you can have a panel both font and back, just a panel on one side or different fabric panels on each side.. Remember to cut your pattern where you want the panel to be and add a seam allowance to both sides of the cut.
3.Your addition of a different fabric doesn't have to be straight down or across. Try going asymmetrical, a chevron or undulating wave ( this latter is trickier and probably best done as an applique).
4. Trim the neckline, hem and sleeves with a different fabric. You can make your own bias binding for the neckline, see Miss P's technique here. That's how I cut my binding to trim the neckline of my tee.
Alternatively you can cut facings for your hem, neckline and sleeves in your alternative colour fabric. Stitch them to the relevant edges with the right side of the facing against the wrong side of the fabric of the body. Trim the seam and, if necessary, clip around curves. Do not press seam open but press toward the tee body. Then flip the facings over to the right side of the garment, press the neckline (or hem or sleeve) edge on to the right side of the garment. Press or pin a hem of about 1 cm on to the wrong side of the facing around the outer edge of the facing and then pin or tack the facing to the tee preparatory to topstitching around the outer edge of the facing to secure it. The advantage of this is that you have no raw edge to hem.
5. If you have quite a bit of fabric you can make a dress of any length, short, knee length or maxi. I made a dress for my second effort, just adding the extra length to the pattern that I had created and leaving the cuffs off (see photo below). If you wish you can gather it in at the waist or under the bust, as in sketch 5, by running some elastic through a casing sewn around the inside of the dress at the relevant point.
Necklines. As Miss P. says, you can cut the neckline into a lower curve. You don't have to make the neckline the same at the back as the front, just adjust the pattern according to your desire. Remember though that you need to make it wide enough to get your head through. If you want it to be closer to the neck then you will need to make an opening, such as the keyhole neckline in my sketch no. 4 which is closed with a button and loop. An opening could be placed at the back instead of the front.
Hems. The simplest and quickest is just to turn up a straight hem at the bottom and machine along it. The example from Miss P's blog has a hem curving up at the sides ( you can use a plate to draw this for your pattern, this is what I used for the blue tee). You can follow the current fashion for hems lower at the back than the front, have an asymmetrical hem (sketch 3) scalloped...and so on! For my dress I left a small slit at the side seams to allow for more walking ease.
Embellishment. Here you can go to town if you want something truly unique- lace, ribbon, sequins,ruffles, pockets, pleats, pintucks, buttons, beads, fringing-- the opportunities are endless. To my dress I added an old lace collar (detachable) and a slim belt to give a 1940's tea dress feeling. See how it changes the effect.
Why not join in our sewalong and create your own unique version? See the details here http://www.meetup.com/dressmakers/events/196657002/
Thursday, 26 June 2014
How to ... turn a weekend project into a week's project
Saturday, the weather forecast mentions heavy and thundery rain, hail and frequent lightning. My plans were cancelled, not due to the weather, so I had all possibilities at my fingertips, as long as it didn't include wandering outside. My eyes looked at my famous Ikea bag with fabric, went over to my desk with my sewing machine and my brain remembered the sew-along "A simple item from stash fabric" which was about to start. Still lying in my bed, my weaker self started to nag about closing the eyes and get more rest, but my fingers were already infected with the sewing bug and it finally got hold of the rest of my body, wanting to finish the skirt over the weekend.
I found a white polycotton with red polka dots which I wanted to use as the skirt part of a dress. Since I don't yet have a dress pattern, I work with body blocks rather than with commercial patterns, that fabric had to wait ... or not. I could just turn it into a circle skirt and wear it on a lovely summer day. I decided for the latter and, instead of inserting a zipper or using elastic band, I decided to use some of my buttons. It also helped that I found a similar fabric here.
The fabric itself is rather see-through, so I decided for an underlined skirt and used some of the white polycotton I bought a while ago. I used the half circle skirt pattern which Barbara helped me to make, and cut the pieces. For the back piece, I just traced the pattern onto my fabric. For the front pieces though, I folded the pattern in half, traced it and added some extra fabric for the buttons and button holes, respectively. The width of that extra fabric is the width of the buttons I used, in this case 2 cm. (More explanations on how to add a button front closure can be found here - although that tutorial is for a dress.)
I then sewed together my red polka dot fabric with my white underlining, wrong sides up, just a straight line along the edge where the buttons and buttonholes will be, zigzagged it and then trimmed it. Ironing is essential, so I ironed it, flipped it over and sewed another straight line, just for effect than for anything else, two cm (my button width) from the edge. If you want to, you could add another layer of fabric or underlining for the part where the button holes will be. But since my skirt is already underlined, I decided against it.
It turned one pm, and the weather forecast was slightly wrong. It rained a few hours, no sign of hail or thunder and then the sun was visible. Quickly sewing the back piece to the two front pieces, and all which was left were buttons, buttonholes and hems. But first it was time for socialising!
Sunday morning, and this is how you turn a weekend project into a week's project: I realised that my back piece is wrong side up, so I had to rip the side seams apart and start again. Important note to myself: You must never rush things! I spend most of Sunday evening to undo the wrong I did to my skirt. And I did the hems.
After I found my motivation the week after, and a very useful hint to start with the button holes from my fellow seamstresses at a monthly meeting, I did the button holes. And forgot to take a picture. But basically, I marked where the top and bottom button hole would be. I then put a mark on exactly half the way down and made this the centre of another button hole. I repeated that until I had no more space on my fabric and marked 9 button holes. After sewing all of them and ripping them open, I marked the middle of each button hole on the other skirt front to know where my buttons should be.
Et voila:
I found a white polycotton with red polka dots which I wanted to use as the skirt part of a dress. Since I don't yet have a dress pattern, I work with body blocks rather than with commercial patterns, that fabric had to wait ... or not. I could just turn it into a circle skirt and wear it on a lovely summer day. I decided for the latter and, instead of inserting a zipper or using elastic band, I decided to use some of my buttons. It also helped that I found a similar fabric here.
The fabric itself is rather see-through, so I decided for an underlined skirt and used some of the white polycotton I bought a while ago. I used the half circle skirt pattern which Barbara helped me to make, and cut the pieces. For the back piece, I just traced the pattern onto my fabric. For the front pieces though, I folded the pattern in half, traced it and added some extra fabric for the buttons and button holes, respectively. The width of that extra fabric is the width of the buttons I used, in this case 2 cm. (More explanations on how to add a button front closure can be found here - although that tutorial is for a dress.)
![]() |
| My folded blue half circle skirt pattern on the fabric I want to use, the buttons are next to it. |
I then sewed together my red polka dot fabric with my white underlining, wrong sides up, just a straight line along the edge where the buttons and buttonholes will be, zigzagged it and then trimmed it. Ironing is essential, so I ironed it, flipped it over and sewed another straight line, just for effect than for anything else, two cm (my button width) from the edge. If you want to, you could add another layer of fabric or underlining for the part where the button holes will be. But since my skirt is already underlined, I decided against it.
![]() |
| The front layer |
It turned one pm, and the weather forecast was slightly wrong. It rained a few hours, no sign of hail or thunder and then the sun was visible. Quickly sewing the back piece to the two front pieces, and all which was left were buttons, buttonholes and hems. But first it was time for socialising!
Sunday morning, and this is how you turn a weekend project into a week's project: I realised that my back piece is wrong side up, so I had to rip the side seams apart and start again. Important note to myself: You must never rush things! I spend most of Sunday evening to undo the wrong I did to my skirt. And I did the hems.
After I found my motivation the week after, and a very useful hint to start with the button holes from my fellow seamstresses at a monthly meeting, I did the button holes. And forgot to take a picture. But basically, I marked where the top and bottom button hole would be. I then put a mark on exactly half the way down and made this the centre of another button hole. I repeated that until I had no more space on my fabric and marked 9 button holes. After sewing all of them and ripping them open, I marked the middle of each button hole on the other skirt front to know where my buttons should be.
Et voila:
Labels:
accuracy,
cutting out,
how to,
intermediate,
lining,
pattern,
skirt,
stash,
tips and tricks
Wednesday, 18 June 2014
Four kinds of finishing seams
This is an interesting blog posts about different kinds of finishing seams. Four of them to be precise. There are another few mentioned in the comments.
Do check it out: I want to be a turtle -Notionally Speaking: Finishing
I don't agree that bias binding is a quick method, but maybe you get quicker with practice? Love an overlocked or a French seam. But then again the Hong Kong (bias strip) seams do look very nice! Just make sure to use tape from a really thin fabric. I wonder if organza would work? Might be too slippery to work with though.
What's your favourite kind of seam finishing?
Do check it out: I want to be a turtle -Notionally Speaking: Finishing
I don't agree that bias binding is a quick method, but maybe you get quicker with practice? Love an overlocked or a French seam. But then again the Hong Kong (bias strip) seams do look very nice! Just make sure to use tape from a really thin fabric. I wonder if organza would work? Might be too slippery to work with though.
What's your favourite kind of seam finishing?
Labels:
advice,
help,
how to,
intermediate,
link,
online,
sewing,
sewing tips,
technique
Sunday, 15 June 2014
Can I make a Dress in a Day? Part 2. Fusible interlining, amongst other things.
So to continue, there I was with my fabric, pre-washed, spread upon the table. Looking down at it I had one of those moments and thought "This fabric is not right for this dress because the bold pattern needs a more voluminous style to show it to better advantage".
Thus Hurdle Number 1. Do I have another fabric in my stash that will be suitable and has enough yardage? The answer, after a good rummage, was "Yes".
But Hurdle Number 2 . It had not been washed. I have learned always to launder fabric in the manner in which the made-up garment will be washed before cutting out and sewing it up. It prevents nasty horrors, such as finding the fabric shrinks or bleeds. Into the washing machine the fabric goes and 3 hours later, (no tumble drier so I have to wait for it to dry on the line), I have it washed, dried and pressed fabric on the table.
Just to show those 3 hours were not wasted I used them to finish this dress pictured below, made in a jersey fabric with a silvery thread through the material that gives it a slight sparkle as it catches the light. Unfortunately the silver thread is so subtle that you cannot see it in the photograph, it needs body movement or shifting light to make it catch the light and glisten. I finished it with silver ball buttons, taken from an old dress, at the throat and at the cuffs of the straight sleeves. The pattern is an old one that I picked up for a few p earlier this year.
It is intended to be a dress that I can take on trips away as it doesn't crease or show marks. However much I may long to wear shimmering pale silk with voluminous ruffles in the evening, in the end I need to have something that fits with my lifestyle and budget (i.e. budget airlines with cabin baggage only and washing and drying in hotel bedrooms) The fabric came from Brighton Fabricland and the dress cost under £8 altogether..
To get back to the original dress and Hurdle Number 3. The substitute fabric came from the oddments bin at "Simply Fabrics" in Brixton for £4. There was plenty of yardage to make the dress but it had been cut out to an odd shape, which I didn't realise until I came to spread it out to place the pattern on it. It took me some time to work out where the straight grain lay and it was a stretchy-stretchy knit that slithered away from me. Anyone got any tips on handling fabric like this? Also my old and fading eyesight made it difficult to determine which way the tiny but regular motif needed to be.It took an hour and a half to get it laid out, pinned and cut (not including the inevitable tea break because I got fed up bending over) Once cut out I could legitimately sit down and put in the tack marks for various features- where to gather, match seams etc.
Then I basted the side seams and did the gathering required on the front of the dress so I could try it on for fit. And, Boy!, did it fit- like the finest kidskin glove, absolutely skintight. That was fine because the stretch of the fabric meant that there was no impediment to movement but -Oh!- I shall have to hold my stomach in as the evidence of every cake that I eat during the day will be there for all to see.
So now to Hurdle Number 4 I had forgotten that the pattern called for Vilene Bias tape or stay tape to stabilise the neck and certain sections of the armholes. I had tried to buy this from a fairly local store but they did not have it and I forgot about getting it. However I now thought that probably I could use some light-weight fusible non-woven interfacing instead and that, as only a small amount was needed at each point, I could use some of the little scraps that I can not bring myself to throw away that were left over from other projects. But it did mean tracing each piece individually from the pattern to fit the required section.. Luckily, as the interfacing was fine and see-through, I could trace directly from the pattern on to the interfacing- fiddly job though.
The tracing one of the pieces is seen below.
The piece cut out, the middle line, just faintly visible on the piece of interfacing, is where the seam line will be.
Applying fusible interfacing
Now many of you will know all about this but, from questions I've had from some of our members, beginners are not always sure about how to use or handle interfacing and how to apply it. Very basically there are two types of interfacing used to reinforce or stiffen garments or, as in this case, to prevent stretch fabrics from stretching where no stretch is required. Those types are "sew-in", where the interfacing is stitched to the main fabric, and the other is fusible where heat from an iron is used to fuse the special backing to the fabric ( and, once that is done, there is no unpicking it!).
So, to apply this fusible interfacing, firstly I am going to iron the fabric to which I am going to apply it. If you fuse interfacing to wrinkled fabric it is going to stay wrinkled permanently
Next, check that you have the fusible side of the interfacing against the fabric or you will get the fabric sticking to your iron instead of the fabric. The fusible side looks a bit shiny or has small dots visible.
I've pinned the interfacing in position in the photograph below so I can lay it on the ironing board. Then I remove the pins, making sure the interfacing and fabric are flat before the iron is applied.
Check whether your interfacing should be applied with a dry iron or using a damp cloth. Often that detail is written along the "selvedge" of the interfacing. Usually you should be pressing down for a few seconds rather than using an ironing motion. Make sure this is not going to damage your fabric, scorch or melt it. After doing this check that the interfacing has bonded to the fabric by very gently try to pull them apart. If it starts to separate then apply some more heat until they are firmly together.
After applying all the interfacing pieces I confess that I gave in and abandoned the idea of trying to complete it all in one day- failure. What happened next will be in Part 3.
Thus Hurdle Number 1. Do I have another fabric in my stash that will be suitable and has enough yardage? The answer, after a good rummage, was "Yes".
But Hurdle Number 2 . It had not been washed. I have learned always to launder fabric in the manner in which the made-up garment will be washed before cutting out and sewing it up. It prevents nasty horrors, such as finding the fabric shrinks or bleeds. Into the washing machine the fabric goes and 3 hours later, (no tumble drier so I have to wait for it to dry on the line), I have it washed, dried and pressed fabric on the table.
Just to show those 3 hours were not wasted I used them to finish this dress pictured below, made in a jersey fabric with a silvery thread through the material that gives it a slight sparkle as it catches the light. Unfortunately the silver thread is so subtle that you cannot see it in the photograph, it needs body movement or shifting light to make it catch the light and glisten. I finished it with silver ball buttons, taken from an old dress, at the throat and at the cuffs of the straight sleeves. The pattern is an old one that I picked up for a few p earlier this year.
To get back to the original dress and Hurdle Number 3. The substitute fabric came from the oddments bin at "Simply Fabrics" in Brixton for £4. There was plenty of yardage to make the dress but it had been cut out to an odd shape, which I didn't realise until I came to spread it out to place the pattern on it. It took me some time to work out where the straight grain lay and it was a stretchy-stretchy knit that slithered away from me. Anyone got any tips on handling fabric like this? Also my old and fading eyesight made it difficult to determine which way the tiny but regular motif needed to be.It took an hour and a half to get it laid out, pinned and cut (not including the inevitable tea break because I got fed up bending over) Once cut out I could legitimately sit down and put in the tack marks for various features- where to gather, match seams etc.
Then I basted the side seams and did the gathering required on the front of the dress so I could try it on for fit. And, Boy!, did it fit- like the finest kidskin glove, absolutely skintight. That was fine because the stretch of the fabric meant that there was no impediment to movement but -Oh!- I shall have to hold my stomach in as the evidence of every cake that I eat during the day will be there for all to see.
So now to Hurdle Number 4 I had forgotten that the pattern called for Vilene Bias tape or stay tape to stabilise the neck and certain sections of the armholes. I had tried to buy this from a fairly local store but they did not have it and I forgot about getting it. However I now thought that probably I could use some light-weight fusible non-woven interfacing instead and that, as only a small amount was needed at each point, I could use some of the little scraps that I can not bring myself to throw away that were left over from other projects. But it did mean tracing each piece individually from the pattern to fit the required section.. Luckily, as the interfacing was fine and see-through, I could trace directly from the pattern on to the interfacing- fiddly job though.
The tracing one of the pieces is seen below.
Applying fusible interfacing
Now many of you will know all about this but, from questions I've had from some of our members, beginners are not always sure about how to use or handle interfacing and how to apply it. Very basically there are two types of interfacing used to reinforce or stiffen garments or, as in this case, to prevent stretch fabrics from stretching where no stretch is required. Those types are "sew-in", where the interfacing is stitched to the main fabric, and the other is fusible where heat from an iron is used to fuse the special backing to the fabric ( and, once that is done, there is no unpicking it!).
So, to apply this fusible interfacing, firstly I am going to iron the fabric to which I am going to apply it. If you fuse interfacing to wrinkled fabric it is going to stay wrinkled permanently
Next, check that you have the fusible side of the interfacing against the fabric or you will get the fabric sticking to your iron instead of the fabric. The fusible side looks a bit shiny or has small dots visible.
I've pinned the interfacing in position in the photograph below so I can lay it on the ironing board. Then I remove the pins, making sure the interfacing and fabric are flat before the iron is applied.
Check whether your interfacing should be applied with a dry iron or using a damp cloth. Often that detail is written along the "selvedge" of the interfacing. Usually you should be pressing down for a few seconds rather than using an ironing motion. Make sure this is not going to damage your fabric, scorch or melt it. After doing this check that the interfacing has bonded to the fabric by very gently try to pull them apart. If it starts to separate then apply some more heat until they are firmly together.
After applying all the interfacing pieces I confess that I gave in and abandoned the idea of trying to complete it all in one day- failure. What happened next will be in Part 3.
Subscribe to:
Posts (Atom)


