Subtitle

. . . . . . A place to contribute, exchange tips and ideas and find further info on the LDC group on Meetup.

Sunday, 5 February 2017

Sewing Productivity

We all want to complete more sewing projects. I often look for articles on how to sew faster, and I love reading sewing blogs. In the last year I've become much more productive! There are lots of tips in different places so I've tried to bring them all together and also explain what works for me. The ideas are laid out into several categories including real life, sewing room setup, materials, methods and you. 


1. Real life
We're all busy people, trying to fit sewing into the gaps between jobs, family, friends and other hobbies. Sometimes sewing is the lowest priority and that's definitely ok. One difficulty is overcommitting oneself, which is a major problem I've had in the past. Is there much point creating a rigid queue of complex projects each needing sewn in two weeks, when in reality you might complete three garments in a year? Why not keep a note of all your ideas but use simpler patterns again and again so you don't have to fit them, and have a shorter queue? I now only have one or two projects on the go at any time so changes to the "queue" are easy. This means I'm more likely to finish items when I need them but I can still keep dreaming of fancy ballgowns. Another thing I learnt after the first few years of sewing is to think like the big fashion houses in terms of when to make garments. Make a coat in Summer so it's ready when the cold hits, rather than starting a coat in October, feeling cold, getting busy, giving up, buying one anyway and finishing the coat in March. And make a swimsuit in Winter!

Me and my real-life distraction :)
2. Setup
The ideal setup is a whole sewing room, or even part of a room with a table, sewing machine and ironing board always up. I used to have that but now the room is the baby's nursery so the ironing board is folded until needed. Often use my sleeve board or ham instead which are quicker to pull out! You may only have a tiny desk and that's ok. Whatever your situation, figure out how much stuff you can keep ready to go in an instant. This prevents time being wasted by setting up and putting away equipment.

My sewing room setup: an old school desk with patterns in one drawer and notions and scraps in the other. Fabric is in the large bookcase, and ironing accessories are to the left of the desk. I made no effort to clean up before taking this photo!
Minimising the amount of patterns, books, notions and fabric you have also makes it easier to find things when you need them. What is minimal to one person and their sewing space is different to another so this is your decision. I have one shelf on a bookshelf which contains fabric. My sewing desk is an old school desk with two deep drawers so one contains patterns and paper, the other contains notions and fabric scraps. I try to keep all these areas regularly cleared out.
The pattern drawer: large patterns in pockets on the left, smaller ones on the right. I have around 60 patterns in here, neatly arranged. 

The other thing that helps productivity for me is using phone apps to organise my patterns and fabrics. I use TapForms for both but a lot of people like Cora for fabrics. I'm fairly sure both are only available for iPhones, but please comment below if I'm wrong! TapForms is database app where you can completely customise all the fields. Examples: 1. I have all my patterns stored with a photo of the front cover, the type of garment(s), the era (40s to modern) and the back cover, with an optional field for TNT; 2. Another form for all my fabrics with a photo, width, length, freeform box to note any scraps or other info, type of fabric and drape; 3. Another for notions... I also keep crochet patterns in one but that's not relevant here. This app takes longer to set up than some, but if you want something completely customisable it's amazing. It also has a search function. Using the database means I can search everything quickly when planning garments or buying fabrics.  It also prevents lots of fabric and patterns being scattered around each time I start daydreaming about making new things.

Lastly, my sewing queue is almost nonexistent. I work on a maximum of two garments at once, with the patterns, thread, fabric and all the bits and pieces for both in a shoebox. If I get bored of one I change to the other but I never have more than two. It would mess up the sewing area and confuse my tiny brain. Also, keeping to this means fewer UFOs.


3. Materials
a. Fabric and patterns
It's easy to get overwhelmed by patterns and fabrics, especially if a bunch of both get pulled out each time you ponder a new project. I have 50-60 paper patterns at any time and often clear out ones that I think I won't use again, or represent my fantasy self rather than being items of clothing I will actually wear. 

Regarding notions: keep a few extra reels of thread which match most of the clothes you make, as well as a few weights of black and white interfacing, zips, buttons, stay tape and anything you use a lot. Chuck the rest or use it up. I use up thread in colours I don't normally need by making tailors' tacks.

b. Cutting
A lot of bloggers swear by using rotary cutters rather than shears. They do cut faster and don't lift fabric as they cut, however, they need a big mat underneath and the blades need replaced often. There's an interesting article on Fashion Incubator about why they're not actually better at cutting: http://fashion-incubator.com/rotary_cutters_a_guaranteed_argument/ As ever, it's really up to you. Also while cutting you can use weights to hold the pattern in place on the fabric. These need storage space and don't hold slippery fabrics as well, but on the other hand they are much faster to place and remove, and won't leave marks in the fabric. I prefer pins but use as few as possible for each pattern piece.

c. Sewing
A comparison of sewing machines is definitely outwith the scope of this post, however, I would like to suggest exploring different feet and needles as these can help you sew better as well as faster. Most machines can take an invisible zipper foot and rolled hem feet of different sizes. I am a recent convert to twin needles for hemming. Lastly, change your needle often. When they get blunt or damaged you only end up unpicking which doesn't save time at all!

d. Pressing
Pressing every seam is important and is easier and faster with the right equipment. My iron is a Rowenta with lots of steam and a million holes on the bottom as well as a special point for tight corners.
Check out my iron!

Some people get big gravity-feed irons to press faster and better but these take up more space. Instead I would suggest investing in pressing accessories: a tailor's ham is amazing to help press curves; sleeve boards make it easier to press seam in narrow tubes e.g. sleeves or childrens' trousers; clappers help set in the seam and press cloths prevent fabric scorching and thus recutting of fabric. The only one I don't yet have is a clapper, though I definitely want to get one, and here's why: http://londondressmakersclub.blogspot.co.uk/2016/09/the-clapper-highly-recommended-sewing.html
My ironing gear: large ironing board, old tatty sleeve board from a charity shop (50p!), tailor's ham and press cloths. 

4. Methods
a. Blocks/slopers, toiles/muslins, and reusing patterns
Making your own blocks takes an initial time outlay but saves a lot later. Having even a basic bodice block means you can take any pattern and quickly check there is enough space around the bust, that the bust dart actually ends at the apex of the bust, and that the shoulder slope is correct. These things are hard and/or annoying to alter once you've cut and started sewing! Using a block often means you don't need a toile/muslin.

If you don't have (or want to have) a block, making a toile is also useful, particularly if the garment has unusual features, your fabric is expensive, or ripped-out stitches would leave marks e.g. leather. I use cheap jerseys for testing out knit patterns and cut up old duvet covers from charity shops for patterns requiring woven fabric. Duvet covers give the most fabric for your money.

If you'd rather not do either, and jump straight into making things (and there's no shame in that!) one way to sew faster is to reuse a pattern several times as you know the fit and the sewing order already.

b. Pinning
Some sources advise using no pins while sewing. I think this really depends on how comfortable you are with the techniques e.g. curved seams as well as straight, armholes et cetera. I've seen articles suggesting using no pins while sewing in sleeves, but these are industrial machinists who do thousands. Personally I've moved from about 20 pins to 6 for a set-in sleeve, going with my comfort level and certainty that I won't have to unpick the whole thing again! Pinning is also very dependent on the fabric itself. If the two layers are flat and adhere to each other well with friction, you can easily forego pins; if one layer is shorter or the fabrics are slippery, use pins liberally. Again, the question is whether you are likely to have to unpick, losing the time you "saved" by not pinning.

c. Sewing order
One thing that has improved my speed and enjoyment of sewing is changing the sewing order and doing as much sewing as I can before stopping to press, trim etc. Instead of sewing a dress by making the bodice, then the skirt, then the sleeves, and pressing in between, do as many sewing steps as you can, then press as much as you can, then sew... It feels odd at first but does become second nature. While sewing, you can even "chain" the pieces by not cutting the threads in between until you finish sewing as much as you can. I have a small sewing desk and get confused by the resulting lump of pieces, but some people find this really helps their speed.

d. Specific techniques
There's not enough space here to discuss all the different techniques one can use when sewing. I like to read sewing blogs to get ideas and google specific techniques only on occasion. With each new technique, one must balance the time saved with the finished result. I recently made a knit skirt with a waistband containing wide elastic. I found a brilliant set of instructions for sewing a casing fast and neatly, so sometimes you can get lucky with both! http://fashion-incubator.com/an-easier-way-to-sew-elastic-casings/


5. You
The usefulness of all of these tips depends on your skill and comfort levels and how much you wandt to push your boundaries. Just because you CAN sew fancy couture methods doesn't mean you have to every time. It's often nice to make a simple pattern with only a few pieces.

Find your mental blocks. If you hate cutting, why? Can you change your materials or processes or get someone else to do it? If you have fitting issues find a buddy to help. Figure out where your UFOs often halt and work through the issues.

Sew in small increments. If you only have ten minutes, do some stay stitching or change the needle and thread. Sometimes I will wind a bobbin while my baby's playing on her changing mat, or I'll simply position the next piece of fabric and put the needle down so that sewing can start immediately next time I have five minutes. Out of all the tips I've just written out, this by far is the reason I manage to sew so much now.

That's it! I hope you enjoyed reading.

A final gratuitous baby photo :) 


Saturday, 28 January 2017

Sew Small- and use up those scraps.

There are times when you need to think small. When you just can't face or don't have the space to make something that takes more than half a metre, when you are confronted with a growing pile of scraps that you cannot bear to throw out, when you need something small to take with you when travelling, when you want to play around with fabric - those are the times I am thinking about.  If you have small children for whom to sew you may have a ready outlet for this type of sewing - bibs, caps, coverall aprons for messy play, toys, pencil cases for school.  Cushion covers, pot holders, coasters  are all possibilities but there is a limit to the number you need for your own home. Thus I am pleased that I decided to take a doll-making class with the multi-talented Maria Anderson-Contreras, pictured here during a class break, at the end of November 2016.


That's my effort in the foreground on the way to completion .  All the materials needed were provided in the workshop so I didn't have to remember to take anything with me.  The doll pattern is simple as the the legs and arms are not separate pieces, here it is laid on calico ready to be cut out.


As directed I sewed around the doll, reinforcing the stitching at the necessary points, leaving a section unstitched at the top of the head where the stuffing would be inserted.  The face of the doll had been ready painted by Maria, there is no way that I could get such a lovely face.


My initial idea, when I booked the workshop, was that I could make dolls with the features of family and friends taken from photographs digitally printed on to the cloth but Maria pointed out that the proportions of the features on a doll are different to those of an adult and my idea would not work or be attractive.  Better start practising drawing faces!  Once I had clipped the seams in the appropriate places and turned the doll right side out, it was time to start stuffing.  This was made easier by using straight forceps to get the stuffing down the narrow arms and legs.  These are inexpensive items, £3- £5 depending on the length, available from medical suppliers and fishing tackle shops (they are used by anglers to get hooks out).


Hair is made from knitting yarn and applied with glue, although I used a combination of glue and stitching.  Once applied you can style the hair as you  wish, long tresses, plaits, a bob- the choice is yours.  I decided on a chignon.
Next it was time to make some clothes from the tiny patterns provided - a sleeveless top and a full gathered skirt with a ribbon tie at the back.  I only had time to get halfway with completing these- too much time chatting and tea drinking!  I intended to make these up swiftly but Christmas preparations and minor illnesses intervened and I have only just given the doll some clothes.  Here is the front and back views of her in the floral two piece I started in the workshop. I made a tulle petticoat to go underneath.


Here she is in casual gear, a cotton top (from the same top pattern but with extended arms and slightly looser fit) and denim skirt.
The tops are fastened with tiny strips of velcro and the skirt with a tiny press fastener. 
I am not happy with my attempt at shoes, made with red felt, so I will experiment further.  Meantime I am thinking of making her a shift dress in this bright striped jersey scrap - I am sure I will have fun playing about and sewing things for her. She can be my alter ego and wear all those items I no longer can or the styles I fantasise about. 

I may even become addicted to doll making, as Maria has.  Anyone interested in taking a workshop like this or having a personal lesson or commissioning a doll can find more information on Maria's web site 
And what about scraps of knitting yarn, as I know many of us knit as well.  My solution, a godsend in this frosty weather, has been to make Mobius Twist Headbands in crochet following the instructions on Youtube from Oana's crochet Channel .  You can make them as wide as you like and wear them with the twist in the front or back.  How my ears have thanked me for these, a few of which you can see below.  Even a beginner can make one quickly.

And finally, another cold weather scrap make - gloves.  They do not have to be one colour, in fact the more stripes the better in my opinion.  These are knitted on two pins using yarn of the same tension and I knit them both at the same time, using yarn from the beginning of the ball for one glove and the end of the ball for the other so the stripes will match in width and thus I do not have to calculate how much to use on each glove but just knit until there is not enough yarn left to complete a matching row on each glove.  They don't have to match at all and I am inclined to have odd coloured fingers in my next pair. Just remember to knit one shaped for the left hand and one for the right hand.


Anyone have any tips for using small pieces of fabric or knitting yarn?  Perhaps you can tell us about it in a comment below and then post a photo on our club web site in the Member's Makes  Album.

Friday, 27 January 2017

London Dressmakers Club meetings

Do you live in or near London and fancy coming to our monthly meetings?

This is the link: London Dressmakers on Meetup.com

We schedule the monthly meetings between Tuesday and Thursday per quarter so anyone with a regular evening class is able to attend at least two out of three. January's meeting was on a Tuesday, February will be a Wednesday and you can guess what weekday the meeting in March will be. The following quarter we start over, Tuesday, Wednesday, Thursday.

You may not have heard of Southwark, it is the tube stop between London Bridge and Waterloo - extremely conveniently only a few minutes from central London. Our meeting place is a lovely cafe under the arch in Isabella Street. Detailed directions are in the Pages section on the Meetup site.

Someone will be there from 6pm and we usually stay until at least 8.30pm if not even 9 o'clock. The get togethers are very informal: you can turn up whenever you want to and leave at any time. There is no agenda and no program.  We sit and chat about all things sewing (and all sorts of other stuff), the meetings are very social.

We are obviously not able to bring sewing machines along. We haven't found a venue that would be affordable so EV is as good as it gets. The staff are lovely and let us get on with it (we hope we are good customers for them) - many of us have some kind of craft project with us. Maybe hand sewing or mending, basting or similar things - or something other than sewing. It is up to you. New people who join us often say that they wish they had brought their own craft project. We seem to be quite motivating in that respect!

Hopefully in other respects too: we love to share our love, enthusiasm and knowledge of sewing. So if you ran into a dressmaking issue and need some advice, ask us. Even if no-one knows, we may know of somewhere to look. Some of us are keen on pattern drafting too, others are into making costumes more than everyday clothes. The group's members are a varied lot and we love meeting new people. So don't be shy, come along and see what the meetings are like.  We don't charge the (very small annual) membership fee on the first evening, if you like it and come back then I much appreciate the contribution towards the organiser's fee that I pay to Meetup.


Do you live too far to travel to meetings but you would love to be part of things?  Check out our sewalongs - they are virtual events that we don't meet up for.  We pick a theme of what to sew and participants can then post comments to share what they are hoping to make, or ask questions if they want - we usually get quite a lively exchange going. There is also a photo album that anyone can post a picture of their item to - lots easier to show then try to describe something.

The sewalongs are posted for a two week period, this is the longest that Meetup allows an event to be scheduled. Sometimes we put on a second part if we feel that some members would like more time.

The current sewalongs are about checking through unfinished projects, known as UFOs, to decide what to do with them (Part 1 is almost over (January 2017), Part 2 is here March 2017). There is a separate sewalong for picking a UFO project and finishing it (February).

One of our members suggested a sewalong to Make Two garments from the same pattern: two different versions, or a toile and the actual project, or any other kind of making two things that you only need to mess around with for the fitting once. This is also in February, immediately after the other February sewalong.

We also post monthly reminders about Sewing Resolutions that we hope will motivate us into great progress - you can also take part in these by posting in the comments. There is one a month so please check the general website.


Are there any questions about the group that I haven't answered?  Please let me know in the blog comments underneath this. Thank you.

Hope to see you soon.

Wednesday, 11 January 2017

Tilly & The Buttons Cleo Dungaree Dress Part 3- In which I sew another version.

I was so pleased with my first version, like so many other sewing bloggers, that I decided to go ahead and make another, learning from my original effort. and making a few changes.
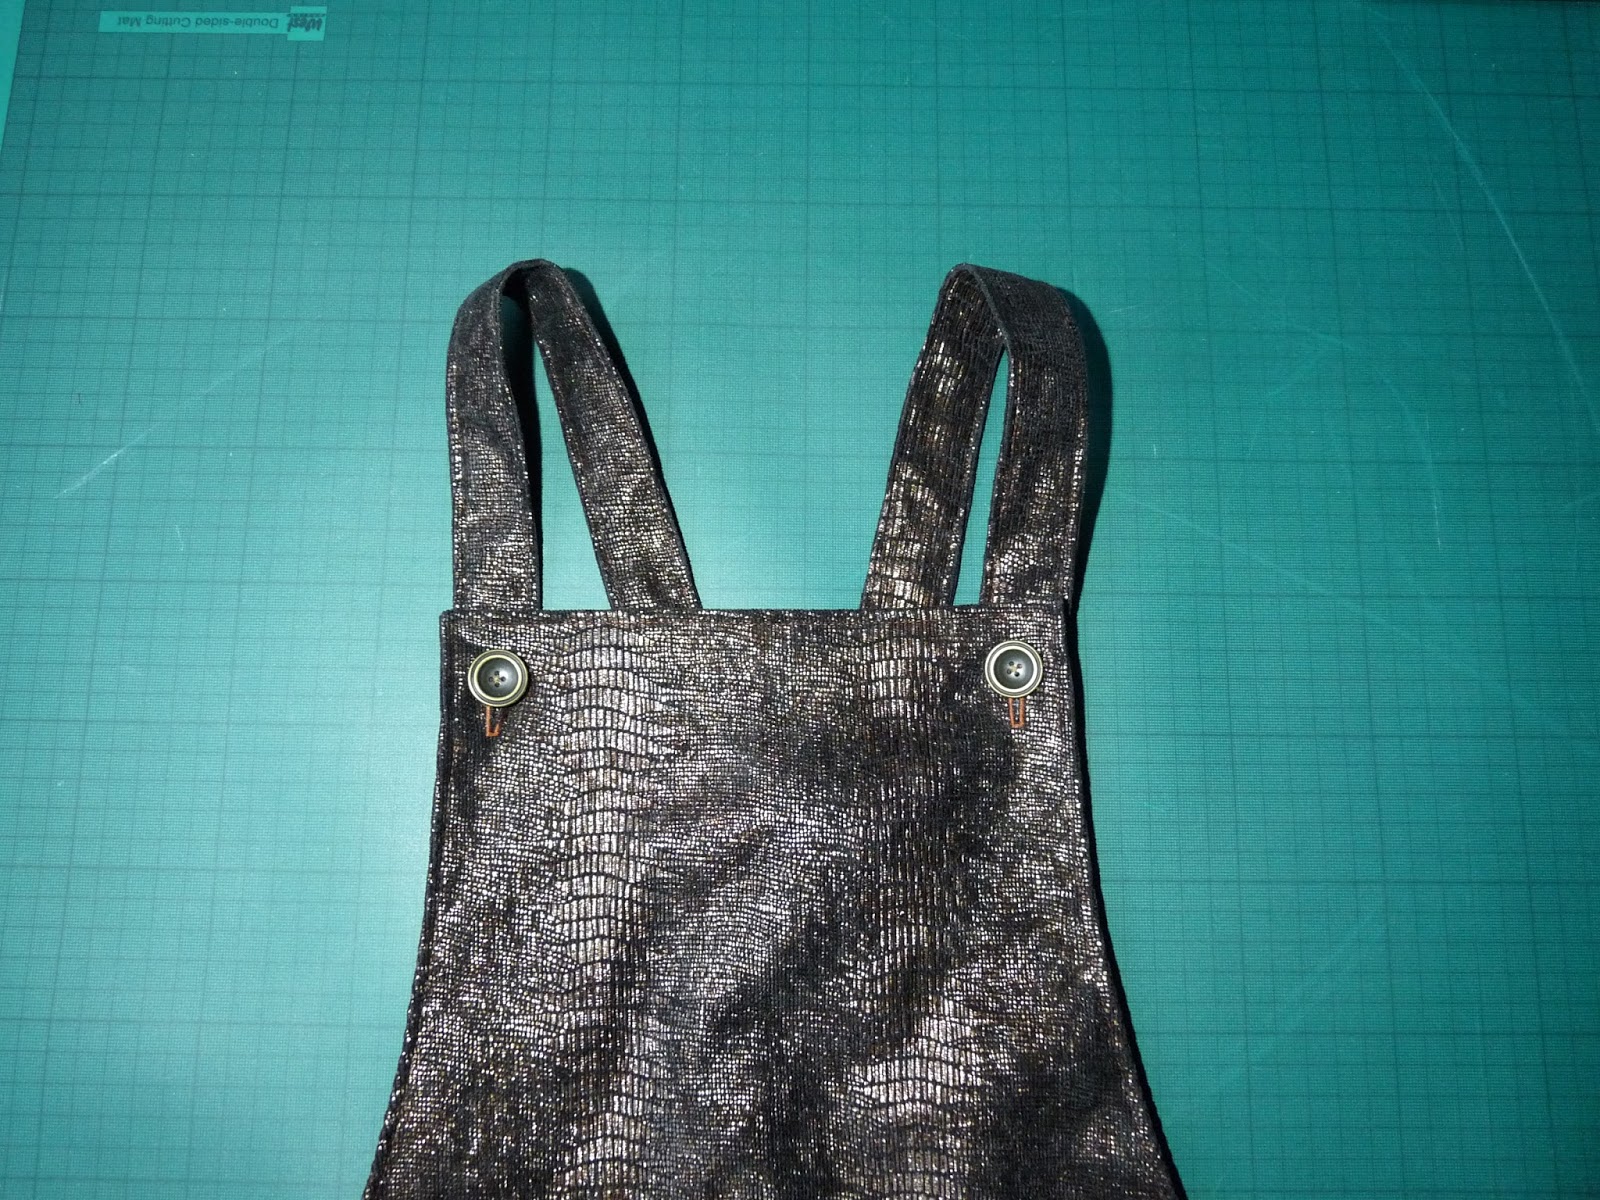
The fabric was a faux snakeskin in a bronze colour with a sheen, purchased about three years ago for a pittance at 34 Market Row, Brixton.  I did away with the centre front and centre back seams, as such seams would detract from the effect of the fabric, and added some length.

To  leave some walking room, as I was making a longer version, I left slits at the bottom of the side seams but rounded the side edges for a shirt tail effect.

 I also drafted new hip pockets with rounded bottoms echo that hem style.


I fully lined the dress and applied the fusible interfacing to the inside of the lining.  Below you can see the inside back of the Cleo.

The lining was from the Sewing and Craft Store by Tooting Bec tube station and was such a gorgeous purpley bronze colour that the photograph doesn't do justice. I would love to use it to make something you can see, it's ex-Jigsaw and so soft and smooth.  The buttons, which have an unusual concave shape, came from Simply Fabrics, Brixton. 


Unfortunately I can't take a photograph of it being worn as I have no "volunteer" photographer to hand today.  I cannot even take one of the dress on my Adjustoform Tailor's Dummy as the shoulders are too wide to get the dress on it.  This just shows that, helpful as they may be, these type of dummies cannot reproduce you exactly, I always have to do a narrow shoulder adjustment to garments I make. The best I can do is below.
I have enthused before, in the previous parts of this particular blog, about this pattern.  Not only is it easy to make and has no zips, darts, gathers or pleats to contend with but it is takes very little fabric and could be a stash buster, especially if you do a short version, - imagine it with contrast pockets and straps, using two fabrics, maybe two different colour denims, and dividing it horizontally, vertically or creating panels.  Let your imagination run wild! One day there may even be a part 4 to this blog if I make another.
Have you made a Cleo?  We would love to see a photograph of it in our Member's Makes Photo Album on The London Dressmakers Club Meetup site.

Thursday, 1 December 2016

Woven or stretch fabric?

I like trying out Lekala patterns because you can get a sewing pattern to your own measurements, and you can use the advanced features (called 'Optional' or 'Adjustments') to further personalise the pattern: arm or leg length relative to torso, neck or upper arm width, short-waisted, narrow-shouldered...  there are all kinds of different options.

This Lekala pattern #5081 is the most standard blouse pattern I found on the site. I thought it would make a good basic pattern that I could then adjust for other versions.


I am not sure though that the required fabric is listed correctly. It says: "Fabrics: Knit" and "Is stretchy: yes". Really?

Can this be right?  This is a blouse with bust darts, a buttoned front opening and placketed cuffs.  I have never seen these kinds of features in a pattern for stretch fabrics.  I feel that this has got to be a pattern for woven fabrics instead.

I decided to try a polycotton fabric to see how it works out.

Unfortunately the sleeve/body seam is very puckered despite gathering the sleevehead in the normal manner before sewing them in.  So there is not a good fit in this area.

On me the blouse shoulders are too wide (I didn't use the "narrow-shouldered" advanced option, I didn't think I was) - I may be able to adjust this by cutting the armholes a touch bigger to narrow the shoulder and sewing the sleeves as they are back in. This should reduce the puckering.


My biggest gripe is that the blouse doesnt overlap enough for buttonholes and buttons - in fact this would be a perfect fit if the front closed with a zip: the centre fronts fit wonderful if they meet flush with each other. I had to add a piece for the 'underlap' and attach loops to the edge of one side to catch the button I sewed onto the seamline with the added piece, i.e. onto the front centre line where they need to be.


I should be able to adjust the pattern at the front centre by adding about 2/3 of an inch (around 2cm). This would also increase the tiny little lapel to a more reasonable size (just look at them in the above photo: they're barely there!). I just feel that the very small lapels look rather ridiculous - as if something had gone wrong to be honest.

I think all round this is not the most successful of Lekala's patterns, but it has potential. I just dread having to make all the adjustments when I had been hoping I could just sew this together and be done. Which is really what you want when you go for a personalised pattern.

I am also not enamoured of my fabric choice: this polycotton is just that bit too stiff and I worry that I won't want to wear this blouse much.  A big reason why I am finding it so hard to finish this - this project has been languishing in my sewing basket for at least the last year.  What a shame.

What kinds of fabrics do you think are suitable for this pattern? Is the website right or should I try some other fabric?  I could really do with some advice and ideas.

Thank you.