I knew it was going to be difficult for me to stick to a resolution not to buy any more fabric when I headed, with LDC member Joy, for the Stitching, Sewing & Hobbycrafts show at Excel on 7 April. It only took us 45 minutes to get there, 45 minutes of non-stop sewing chatter. In fact, we were so busy talking that we went straight past the entrance to the show and had to turn round and retrace our steps.
Once inside we headed to book some of the free workshops available. We both signed up for one on ribbon embroidery techniques and Joy also bagged a place on one just about to start and headed off to take her seat in the workshop area. That left me with about 40 minutes before the start of a talk by Wendy Dolan on the techniques that she uses for her textile art, techniques that I thought might be useful for dress making embellishment. Should you have the chance to hear Wendy talk and show how she creates her work then take it. She showed some wonderful examples and the lace she created for a wedding gown, using only sewing machine stitching, is just amazing.
Those 40 minutes led me into temptation and by the time I met up with Joy, who had spent the time being very creative in her workshop, I had 2 metres of jersey knit in my bag purchased from the stall of Lili Fabrics . I had not been able to resist the dark blue, grey and tan colour way, as I knew it would go with many items in my wardrobe but I still felt Guilty for breaking the resolution yet again. The plan was to make a simple knit dress using a pattern that was in the May 2016 issue of Prima magazine. It had to be something simple because I have had two frustrating makes in the past few weeks, one being a disastrous pair of trousers and the other a dress, which turned out well but caused a number of headaches in the making. I needed some easy sewing Gratification to restore my confidence.
The yardage requirements for the pattern were stated to be 1.80 metres but the length was just under 20 cm shorter than I wanted so I bought 2 metres. I should have remembered that in the past I had found that Prima overcalculated the amount I would need and so it proved. I decided to make a skirt and top instead, giving me the chance to wear them together or separately.
The top was taken from a pattern that I bought in the 1970's and had made previously. In fact I still wear the top, now even more fashionable than when I first made it as it is in a quilted knit. It is worn by the middle figure on the pattern envelope - and check out the flare on those trousers!
The skirt was View D from New Look 6164, bought a couple of years ago in a closing down sale of a Brixton fabric store. It has an elasticated waist and a centre back seam with a slit for ease of movement.
I made only two adjustments to the skirt pattern , the first was to lengthen it and the second was my usual one for flat buttocks by pinching out an amount from the centre back seam accross the pattern along the hip line, graduating the amount of the reduction to nothing at the side seam. I do it by slashing the pattern across the hipline and pivoting it the required amount, then taping it in position. If I don't do this my skirt side seam will swing forward because I do not have enough derriere to support the shape at the back.
Fortunately for me and my sewing sanity, all went smoothly, the only hiccup being that I cut the top sleeves separately and was just about to cut the second one when, in the nick of time, I realised I had failed to reverse the fabric and was about to cut another left sleeve.
I am pleased with the result. I am not a fan of elasticated waists but it certainly gives a quick and easy result and is easily disguised with a belt or by a top worn over it plus no worries about overeating as the skirt waistline expands with you. My only niggle is that the centre back slit seems rather high for modesty but it does mean that I shall have no worries about there being enough leg room for bicycling.
So here it is, top and skirt worn together.
And taking a leaf out of the book of member Pia, who writes this inspiring blog , I have attempted to coerce my partner into taking some other photos to show the two items worn in other ways. First the casual jeans mode-
and next the efficient secretary at work mode-
I wore the top and skirt on 12 April to the Monthly LDC meetup at Ev's, where almost everybody was wearing great examples of their makes- jackets, skirts, blouses and dresses. I can see that I will wear these two pieces a lot as it doesn't crease and can be dressed up or down. I don't feel quite so guilty now and got so much gratification that I am likely to make these again soon using some knit fabric from my stash to take part in the sewalong starting on 22 April, details here , thus allowing me to feel very virtuous.
Subtitle
. . . . . . A place to contribute, exchange tips and ideas and find further info on the LDC group on Meetup.
Wednesday, 13 April 2016
Friday, 26 February 2016
Using two types of materials in dressmaking
We are thinking about suggesting a new sewalong with the theme of using a contrast material with the main fashion fabric.
Googling the phrase I just found this wonderful article on the Threads website:
http://www.threadsmagazine.com/item/28239/combining-fabric-weaves-and-weights/page/all
There are so many very useful and inspiring tips there, with photos that illustrate the subject, that I couldn't ever hope to provide from my own sewing expertise so I thought you might like a link to the article. I won't attempt a summary of the article either, do have a look yourself.
Our sewalong came out of an observation by Barbara on an element of a Chanel fashion show that had lace filling in the kick pleat of a skirt.
Most of us have some kind of material in our stash that we don't know what to do with - usually a small amount that was meant for some kind of trim or accent.
Here is a skirt I made with a fat quarter of cotton and a Scuba like stretch fabric in black, just as an example:
This is just one example of a garment that was made from two fabrics (I had to interface the hem of the red fabric or it would have been too floppy)
How about we exchange ideas of how to use at least one of these stash items up?
I myself still have a length of lovely scallopy lace or ribbon that I haven't found a use for in over fifteen years. I think it's time I did.
How about you? Is anything lurking in your stash that could provide a great contrast to a fabric - what kind of garment can you imagine yourself making?
Please share.
Googling the phrase I just found this wonderful article on the Threads website:
http://www.threadsmagazine.com/item/28239/combining-fabric-weaves-and-weights/page/all
There are so many very useful and inspiring tips there, with photos that illustrate the subject, that I couldn't ever hope to provide from my own sewing expertise so I thought you might like a link to the article. I won't attempt a summary of the article either, do have a look yourself.
Our sewalong came out of an observation by Barbara on an element of a Chanel fashion show that had lace filling in the kick pleat of a skirt.
Most of us have some kind of material in our stash that we don't know what to do with - usually a small amount that was meant for some kind of trim or accent.
Here is a skirt I made with a fat quarter of cotton and a Scuba like stretch fabric in black, just as an example:
I basted the black fabric in two lines to the red fabric underneath, turning under as I went. Then later I top-stitched both edges, as below, and then removed the white basting thread:
This is just one example of a garment that was made from two fabrics (I had to interface the hem of the red fabric or it would have been too floppy)
How about we exchange ideas of how to use at least one of these stash items up?
I myself still have a length of lovely scallopy lace or ribbon that I haven't found a use for in over fifteen years. I think it's time I did.
How about you? Is anything lurking in your stash that could provide a great contrast to a fabric - what kind of garment can you imagine yourself making?
Please share.
Sunday, 7 February 2016
I LOVE- shopping in the Goldhawk Road, enjoy it while you can
The GOLDHAWK ROAD- what does it mean to you?
Well, golden hawks, of course! OK, for those bird spotters amongst you, this is not a golden hawk but an African Tawny Eagle. However I just took this picture today and could not resist putting it on the blog.
However, if you sew The Goldhawk Road means that section of it with shops filled with irrestible fabrics, mostly at bargain prices. You may also know that, since December 2010, the businesses on the North side of Goldhawk Road and Shepherd's Bush Market have been fighting a Compulsory Purchase Order to enable a redevelopment of the area, which creates luxury flats for sale while failing to address the needs of small businesses. Read about some of the issues here in a report from March 2015. Sadly, on Saturday during a shopping trip with a group of sewers from The Foldline ,one of the shopkeepers told us that the shops are likely to be closing this year, probably from sometime this summer, so go while you can and before scenes of groups of smiling sewers like these, indulging in a favourite past time (oohing and ahhing over quantities of fabric) are a thing of the past.
I know you want to hear that what I bought. One of my resolutions this year is not to buy anything more unless I need it for something I planned and, although sorely tempted, I did buy only fabric for lining a jacket. I wanted to have some fabric for the lining that was a contrast to the plain exterior so, lurking beneath a plain darkish blue jacket, will be this!
And, finally, here is a hawk. This is me and a female Harris Hawk, they are bigger than the males, the extra weight makes them better at killing but less speedy in flight. She is a working girl and used for scaring pigeons away from areas in London where they cause a nuisance.
She is just one of the birds that I flew, including vultures and owls, at a great day out at The Hawking Centre in Kent. I think the next fabric I buy will have to have some birds on it.
Saturday, 23 January 2016
I LOVE-Skirt pattern New Look 6035- but hate pleather
A story of three skirts
This pattern came with September 2015 edition of Sew Style and Home. It was the jacket to which I was initially attracted- but haven't made yet. It is New Look 6035
Skirt number 1
I wanted to make a simple A-line skirt with pockets. I used some fabric from my stash, a pale grey cotton twill in a medium weight that I bought some time ago from Fabrics Galore of Lavender Hill, Battersea, with a completely different project in mind . Looking through my boxes of patterns I saw the skirt, included in this pattern, and liked the simple lines. There are only 3 main pieces to the pattern, the front and back yokes and the skirt, both front and back pieces of the skirt are the same. There is a lapped zip fastening at the left hand side. The skirt has facings, these are made using the same pattern piece as for the front and back yoke. There are carriers for a belt on the skirt yoke if you wish.
I made the following alterations to the pattern:
1. The pattern is designed to sit one inch (2.5 cm) below the waist but I extended the yoke upwards for an inch to make it sit on the waist. I cut a toile only for the extended yoke to test it for fit as I reckoned that, since I am not big in the lower hip area, as long as that yoke fitted the lower skirt would skim over my hips with no trouble.
2. I left out the belt carriers for the yoke because I wanted to be able to wear the skirt with tucked-in tops and with tops over the skirt, in this latter case I thought carriers would stand out as lumps under the top.
3. I extended the length of the skirt as I wanted mine to come over the knee,
4. I have flat buttocks, which means the back of the skirt droops down. I counteracted this by shortening the back length of the skirt by taking out a small amount from the bottom of the yoke and the top of the skirt from the centre back tapering to nothing at the sides.
5. I added a lining by cutting out the lower skirt pattern and sewing it to the bottom of the inner yoke facing. You can see how this works with the photo below of the inside of the second skirt I made ( I blush at the wrinkles in it but I didn't press the lining before taking the picture).
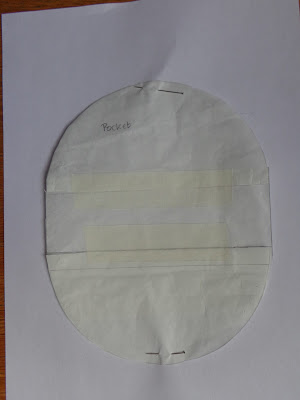
6. I added patch pockets. I wanted something slightly different from a rectangular pocket. I waited until I had made up the skirt to play around with designs for pockets. The pocket pattern piece was created by tracing around a saucer, cutting through the middle of the paper and inserting a strip of paper to create an oval (see photo below). To make both pockets I cut 2 pieces of the entire pattern piece from the grey fabric, 2 pieces from the base to the line in the photograph below in grey fabric for the flap and 2 pieces in lining fabric from that line up to the top adding a seam allowance to sew it to the flap.
This pattern came with September 2015 edition of Sew Style and Home. It was the jacket to which I was initially attracted- but haven't made yet. It is New Look 6035
Skirt number 1
I wanted to make a simple A-line skirt with pockets. I used some fabric from my stash, a pale grey cotton twill in a medium weight that I bought some time ago from Fabrics Galore of Lavender Hill, Battersea, with a completely different project in mind . Looking through my boxes of patterns I saw the skirt, included in this pattern, and liked the simple lines. There are only 3 main pieces to the pattern, the front and back yokes and the skirt, both front and back pieces of the skirt are the same. There is a lapped zip fastening at the left hand side. The skirt has facings, these are made using the same pattern piece as for the front and back yoke. There are carriers for a belt on the skirt yoke if you wish.
I made the following alterations to the pattern:
1. The pattern is designed to sit one inch (2.5 cm) below the waist but I extended the yoke upwards for an inch to make it sit on the waist. I cut a toile only for the extended yoke to test it for fit as I reckoned that, since I am not big in the lower hip area, as long as that yoke fitted the lower skirt would skim over my hips with no trouble.
2. I left out the belt carriers for the yoke because I wanted to be able to wear the skirt with tucked-in tops and with tops over the skirt, in this latter case I thought carriers would stand out as lumps under the top.
3. I extended the length of the skirt as I wanted mine to come over the knee,
4. I have flat buttocks, which means the back of the skirt droops down. I counteracted this by shortening the back length of the skirt by taking out a small amount from the bottom of the yoke and the top of the skirt from the centre back tapering to nothing at the sides.
5. I added a lining by cutting out the lower skirt pattern and sewing it to the bottom of the inner yoke facing. You can see how this works with the photo below of the inside of the second skirt I made ( I blush at the wrinkles in it but I didn't press the lining before taking the picture).
6. I added patch pockets. I wanted something slightly different from a rectangular pocket. I waited until I had made up the skirt to play around with designs for pockets. The pocket pattern piece was created by tracing around a saucer, cutting through the middle of the paper and inserting a strip of paper to create an oval (see photo below). To make both pockets I cut 2 pieces of the entire pattern piece from the grey fabric, 2 pieces from the base to the line in the photograph below in grey fabric for the flap and 2 pieces in lining fabric from that line up to the top adding a seam allowance to sew it to the flap.
This rubbish sketch below indicates how the pockets were created. I read in a book that the haute couture method of attaching patch pockets was to topstitch them first and then hand sew them to the garment, this is the method I followed to attach them to the skirt. However, in future, I will just topstitch them straight to the garment as it is much more secure than my wobbly handstitching.
7. As there is a lapped zip on the left side I made the seam allowance on this side 2 cm instead of 1.5 cm. I always do this for a lapped zip as it avoids finding out that when you come to stitch around the outside of the zip you have not got enough seam allowance to extend under the stitching. Here is the finished lap zip and a view of the pocket to which I added some vintage buttons from my button box .
And here is the finshed skirt.
Skirt number 2
I was so pleased with the first skirt that I used the same pattern to make another in a denim I had bought last year at the Summer Open Day of the Fabric Godmother . Fabric Godmother usually sells on the internet only and I went to the Open Day as I do not buy on the internet because I like to feel and see fabric before purchasing. Among the lovely fabrics I found just the colour and weight of denim that I had been searching for to make a skirt.
For this one I made the following alterations to the pattern:
1. As steps 1,2,3 and 5 for the first skirt.
2. I changed the zip placing from side to centre back and put in an invisible zip and a hook and eye clousure above it. This was because I wanted to insert pocket bags into the side seams. This meant that I changed the alteration for flat buttocks to a position lower down on the body of the skirt instead of between the bottom of the yoke and the top of the skirt but used the same technique of taking out a small amount from the centre and tapering it to zero at the side seam.
3. I cut extensions in the side seams to which to attach pocket bags. The pattern for the bags I took from another pattern.
Here is skirt number 2 in action.
Skirt number 3
Due to the lack of darts and limited number of seams I thought this would be ideal for making a skirt from some pleather ( as I understand people now refer to faux animal skin fabrics). This time I wanted an exposed metal zip at centre back. Given that I had made this skirt twice I thought the third version would be so easy. I had not taken into account the material I was using! This pleather had a knit backing and an embossed PU surface. This means that you cannot press the seams because the surface will melt as I found out, luckily I was only trying to press the seam between the lining and the back yoke, which is on the inside of the garment, and I realised what was happening before anything too drastic happened. Thus, in order to get the seams to lie flat you need to topstitch them down.
Now my Janome DXL603, a fairly basic computerised model, was fine when stitching with the right sides of the fabric together for the inside seams but just would not work when it came to stitch on the outer face. I tried everything, using different types and sizes of needles, adjusting the tension, changing the stitch length, buying a teflon foot, putting tissue paper under the fabric, using different types of thread, seeking advice from The Sewing Forum but to no avail. Nothing produced consistent results, sometimes the needle would not pick up the lower thread, sometimes the fabric would not move forward, sometimes stitches were skipped. I had to stitch in the exposed zip, using a different method to that I intended, entirely by hand.
However only by topstitching could I hope to keep those seams flat. I was in despair. Then, with nothing to lose, I though of trying my almost 50 year old mechanical machine- Behold!, it stitched like a dream with an ordinary foot, standard thread and with any size of universal needle. It even went smoothly over the side seams where the yoke joins with its multiple layers of fabric. I am so cross that I did not think of trying this before I did. Check out the topstitching in the photo below.
I still have not finished the skirt. I am waiting for my partner to have the time to undertake his usual task of marking up the hem, hopefully this weekend, so that I can topstitch that in position, and then it will be done.
Despite managing to discover how to sew the pleather in the end, I will still never use this fabric again. More than ever I realise how important pressing is to sewing. But I still love the pattern and will probably make some more variations on it in the future. To introduce beginners to this pattern I am going to run a Meetup workshop soon.
If you would like to see some other versions of this skirt here are two blogs about it, one from BETSY MAKES - her version includes the belt carriers and is made in a lovely patterned needlecord and an emerald green version by SEWN
Sunday, 20 December 2015
Sewing a jersey dress when you are scared of knits
A number of sewers have told me that they love to sew jersey knit fabrics, that they run up garments in no time using their serger. I haven't got a serger, they seem even more scary to me than sewing jersey on an ordinary machine because they sew, overlock and cut the fabric in one go. Where is the chance of unpicking if you get it wrong? I even bought "Sew U Home Stretch, The Built by Wendy Guide to Sewing Knit Fabrics" when I saw it discounted in a book shop but was put off trying the included patterns because therein I read "For the most professional-looking stretch fabric clothing, I recommend using a serger and a cover-stitch machine together" - so that would be two expensive machines just to make a T-shirt. To be fair, this book did give tips on using a conventional machine and several blogs and magazine articles urge readers that it is perfectly possible get good results with an ordinary machine. I have made shrugs and relax-at-home trousers using more stable jersey fabrics, such as Ponte Roma, but the tendency of finer jerseys to stretch and slide while being sewn still made me fearful of tackling a dress in this type of knit.
However, inspired by Chinelo Bally speaking recently at the launch of her book "Freehand Cutting" and urging sewers to be brave and face up to a challenge because it wasn't the end of the world if your garment didn't turn out perfectly, I decided to dig out one of the pieces of jersey that had been languishing in my stash for a couple of years and make a dress. This was a purchase from Ditto Fabrics, in Kensington Gardens, Brighton, which always has such desirable materials and this arresting print, with a soft velvety feel to it, grabbed my attention.
The patterns in the "Sew U Home Stretch" book included a simple dress with only 5 pattern pieces, bodice back and front, skirt back and front and sleeve. This is the page from the book showing the pieces and the dress. However, ignore the inclusion of a waistband piece and a waistband insertion on the dress. Why this is shown I do not know as the waistband is only used when making a separate skirt and the inclusion of it in making up the dress would make the dress skirt sit very low.
What I learnt in the process of making:-
Pattern size. Many knit patterns have negative ease and it is the stretch that creates the fit to the body. Consider carefully just how close you want the fit to be. I checked on the internet to see if anyone had blogged about making this dress. I found a couple of blogs that mentioned it was a very close fit. I didn't want a really tight fit so went for the Small size, which is slightly larger than my own measurements. In doing this I also took into consideration that the seam allowance stated was only a quarter of an inch (OK for a serger but I was not happy with this for a conventional machine) and by using the bigger size I could use a larger seam allowance if a pin-fit of the dress showed this was possible. I also added extra length to allow for a lower hemline as usually patterns are a bit short on me as I definitely need knee coverage. Actually it turned out that it was not necessary to add that length.
Laying and cutting out the fabric I took great care when laying out the fabric ready to cut that I did not stretch or distort it. If you have a surface where all the fabric can be laid flat at the same time then you are lucky. Otherwise you may have to resort to the floor or cut out a section at a time and don't allow any fabric to hang over the edge of your table. I used ballpoint pins to pin the pattern to the fabric, it is much easier to insert them into jersey fabrics than ordinary pins. Some dressmakers use weights and a rotary cutter but I haven't mastered this method yet and used sharp dressmaker's scissors.
Sewing machine decisions. Sewing Machine Needles. I have used both ballpoint and stretch needles on knit fabrics. I find that with any stretch fabric I have to do a test sewing on scraps to see which type of needle best suits that particular fabric- in this case it was the stretch needle. Usually it is ballpoint for thicker, less stretchy fabric and stretch for thin jersey and those with more stretch. For the hems I used a stretch twin needle.
Stitch. For the seams I used a stitch called stretch stitch on my Janome, also known as lightning stitch due to its appearance. It sews a stretchable seam that can be pressed open to lie flat. In the distant past, when using an old mechanical machine I have used a zig-zag stitch set at a very narrow width but it does not press open as well as a stretch stitch.
Presser foot. I did consider using a walking foot to make sure that the layers of fabric went through the feed dogs at the same rate but my test sewing on scraps showed this was not necessary if I lowered the thread tension slightly. Adjusting your thread tension or the pressure of your presser foot can help you achieve a smooth feed when sewing jersey. Make sure you do not pull or stretch the fabric as your machine sews, just guide the material gently under the presser foot.
Making up. It went smoothly for the most part. The dress has no darts or fastenings to deal with and just pulls over the head. I followed the instructions on making up almost exactly, except for the neckband. The suggested way of applying the neckband meant that I would have machine stitching showing on the outer side. I did not want any stitching showing at the neck so, instead of sewing the right shoulder after hemming the neckband, I applied one side of the band, then sewed the right shoulder and then hemmed the neckband by hand, using catch stitch which allows for some stretch to the band.
After sewing the shoulder seams and insetting the sleeves I thought the shoulder seam might stretch with wash and wear so I tacked in by hand a piece of seam binding along each shoulder seam. Not beautiful to see but it should do the job. In future I will sew binding into that seam or put some fusible tape along the sewing line.
The only adjustment I made to the fit was to raise the waist seam very slightly at the front, tapering to nothing at the side seams. To hem the sleeves and skirt I used a twin needle for the first time with a zig-zag stitch to produce a stretchable hem with two neat lines of topstitching on the right side. I tried this out on a scrap first luckily as it was a disaster. Then I realised that I had threaded the machine incorrectly and it was so easy once I put this right. Wendy Ward has an excellent piece on two methods of hemming knits, including the twin needle method, on a domestic machine here. The picture below shows my hemming result.
And here is the finished dress. It actually looks better on me than the Dressform but I had nobody to photograph me. Would I make it again? Definitely. It has gathered sleeve heads and, initially, I thought this might look too fussy but decided to give it a go. Now I am glad that I did because I like it as a design feature that makes the dress a little bit different. However, in opting to cut a slightly bigger size I forgot to adjust for my shoulders so I will make this alteration next time.
Do you have any suggestions for sewing with knit or stretch fabrics? Have you found a pattern that would be good for beginners to tackle? Let us know about it in the comments section.
Subscribe to:
Posts (Atom)


