This pattern came with September 2015 edition of Sew Style and Home. It was the jacket to which I was initially attracted- but haven't made yet. It is New Look 6035
Skirt number 1
I wanted to make a simple A-line skirt with pockets. I used some fabric from my stash, a pale grey cotton twill in a medium weight that I bought some time ago from Fabrics Galore of Lavender Hill, Battersea, with a completely different project in mind . Looking through my boxes of patterns I saw the skirt, included in this pattern, and liked the simple lines. There are only 3 main pieces to the pattern, the front and back yokes and the skirt, both front and back pieces of the skirt are the same. There is a lapped zip fastening at the left hand side. The skirt has facings, these are made using the same pattern piece as for the front and back yoke. There are carriers for a belt on the skirt yoke if you wish.
I made the following alterations to the pattern:
1. The pattern is designed to sit one inch (2.5 cm) below the waist but I extended the yoke upwards for an inch to make it sit on the waist. I cut a toile only for the extended yoke to test it for fit as I reckoned that, since I am not big in the lower hip area, as long as that yoke fitted the lower skirt would skim over my hips with no trouble.
2. I left out the belt carriers for the yoke because I wanted to be able to wear the skirt with tucked-in tops and with tops over the skirt, in this latter case I thought carriers would stand out as lumps under the top.
3. I extended the length of the skirt as I wanted mine to come over the knee,
4. I have flat buttocks, which means the back of the skirt droops down. I counteracted this by shortening the back length of the skirt by taking out a small amount from the bottom of the yoke and the top of the skirt from the centre back tapering to nothing at the sides.
5. I added a lining by cutting out the lower skirt pattern and sewing it to the bottom of the inner yoke facing. You can see how this works with the photo below of the inside of the second skirt I made ( I blush at the wrinkles in it but I didn't press the lining before taking the picture).
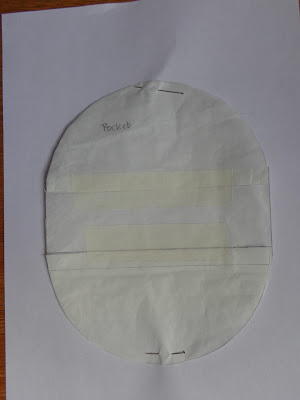
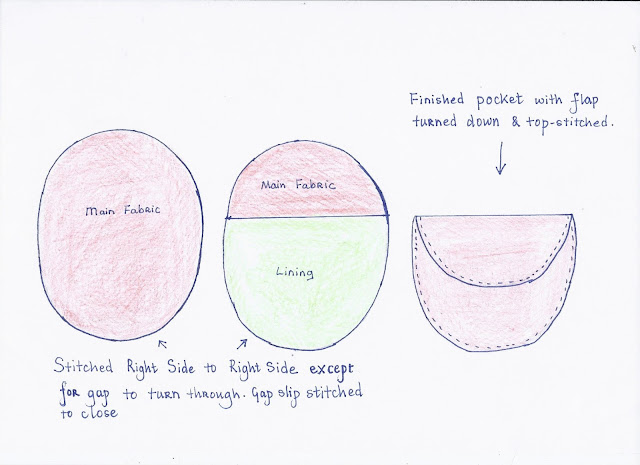
6. I added patch pockets. I wanted something slightly different from a rectangular pocket. I waited until I had made up the skirt to play around with designs for pockets. The pocket pattern piece was created by tracing around a saucer, cutting through the middle of the paper and inserting a strip of paper to create an oval (see photo below). To make both pockets I cut 2 pieces of the entire pattern piece from the grey fabric, 2 pieces from the base to the line in the photograph below in grey fabric for the flap and 2 pieces in lining fabric from that line up to the top adding a seam allowance to sew it to the flap.
This rubbish sketch below indicates how the pockets were created. I read in a book that the haute couture method of attaching patch pockets was to topstitch them first and then hand sew them to the garment, this is the method I followed to attach them to the skirt. However, in future, I will just topstitch them straight to the garment as it is much more secure than my wobbly handstitching.
7. As there is a lapped zip on the left side I made the seam allowance on this side 2 cm instead of 1.5 cm. I always do this for a lapped zip as it avoids finding out that when you come to stitch around the outside of the zip you have not got enough seam allowance to extend under the stitching. Here is the finished lap zip and a view of the pocket to which I added some vintage buttons from my button box .
And here is the finshed skirt.
Skirt number 2
I was so pleased with the first skirt that I used the same pattern to make another in a denim I had bought last year at the Summer Open Day of the Fabric Godmother . Fabric Godmother usually sells on the internet only and I went to the Open Day as I do not buy on the internet because I like to feel and see fabric before purchasing. Among the lovely fabrics I found just the colour and weight of denim that I had been searching for to make a skirt.
For this one I made the following alterations to the pattern:
1. As steps 1,2,3 and 5 for the first skirt.
2. I changed the zip placing from side to centre back and put in an invisible zip and a hook and eye clousure above it. This was because I wanted to insert pocket bags into the side seams. This meant that I changed the alteration for flat buttocks to a position lower down on the body of the skirt instead of between the bottom of the yoke and the top of the skirt but used the same technique of taking out a small amount from the centre and tapering it to zero at the side seam.
3. I cut extensions in the side seams to which to attach pocket bags. The pattern for the bags I took from another pattern.
Here is skirt number 2 in action.
Skirt number 3
Due to the lack of darts and limited number of seams I thought this would be ideal for making a skirt from some pleather ( as I understand people now refer to faux animal skin fabrics). This time I wanted an exposed metal zip at centre back. Given that I had made this skirt twice I thought the third version would be so easy. I had not taken into account the material I was using! This pleather had a knit backing and an embossed PU surface. This means that you cannot press the seams because the surface will melt as I found out, luckily I was only trying to press the seam between the lining and the back yoke, which is on the inside of the garment, and I realised what was happening before anything too drastic happened. Thus, in order to get the seams to lie flat you need to topstitch them down.
Now my Janome DXL603, a fairly basic computerised model, was fine when stitching with the right sides of the fabric together for the inside seams but just would not work when it came to stitch on the outer face. I tried everything, using different types and sizes of needles, adjusting the tension, changing the stitch length, buying a teflon foot, putting tissue paper under the fabric, using different types of thread, seeking advice from The Sewing Forum but to no avail. Nothing produced consistent results, sometimes the needle would not pick up the lower thread, sometimes the fabric would not move forward, sometimes stitches were skipped. I had to stitch in the exposed zip, using a different method to that I intended, entirely by hand.
However only by topstitching could I hope to keep those seams flat. I was in despair. Then, with nothing to lose, I though of trying my almost 50 year old mechanical machine- Behold!, it stitched like a dream with an ordinary foot, standard thread and with any size of universal needle. It even went smoothly over the side seams where the yoke joins with its multiple layers of fabric. I am so cross that I did not think of trying this before I did. Check out the topstitching in the photo below.
I still have not finished the skirt. I am waiting for my partner to have the time to undertake his usual task of marking up the hem, hopefully this weekend, so that I can topstitch that in position, and then it will be done.
Despite managing to discover how to sew the pleather in the end, I will still never use this fabric again. More than ever I realise how important pressing is to sewing. But I still love the pattern and will probably make some more variations on it in the future. To introduce beginners to this pattern I am going to run a Meetup workshop soon.
If you would like to see some other versions of this skirt here are two blogs about it, one from BETSY MAKES - her version includes the belt carriers and is made in a lovely patterned needlecord and an emerald green version by SEWN


