Subtitle

. . . . . . A place to contribute, exchange tips and ideas and find further info on the LDC group on Meetup.

Friday, 24 April 2015

Our Sewalongs


Butterick 4790

Every so often we schedule sewalongs as part of the LDC group's events.  This is how they work:

Our sewalongs usually start with some members of the London Dressmakers Club deciding that they would like to make either a specific garment or item, or something with a specific theme. Sewalong aren't "meetings" as such.  We don't meet up in a physical location for this, this is an opportunity to sew the item at home, at your own pace: a sewalong is just like a knitalong, you do your own thing and then you compare notes.

The scheduled event gives you a chance to exchange tips and comments with the others who have signed up. You can post comments on the Sewalong meetup page, or upload photos in the suitable photo album.  If you have a query or get stuck with your project, then ask a question in the comments or bring your work-in-progress along to a monthly meeting to ask the others for advice in person.

Meetup allows us to post meetings that last up to two weeks, but no more. The Sewalongs typically run much longer - we like to put them on for anything from two to three months.  It is up to you whether you might like to get started early and get it done, or if you want to space out your sewing a bit over the entire period. Life is busy and it can be a challenge to find sewing time.  It is important to be able to sew in whichever way works best for you.  The Sewalongs can be great inspiration and motivation to complete a specific item.

Some sewalongs are quite informal: we did put a 'simple item' sewalong on a while ago and dressmakers could make anything they wanted. We set a time of two months and invited comments and photos but didn't suggest any other framework or structure.

Other sewalongs were a bit more structured: we split the two months into several two week slots that we scheduled individually and suggested specific tasks for each part.  We will probably keep doing both kinds of sewalongs, some people prefer one to the other.

Our May/June/July sewalong is to make a Summer Wrap Dress - any kind. This came out of several members wanting to make the Walk Away dress (as seen on the Sewing Bee 2015: Butterick 4790 or the vintage edition Butterick 6015. There was even a 'Walk Away Dress, the Mini Version'! Butterick 6204), some of us have the pattern and want to make it up.  It is up to you whether you want to make the Walk Away dress or another kind of summer dress, it doesn't strictly have to be a wrap dress, this is more by way of suggestion.  Go with whichever pattern and style of dress you feel like!

Butterick 4790


Butterick 6015

Do you have any question about our sewalongs?  Don't be shy asking, just post a comment below or on the relevant sewalong meetup page.

Happy Sewing!


.

Thursday, 23 April 2015

Invisible zips


This link is the method by By Hand London blog that we already wrote about on this blog:

http://byhandlondon.com/blogs/by-hand-london/11628353-inserting-an-invisible-zipper-the-definitive-tutorial

And Catherine pointed us to this one that emphasises matching patterns, stripes, plaids or other lines and shapes across the zip:

http://www.craftsy.com/blog/2014/10/zipper-seam/


Invisible zips are also called concealed zips, this is what they look like:

http://www.jaycotts.co.uk/search?type=product&q=invisible+zip

You can also get a transparent nylon zip! Who knew...


Tuesday, 21 April 2015

A stash-busting skirt

My most recent project is this skirt out of two fabrics:


I had a little bit of the grey pin stripe, just about 25cm of it or so, and about a half metre of the dark red fabric.  No idea what to do with either, the jacket didn't materialise that might have offered an opportunity for the pin stripe to become cuffs, nor was I happy to have a very short mini skirt out of the red material.

Then I realised I had the same width in both fabrics (150cm wide) and they were the same material (wool) and weight!  Wahey, if that wasn't meant to be...


So I sewed both of 'em together and then treated it as one piece of fabric with an obvious line in it that I had to match between all three pieces: front (cut on the fold) and the two back pieces.

I drafted my darts in the back pieces and sewed those up, coming to a nice shallow point (I like to stitch along the edge of the fold for the last 3-4 stitches or so, with as few fabric threads till the folded edge as you can without sewing off the fabric.  Here's a post on darts that I prepared earlier!).

I didn't use a ready made pattern (I went to my trusty body block from Wendy's pattern drafting course at her MIY Studio in Brighton) so I couldn't follow instructions.  I just went with what made the most sense to me.

I got into a bit of a mess with the lining at some point, but it all ended well eventually. I put a lapped zip in first, then closed the side seams, attached the lining at the top edge at the waist and later sewed the lining edges to the zip on the inside.

It had taken quite a bit of time to get to that stage - but I finally tried on the skirt once I could.  I had a bit of a shock: the panel of the grey colour sits much higher on my hips that I had fondly imagined.  I was really disappointed actually because it just looked... odd...

It was neither a panel, nor a yoke, but just a nothing sort of thing. I did not like the proportion between the two blocks of colour at all.

I had so looked forward to trying the skirt on and getting it all done, and it looks like... Something not at all to my liking.  I felt quite disheartened and upset.

Then I thought: what about a fix that pulls the eye down from that line between the two fabrics?  How about a plain black ribbon at the point where I would have wanted the seamline to be?

Well!

I think it looks pretty good even if I'm a bit prejudiced. I think this did the trick. I am really quite happy with it now.

Here's a close-up:


I think I did quite well in matching up the ribbon ends "across" the lapped zip. Needed only a bit of hand-stitching (and some swearing when I stuck the needle into my finger... We won't mention that)

I wasn't completely happy with my first attempt at the hem. I had only folded it over and stitched it down.  My sewing thread didn't match all that well and the hem looked all puckered despite copious bouts of pressing with lots and lots of steam. It just flipping wouldn't lie flat! Argh.

I wasn't happy so I did a blind hem by hand (I was sitting around with a crafts group on the Sunday afternoon just gone, and it got all done as if it was sewing itself)...

And now I have a much nicer seam:


I suppose I should attach a tab at the top of the zip for a hook and eye or something, but I can't be bothered.  Besides, that V shape looks quite interesting and I think I'll just leave it like it is.

What do you think?

And what kinds of sewing challenges have you encountered?  Please comment below - I changed the settings so it is now easier to leave a comment.

Thank you!

Friday, 17 April 2015

Member of the Month April 2015 Jennifer Taillefer


Hello everyone!  I am really loving being part of this group so far, as none of my friends are really into sewing, and while they are very kind about listening to me talk about projects, I can tell they don’t have a clue what I am banging on about!   So it is lovely to read the posts here, and to have met some of you at an outing.

I have been sewing since I was five years old, when my mother bought me my first little hand crack machine and showed me how to make outfits for my dolls.  I love to upcycle items, play with different ways of putting patterns together (is it called pattern hacking these days?), and to clash fabrics and colours.  I am very inspired by the fashions of the 1920’s to the 1960’s.  I have a particular love of very finely finished garments, and I am always trying out new seam finishes, and ways of making the inside of my pieces as beautiful as the outside.  If you want to know more about me my new website is at www.jennstitches.comI also really enjoy taking old garments and remaking them into new ones, especially as I hate to see fabric wasted.   Therefore Make Do and Mend is right up my street, and that combined with my love of vintage fashion made me eager to see the exhibition I am writing about today.

Fashion on the Ration: 1940’s Street Style is currently on at the Imperial War Museum.  As a lover of all things from the first half of the 20th century, I was eager to see it, and hopefully get some inspiration for my own sewing.

During the Second World War, women showed great ingenuity in clothing their families despite the rations that were placed first on ready-made clothing, and then on dressmaking fabrics.  By re-using and adapting clothes that were already in their possession they created new garments, and I would say a very personal sense of style.  I was really taken with how unique the women looked in the photographs in the exhibition, much more so than in group photos from earlier decades.

There are a number of homemade garments on display in the exhibition as well as a series of uniforms for various branches of the services, although the actual garments are outnumbered by photos of what was worn.  There is however, an excellent section on Utility clothing. 

The Utility scheme was introduced in 1942 as an attempt to create more equality in the clothing available to those in different financial strata.  When rationing was first introduced an article of clothing required the same number of coupons regardless of the quality.  Therefore someone who could afford a high-quality, robust garment would have it last much longer, thereby freeing up future coupon allocations for other wardrobe pieces.   Those who had to purchase much cheaper versions would find themselves needing to replace the garment a great deal sooner.  By introducing the Utility scheme the government was trying to standardise the quality of clothing, and at the same time save even more fabric for the war effort by limiting the amount that could be used for any particular kind of garment.

The range of clothing on display in this part of the exhibition is a testament to how much you can do design-wise with very little material!

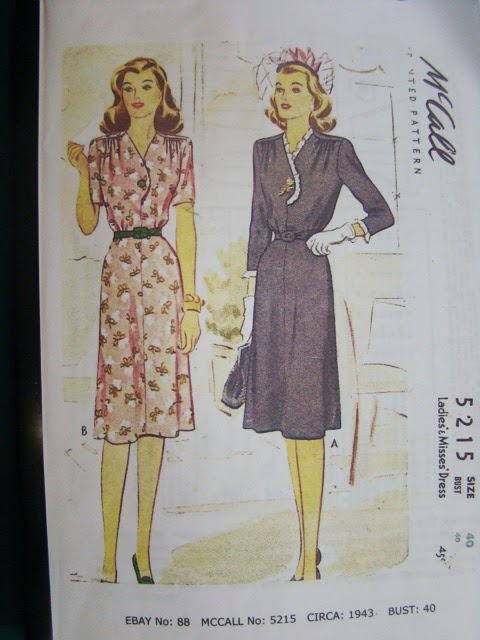
Seeing the exhibition inspired me to have a go at a vintage pattern I had bought last year.  This is a reproduction of a 1943 McCall’s dress pattern, and it uses surprisingly little fabric for the amount of style detail that is in it.


As you will see from the images, it is a lovely curved neckline, which is finished with a rather scanty facing - but why waste material on the inside!  I will say that the neckline was the hardest part of the dress, and I did have to baste it into place twice before I got it to sit nicely.  This is because the shoulder seam is sitting to the front of the shoulder and has a curve in it as well.  There are several large dots close together on the pattern at the shoulder, and it took some time to work out which ones were supposed to match up!  I did burst out laughing at my first attempt and I wish now I had taken a picture of it on the mannequin!


The fastening on this dress is a placket fastening.  Some of you might remember seeing the contestants on GBSB Series Two grappling with this on the vintage blouse they made.  Essentially the way it works is that the seam allowance on each side of the opening is faced with a small rectangle of fabric, one folding inside the garment and one extending past the edge.  These then overlap and have hooks and eyes or poppers attached to close the gap when the dress is done up.


The bright red button and the buckle on the belt were both vintage items I found at my great aunt’s home.  She was a seamstress as well, and I love adding little bits and pieces I found in her stash to my own garments.


The exhibition at the IWM is on until the 31st of August and is well worth a visit.  I particularly liked the recordings of real people sharing their experiences of Fashion on the Ration!  If you do go and get inspired to try a vintage make, then do post a picture of it so we can all admire.
 P.S. from Barbara- Do check out Jennifer's web site and all the fantastic things she has made in the photograph Gallery there.